[Thread Ufficiale] Asus EeePc
-
posto il procedimento per ghostare da usb con l'eeepc ed anche come installare win da chiavetta.
per ghostare ecco come si fa:
Eee PC 1000H Recovery from USB Flash DrivePublished October 15, 2008 Guides
Tags: Eee PC 1000H, Ghost, Recovery
This guide will show you how to restore the Eee PC 1000H (with Windows XP Home SP3) to factory default without the use of an external DVD-Drive. There is also no need to build a BartPE (Bart Preinstalled Environment) from an Original Windows XP CD.
All you need is:
• a USB Flash Drive with at least 4GB of storage
• the original ASUS 1000H XP Support DVD
• WinRAR
• PeToUSB
I’ve tested this guide with a 32-bit version of Windows XP. A 64-bit version of Windows Vista can not be used!
You will find nearly everything you need on the 1000H XP Support DVD. The most important files are:
• WINPE.ISO (in the root directory of the DVD)
• EEEPCAH.GHO (in the “Recovery” folder of the DVD)
WINPE.ISO contains a lightweight version of Windows XP, called WinPE (Windows Preinstallation Environment) and can be booted for example from an USB Flash Drive. It also contains the file GHOST32.EXE, which actually is version 11.0 of the well known backup software Symantec Ghost.
EEEPCAH.GHO contains the image of the complete hard disk after factory install and can be restored using Symantec Ghost.
WinRAR will extract the content from WINPE.ISO to the hard disk. WinZip or 7-zip may also be used (not tested).
PeToUSB will format the USB Flash Drive, make it bootable and then copy the extracted files from WINPE.ISO to the drive.
1. Extract all files from WINPE.ISO
Create a new folder with the name WINPE in the root directory of a drive. In my example i will use drive D:.
Open WinRAR and select the file WINPE.ISO from the Support DVD.

Click “Extract To” and choose D:WINPE as destination path. Click “OK” and all files from WINPE.ISO will be extracted.
2. Choose Symantec Ghost as start application
This step is very important to start Ghost automatically after booting into the Windows Preinstallation Environment from the USB Flash Drive.
Doubleclick to open the file WINPESHL.INI located in D:WINPEI386SYSTEM32 and change …
[launchApp]
AppPath=x:EPCRecover.exe
… to …
[launchApp]
AppPath=x:GHOST32.EXE
… and save the changes (Command: File > Save). Do not save the file under a new name or in another folder!
3. Format USB Flash Drive and copy files
Connect a USB Flash Drive with at least 4GB of storage to your PC and start PeToUSB. It should show up under Destination Drive. Check USB Removable, Enable Disk Format and Enable File Copy. Finally browse to the Source Path of the WinPE files, in this example located at D:WINPE.

Click “Start” and answer the following two questions “Continue?” with “Yes”. Please keep in mind, that all existing volumes and data will be lost! Depending on the write speed of your USB Flash drive it may take a while to copy all WinPE files. If everything goes well, the message “Operation Completed Successfully!” should appear. Click “OK” and close PeToUSB.
4. Copy image file
Copy the image file EEEPCAH.GHO from the “Recovery” folder on the 1000H XP Support DVD into the root directory of the USB Flash Drive. This may also take a while because the file size is 2.53GB.
5. Recovery process
Connect the USB Flash Drive to your Eee PC and turn on the Eee. Press “ESC” at the boot screen and you will be able to select the USB Flash Drive as your boot device from the boot menu.
After booting from USB Flash Drive, WinPE (Windows Preinstallation Environment) should start and finally Symantec Ghost.
Click “OK” and then “Local > Disk > From Image”. From the pulldown menu on the top choose your USB Flash Drive. It should be drive X:, because Windows assigned this drive letter during boot up. From here you can choose the image file EEEPCAH.GHO.
Now you have to select the destination drive. Of course this should be the Eee PCs hard drive. For my 1000H it’s drive 1 and the size is 76319MB. Please make sure to select the correct drive!
The next window will show you the destination drive details. Here you can change the partition layout or just click “OK” to keep the default settings. There will be one last question “Proceed with disk restore?”. If you click “Yes”, the process will be started.
Important: The destination drive will be permanently overwritten. All existing volumes and data will be lost!
After the restore process is finished, you have to reboot the Eee PC.
Notes:
This guide should only be used for the ASUS Eee PC 1000H with Windows XP and cannot be extended to other models because of the different storage solutions ( one or two SSDs, one HDD). The name(s) of the image file(s) in the “Recovery” folder on the Support DVD are also different.
per windows da usb ecco qui:
Cosa occorre:• Assicurarsi che la penna USB da utilizzare abbia una capienza di minimo 1 GB
• Assicurarsi che vi siano almeno 3 GB di spazio libero sul disco fisso
• Assicurarsi che, oltre la penna USB da utilizzare, non vi siano altri dispositivi removibili connessi al computer
Come procedere:
1. Creare una cartella in C:, rinominandola in xpsource;
2. Inserire il CD d’installazione originale di Windows XP nel lettore del PC;
3. Copiare tutto il contenuto del CD nella cartella xpsource, ed attendere che il procedimento termini;
4. Scaricare ed aprire l’archivio USB_MultiBoot_10.zip;
5. Scompattare la cartella USB_MultiBoot_10 in C:;
6. Aprire la cartella USB_MultiBoot_10 ed avviare il programma USB_MultiBoot_10.cmd;
7. Premere un qualsiasi tasto;
8. Digitare H e premere il tasto Invio;
9. Nella finestra apertasi, selezionare la voce NTFS dal menu a tendina e cliccare su Start;
10. Al termine della procedura di formattazione della penna USB, cliccare su Close;
11. Tornare nella finestra di USB MultiBoot e digitare 1, seguito dalla pressione del tasto Invio;
12. Selezionare la cartella C:xpsource e cliccare su OK;
13. Cliccare sul pulsante Cancel;
14. Tornare nella finestra di USB MultiBoot e digitare 2, seguito dalla pressione del tasto Invio;
15. Selezionare la chiavetta USB e cliccare su OK;
16. Tornare nella finestra di USB MultiBoot e digitare 3, seguito dalla pressione del tasto Invio;
17. Cliccare sul pulsante Yes ed attendere circa 15 minuti, per il compimento della procedura di copia dei file sul dispositivo USB;
18. Cliccare nuovamente su Yes;
19. Tornare nella finestra di USB MultiBoot e premere qualsiasi tasto;
Adesso, abbiamo ottenuto la nostra chiave USB con Windows XP, da utilizzare per poi installare il sistema operativo. Per avviare la procedura d’installazione, occorre riavviare il computer (mantenendo la chiavetta inserita), recarsi nel BIOS ed impostare la porta USB come preferita per il boot, effettuare un nuovo riavvio della macchina, e far partire l’installazione di Windows XP da chiave USB inserendo il valore 1.
A questo punto, basterà seguire la procedura per portare a termine questa intensissima operazione da veri geek.
Buona installazione a tutti!
-
oggi sono di buon umore quindi mi faccio il multy boot con windows7... ho fatto un ghost preventivo però

-
ecco come crearsi una penna usb con su vista e/o windows 7:
Unlock For UsHow to Make/Create a Bootable USB Flash Disk Windows Vista Installer

Mr Dave Glover of Blogs.MSDN.com wrote a guide on how to create a USB Thumb Drive Vista Installer. The article is interesting because recently a friend of mine wishes to install Windows Vista onto a laptop in which DVD drive is not working anymore (it's already dead).
BTW, this is really useful for all DVD less laptops. So, I wrote a Complete Step-by-Step Beginner's Style Guide on how to do it easily, Not Just For the Geeks But For All.
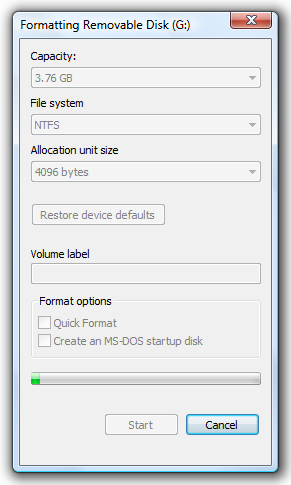
1. Format the USB Stick as NTFS: Open Windows Explorer and Right-Click the Drive > Choose the Format Option
2. In the File System Combo box, Choose NTFS and Click the Start Button to begin.
3. Afterwards, Open the Command Prompt as Administrator: In Start Search type, cmd > Press CTRL + Shift + Enter
or you will get... "Access is denied" Message after launching diskpart command.
4. Setting the USB Partition Active (Diskpart.exe)
a. In the Command prompt, type: Diskpart and press Enter
b. Please wait for a while and type: list volume and press Enter
- The command will let you see all the drives and partitions
c. Find which volume for your Removable USB Drive, in my case 6, Therefore Type: select volume 6 and press Enter again
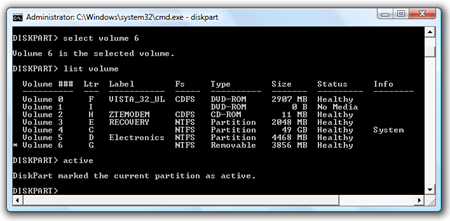
d. type: active and press enter
DiskPart marked the current partition as active. To learn more about the commands, press ? and Enter Key.
Now you already finished setting the volume active so, type the command Exit and press Enter Again
5. Create a Boot Sector (bootsect.exe)
What is Bootsect? In the Command Prompt, enter the following command to learn about the tool: bootsect /?
SYNTAX:
bootsect {/help|/nt60|/nt52} {SYS|ALL|:} [/force]
Boot sector restoration tool
Bootsect.exe updates the master boot code for hard disk partitions in order to switch between BOOTMGR and NTLDR. You can use this tool to restore the boot sector on your computer.
Run "bootsect /help" for detailed usage instructions.
It is located at your Windows Vista installer directory called boot
1. Let's go back to the guide...First, Find where's your DVD Drive is located (Windows Vista Installer) and go to the boot directory, which in my case Drive F:
Next, type: bootsect(space)/nt60(space)Flash Drive Letter
C:WindowsSystem32>f:
F:>cd boot
F:BOOT>bootsect /nt60 g:
Target volumes will be updated with BOOTMGR compatible bootcode.
G: (\?Volume{e5e56f28-84e3-11dd-bd4b-00188bdb682d})
Successfully updated NTFS filesystem bootcode.
Bootcode was successfully updated on all targeted volumes.
F:BOOT>
6. You have now successfully created a Boot Sector for the Vista Installer... Finally, Open Windows Explorer > Go to the the Windows Vista Installer DVD Drive and Copy these Files and folders onto the USB Stick:
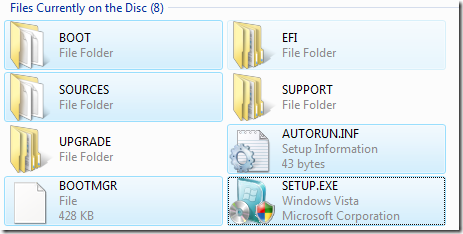
1. Boot Directory
2. Sources Directory
3. Files in the root directory (drive)
That's it!
Now you have a USB Stick Bootable Vista Installer... which BTW Rocks! (As Mr David says... Anyway, Me too!!!)
It's very useful in troubleshooting and fixing Windows Vista problems e.g. Unbootable, infected by a virus, very slow and many more.
Enjoy Learning Windows Vista!!!
-
impressione sull'installazione di windows7: voto 10!
da chiavetta usb 2.0 da 4gb da quando si fa il boot a quando si fa il primo avvio passano meno di 30 minuti su questo piccolo! credo che sia proprio migliorato almeno questo aspetto rispetto solo ad xp che sul pargolo si installa in 40 minuti abbondanti!

-
beh è pur sempre una beta e potrebbe mancare ancora qualcosa...comunque direi che abbiamo buone speranze che sia effettivamente un gran bel sistema

-
allora raga windows 7 lo definirei un xp-killer! non sto scherzando. sul piccolo eeepc va come lui se non meglio.
driver xp quasi tutti accettati! sono riuscito a fargli digerire pure i tasti rapidi fn+tasto che prima non prendeva, wlan configurata, BT pure, lan pure, driver audio hd messi in automatico, vga pure!
eeetcl pienamente supportato, avira pure! cavolo questo appena esce me lo metto al posto di xp sicuro!
-
apix_1024 ha scritto:
allora raga windows 7 lo definirei un xp-killer! non sto scherzando. sul piccolo eeepc va come lui se non meglio.driver xp quasi tutti accettati! sono riuscito a fargli digerire pure i tasti rapidi fn+tasto che prima non prendeva, wlan configurata, BT pure, lan pure, driver audio hd messi in automatico, vga pure!
eeetcl pienamente supportato, avira pure! cavolo questo appena esce me lo metto al posto di xp sicuro!
Vuoi dire che Windows 7 supporta i driver di XP oppure ho capito male ?
Perchè se così fosse lo provo anche io visto che Vista non lo posso mettere perchè i driver della vga non ci sono

-
swattolo ha scritto:
Vuoi dire che Windows 7 supporta i driver di XP oppure ho capito male ?Perchè se così fosse lo provo anche io visto che Vista non lo posso mettere perchè i driver della vga non ci sono
a be i driver dell'eeepc 1000h sono disponibili solo per xp e quelli che windows 7 non ha messo lui di default li ho messi io facendo installare i driver xp:clapclap::clapclap:
ora sto provando opera 9.6!
-
il piccolo atom ha detto basta a ben 2040 mhz... ghghggh le rammine nuove 800cl5 si fanno sentire
 le vecchie 533cl4 le dò al fratellino:)
 -
apix_1024 ha scritto:
il piccolo atom ha detto basta a ben 2040 mhz... ghghggh le rammine nuove 800cl5 si fanno sentire le vecchie 533cl4 le dò al fratellino:)test test :clapclap:
ps: quand'è che lo butti sotto azoto ?

-
ecco un giro veloce di test a codecreatures:
990mhz

1610mhz

1750mhz

1890mhz

2040mhz

c'è un netto miglioramento! :clapclap::clapclap::clapclap:
-
-
penguin86 ha scritto:
semplicemente incredibile. è peggio di rigor questo... ha piazzato di ogni dentro quel povero 701! mamma mia quanta roba ci ha fatto stare!!!!:AAAAH::AAAAH:
-
penguin86 ha scritto:
:king:
-
Le085 ha scritto:
:king:Bello, eh?
-
penguin86 ha scritto:
Bello, eh?Accipicchia che roba O_O :AAAAH:
-
mi serve 1 anima pia che ne sappia di dual boot
mi sono registrato con la microzoz e mi sono scaricato la beta 7000 di windows 7 con relativo cd key ora il problema è: come levo la mia beta 6956 dal disco secondario e metto questa? windows 7 infatti ha fatto tutto lui il dual boot ergo se vado di format sulla partizione secondaria poi rido visto che dopo non mi vedrà manco più xp sulla primaria...come devo fare? grazie ragassss
-
:boh: non puoi installare sopra senza formattare?
-
Le085 ha scritto:
:boh: non puoi installare sopra senza formattare?dici che funzioni?:cheazz:
-
Ragazzuoli mi sono convertito anch'io all'EeePC! :clapclap:
Eccolo al confronto con Orma:

Inutile dire che pesa un terzo di Orma... :AAAAH: Come dimensioni è la metà.
Visto che qualche mese fa si parlava di consumi dell'eeepc... secondo voi è possibile tenerlo acceso con circa 300mAh?
Son curioso di sapere se quest'estate riuscirò ad utilizzarlo in campeggio col pannello solare... magari anche con la luce del display spenta (sempre che si possa fare), tanto se c'è il sole forte...
Il mio è il modello 900, quindi con lo schermo 8,9" (che speriamo non consumi molto più del 7"...).
Ciao! Sembra che tu sia interessato a questa conversazione, ma non hai ancora un account.
Stanco di dover scorrere gli stessi post a ogni visita? Quando registri un account, tornerai sempre esattamente dove eri rimasto e potrai scegliere di essere avvisato delle nuove risposte (tramite email o notifica push). Potrai anche salvare segnalibri e votare i post per mostrare il tuo apprezzamento agli altri membri della comunità.
Con il tuo contributo, questo post potrebbe essere ancora migliore 💗
Registrati Accedi