Mod’n Roll 2012: The Theory of Everything.
-
Hi guys.
I decided to enter my latest worklog in here, I hope that's okay.
The first couple of posts are going to be quite large as I have copied them from my current worklog.
From now on, I will ofcourse post in here with every new update.
I you have any questions please ask. Just be aware that my Italian is really bad.


I gave my girlfriend a pc a couple of months ago, and to be honest the case might be the ugliest one I've ever seen! :lol:
The specs are not insane, but it works.
Foxconn P35AX
Intel E8500
4GB Kingston Hyperx
Nvidia 9600GT
Etc.
Since she's a WOW/RIFT player (I know
 ) and used to play on a laptop ment for schoolwork, this is a big step up!
 I havn't gotten the case yet, but waiting for it. I'm getting a couple of little things for the article I wrote for Custom PC Magazine, and amongst those I'm getting a Fractal Design Refine R3. This will be used for this mod. I have no idea of the color of it, but I know what I'm hoping for! *cough* white *cough*
It's not going to be an insane mod, just a couple of little things here and there.
I havn't worked out all the small querks out yet, but the idea is as follows:
Custom watercooling. (I'm guessing that's kind of required on my part by now) :lol:
Custom CPU block. (started that)
Custom Reservoir. (This is going to require some heatbending in the oven again)
Custom pump housing.
1 x 120mm radidator for the CPU.
I don't know what to do about the NB and SB for now. She's using the pc, and she knows I'm going to do something to it, but has no idea what!
Since she's in school and crazy about math and physics, I'm going with the theme of "The Theory of Everything". I'm going to paint decals of equations from Quantum Physics, String Theory etc. on it. ( Afaik String Theory is not combineable with The Theory of Everything as such, but they have some cool equations so leave me alone! :lol: )
Since my own pc needs a graphic upgrade soon, I'm going to put 1 or 2 9800gtx+ gfx cards in there. I'm gonna go out on a limb and say I'm going to keep the waterblocks on the gfx(s).
Now, the cool part about this mod is going to be the DVD drive. I'm going to keep it a secret untill I get the whole thing worked out, but I'm going to drop a lot of hints for it!
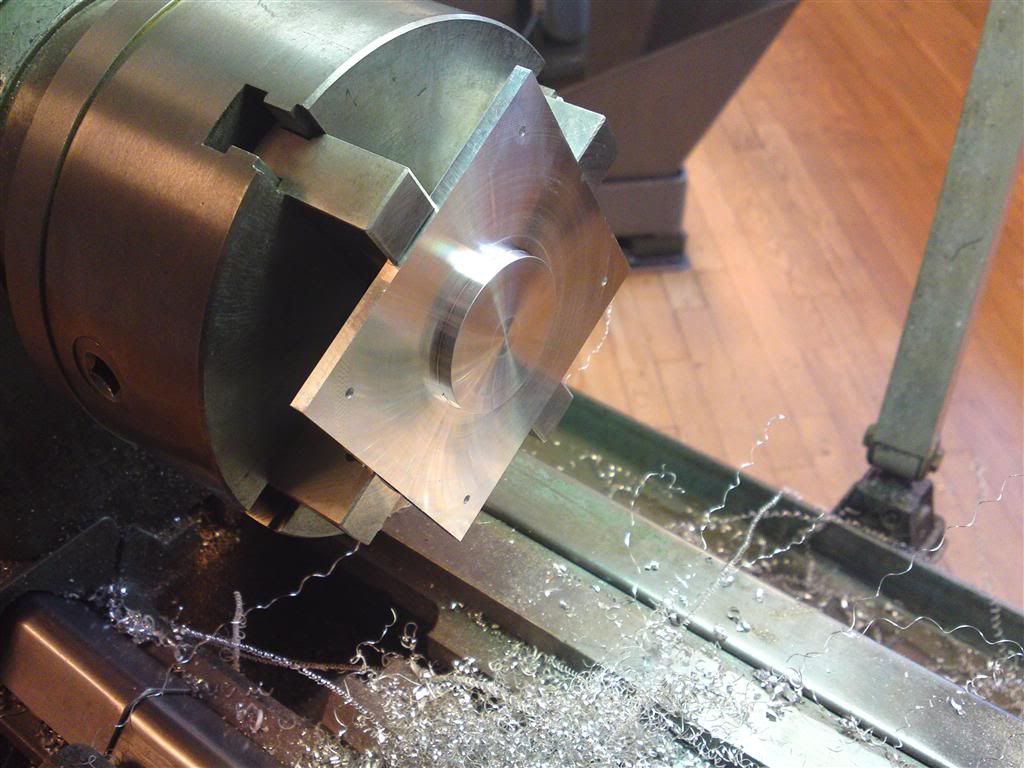
First I needed an old dvd drive. Cut out the pieces I need:
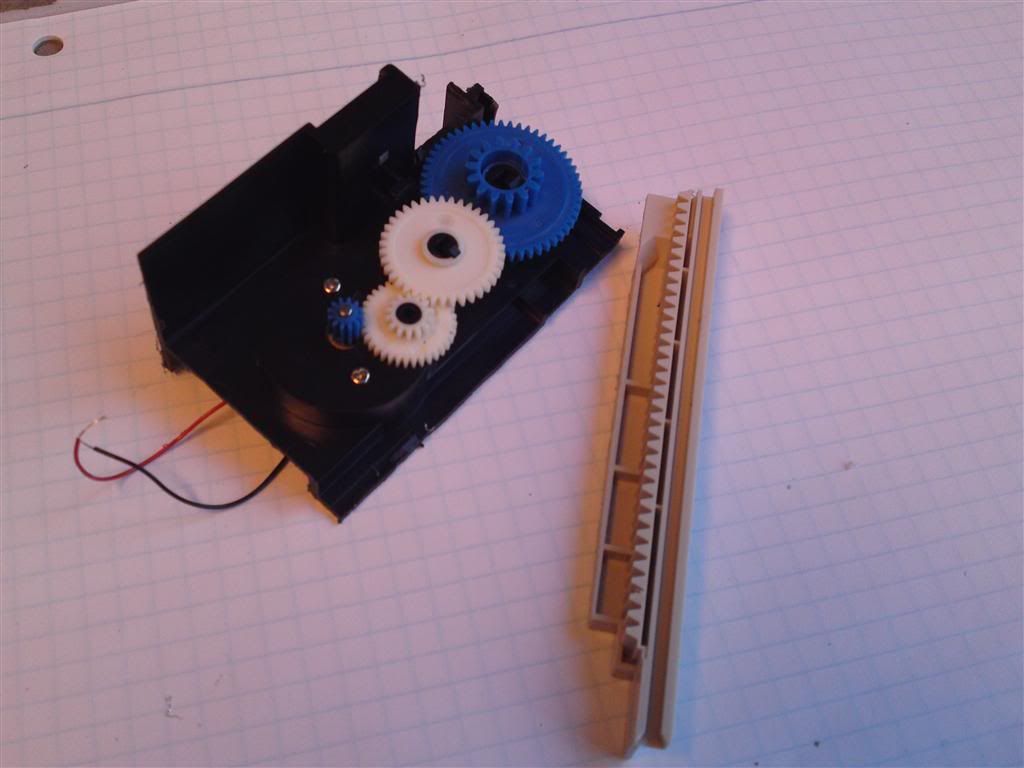
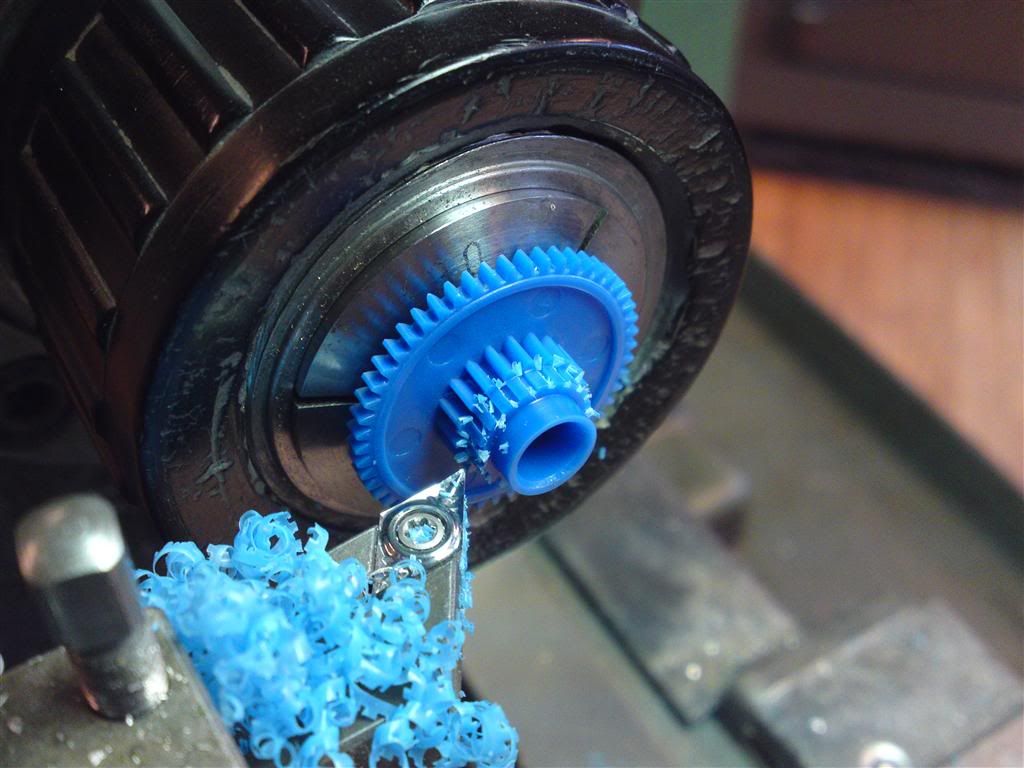
Sprocket didn't fit with my plans:
I need this to be lined up as well as possible, so thin plastic is not going to cut it. Measured up the housing and made it in aluminum:
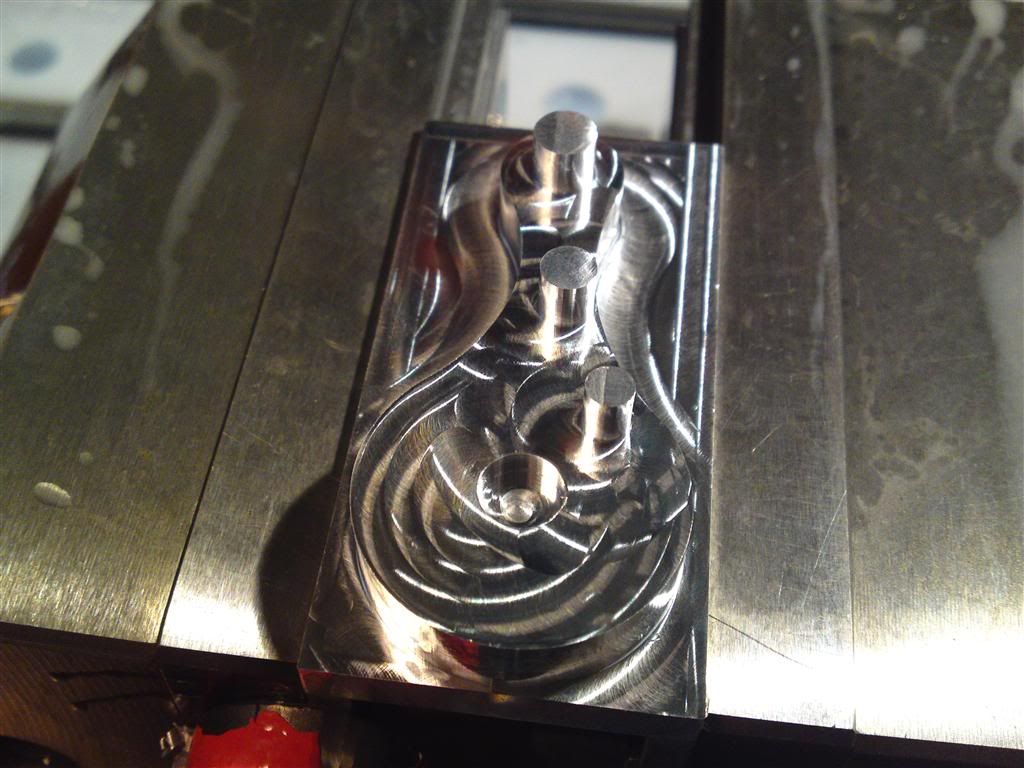
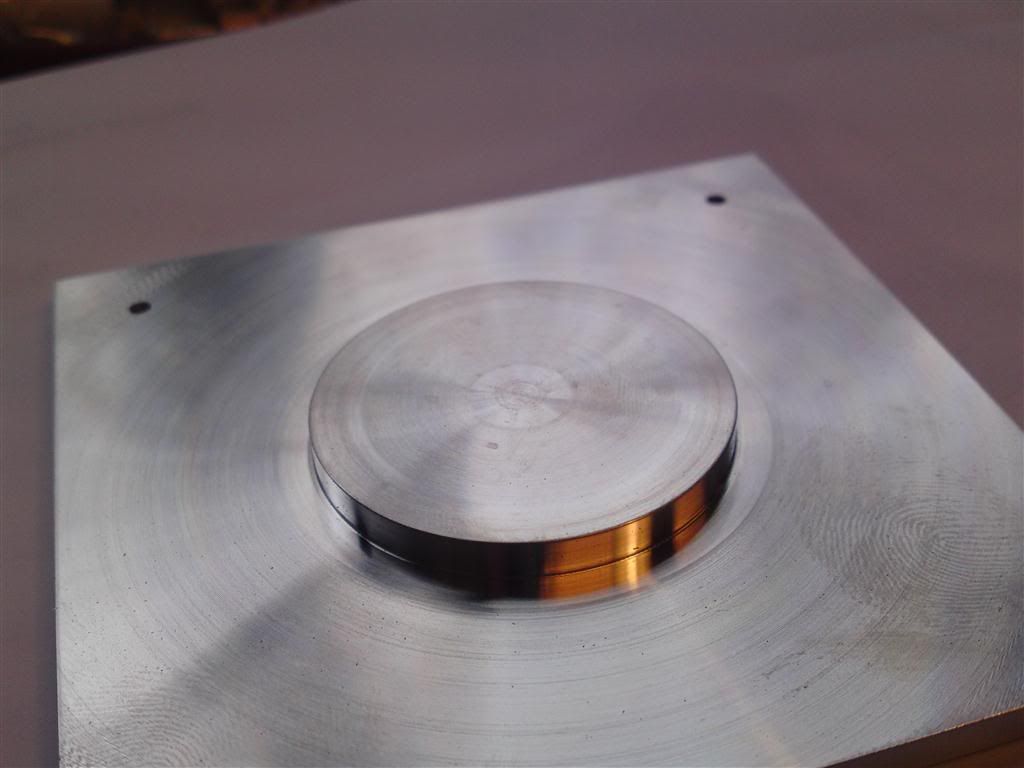
Mounted the sprockets. Seems I still know how a caliper works, all the measurements fits perfectly!
:
Pushed the end piece onto it, just for a look:
This is where I am now. I would love to get this done by X-mas, so let's see how things work out. I need some help from guys at work with the electronic side of this, as I have no idea of what I'm doing. I know how to blow a fuse in my appartment by putting my hands in the PSU, and that's about it! :lol:
I also ordered a Passive InfraRed sensor, that should arrive in a couple of weeks. Hope it will work with my plan.
I hope you will be patient as this is going to take some time!
So, on with the show!
We've been pinned down with work the last couple of weeks. Between working 12-13 hour days a couple of times, and getting my mods ready for the BEEP 2011 show, I havn't had time to work on this little baby. But that's all done, and I'm ready! So I stayed a bit after work yesterday, and got there early this morning as well!
This:
...was put in the mill:

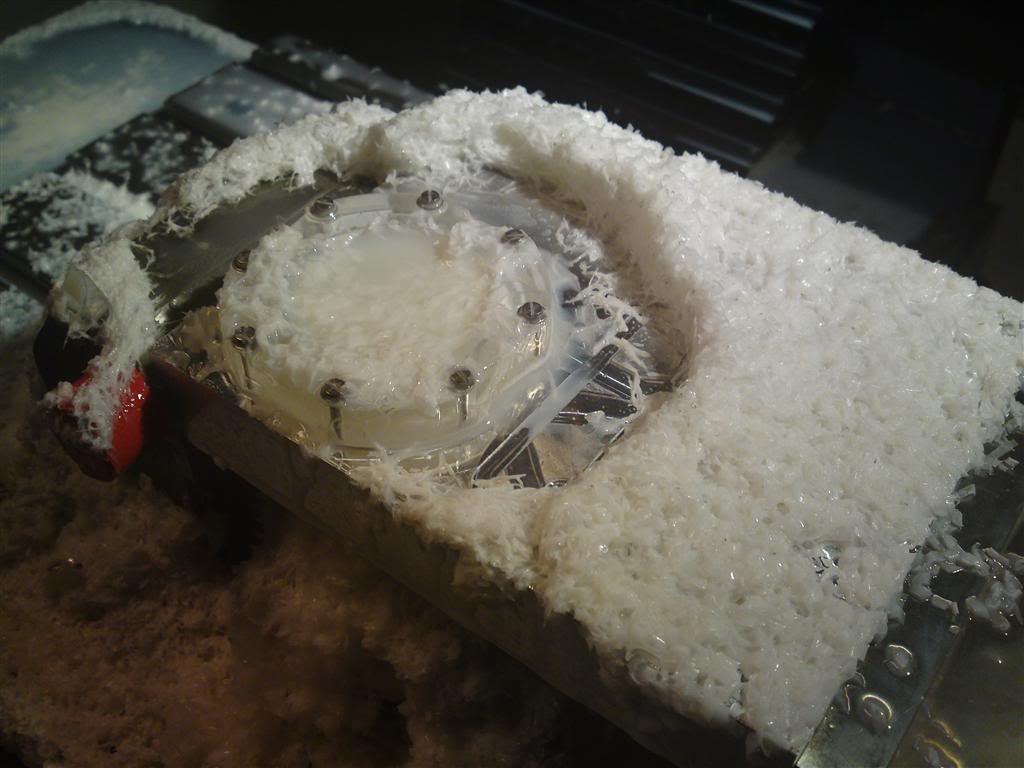
The channel is then done, and the groove for the O-ring is milled. Check.
While the mill was taking care of itself, I made a small aluminum part that goes in the CPU block:
Cut and turned:
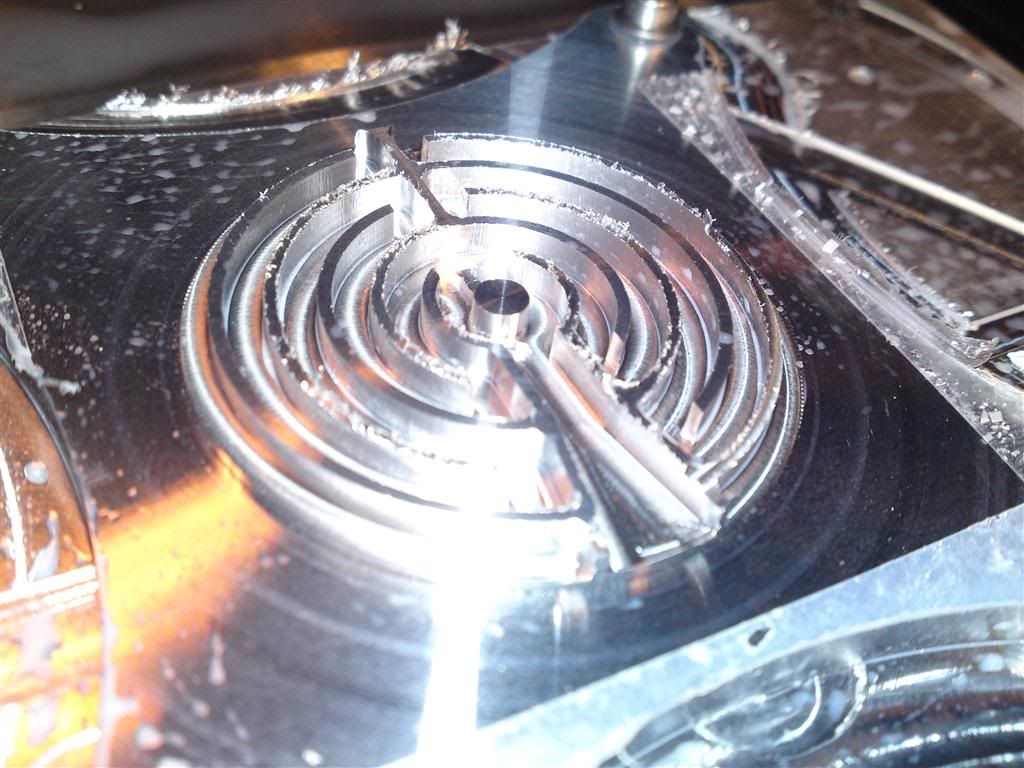
And what I see as the most important part was the next thing!
When milling was done I got a fast look at the pattern through the coolant, and I actually froze for a second as I thought It had milled the parts that was supposed to stay in there! :lol:
No worries, It came out as I had hoped for! :thumb:

That's it for now! I hope I have made you wonder even more about the finishing result of this! :lol:
Oh... I almost forgot! I also received a small package containing a PIR sensor... Time will show what that is for!
Right now I'm just waiting for the parts from Custom PC Magazine, but I'm not worried that I have nothing to do atm! :lol:
-
Hi guys.
I decided to enter my latest worklog in here, I hope that's okay.
The first couple of posts are going to be quite large as I have copied them from my current worklog.
From now on, I will ofcourse post in here with every new update.
I you have any questions please ask. Just be aware that my Italian is really bad.
I gave my girlfriend a pc a couple of months ago, and to be honest the case might be the ugliest one I've ever seen! :lol:
The specs are not insane, but it works.
Foxconn P35AX
Intel E8500
4GB Kingston Hyperx
Nvidia 9600GT
Etc.
Since she's a WOW/RIFT player (I know
) and used to play on a laptop ment for schoolwork, this is a big step up! I havn't gotten the case yet, but waiting for it. I'm getting a couple of little things for the article I wrote for Custom PC Magazine, and amongst those I'm getting a Fractal Design Refine R3. This will be used for this mod. I have no idea of the color of it, but I know what I'm hoping for! *cough* white *cough*
It's not going to be an insane mod, just a couple of little things here and there.
I havn't worked out all the small querks out yet, but the idea is as follows:
Custom watercooling. (I'm guessing that's kind of required on my part by now) :lol:
Custom CPU block. (started that)
Custom Reservoir. (This is going to require some heatbending in the oven again)
Custom pump housing.
1 x 120mm radidator for the CPU.
I don't know what to do about the NB and SB for now. She's using the pc, and she knows I'm going to do something to it, but has no idea what!
Since she's in school and crazy about math and physics, I'm going with the theme of "The Theory of Everything". I'm going to paint decals of equations from Quantum Physics, String Theory etc. on it. ( Afaik String Theory is not combineable with The Theory of Everything as such, but they have some cool equations so leave me alone! :lol: )
Since my own pc needs a graphic upgrade soon, I'm going to put 1 or 2 9800gtx+ gfx cards in there. I'm gonna go out on a limb and say I'm going to keep the waterblocks on the gfx(s).
Now, the cool part about this mod is going to be the DVD drive. I'm going to keep it a secret untill I get the whole thing worked out, but I'm going to drop a lot of hints for it!
First I needed an old dvd drive. Cut out the pieces I need:
Sprocket didn't fit with my plans:
I need this to be lined up as well as possible, so thin plastic is not going to cut it. Measured up the housing and made it in aluminum:
Mounted the sprockets. Seems I still know how a caliper works, all the measurements fits perfectly!
:Pushed the end piece onto it, just for a look:
This is where I am now. I would love to get this done by X-mas, so let's see how things work out. I need some help from guys at work with the electronic side of this, as I have no idea of what I'm doing. I know how to blow a fuse in my appartment by putting my hands in the PSU, and that's about it! :lol:
I also ordered a Passive InfraRed sensor, that should arrive in a couple of weeks. Hope it will work with my plan.
I hope you will be patient as this is going to take some time!
So, on with the show!
We've been pinned down with work the last couple of weeks. Between working 12-13 hour days a couple of times, and getting my mods ready for the BEEP 2011 show, I havn't had time to work on this little baby. But that's all done, and I'm ready! So I stayed a bit after work yesterday, and got there early this morning as well!
This:
...was put in the mill:
The channel is then done, and the groove for the O-ring is milled. Check.
While the mill was taking care of itself, I made a small aluminum part that goes in the CPU block:
Cut and turned:
And what I see as the most important part was the next thing!
When milling was done I got a fast look at the pattern through the coolant, and I actually froze for a second as I thought It had milled the parts that was supposed to stay in there! :lol:
No worries, It came out as I had hoped for! :thumb:
That's it for now! I hope I have made you wonder even more about the finishing result of this! :lol:
Oh... I almost forgot! I also received a small package containing a PIR sensor... Time will show what that is for!
Right now I'm just waiting for the parts from Custom PC Magazine, but I'm not worried that I have nothing to do atm! :lol:
-
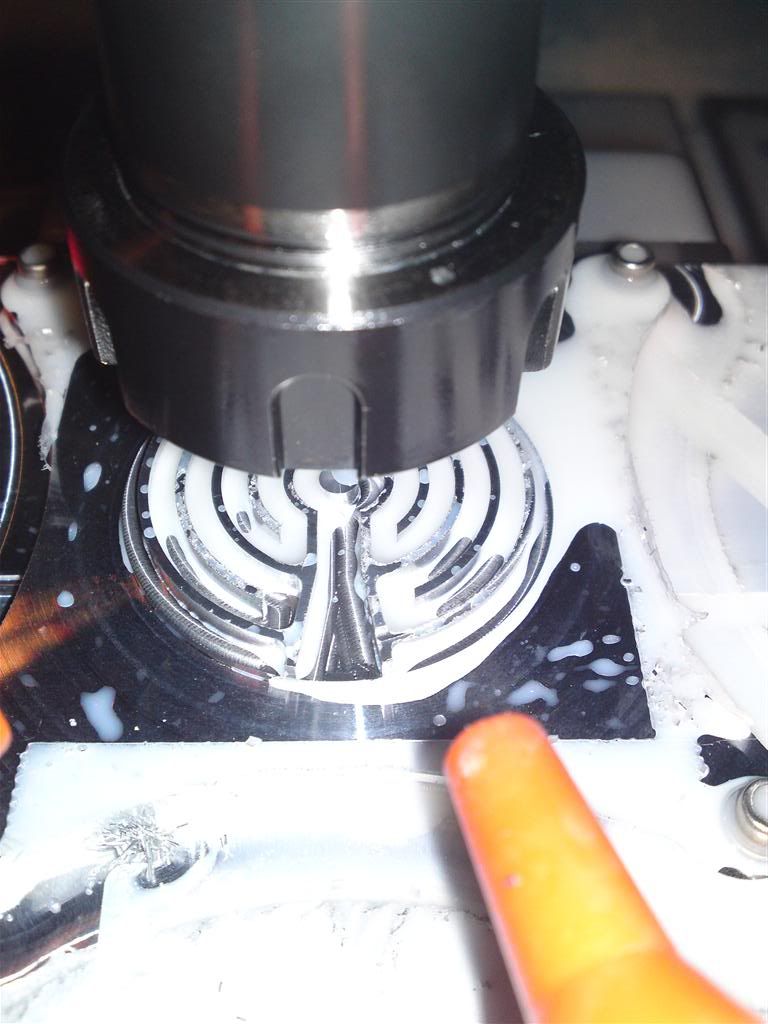
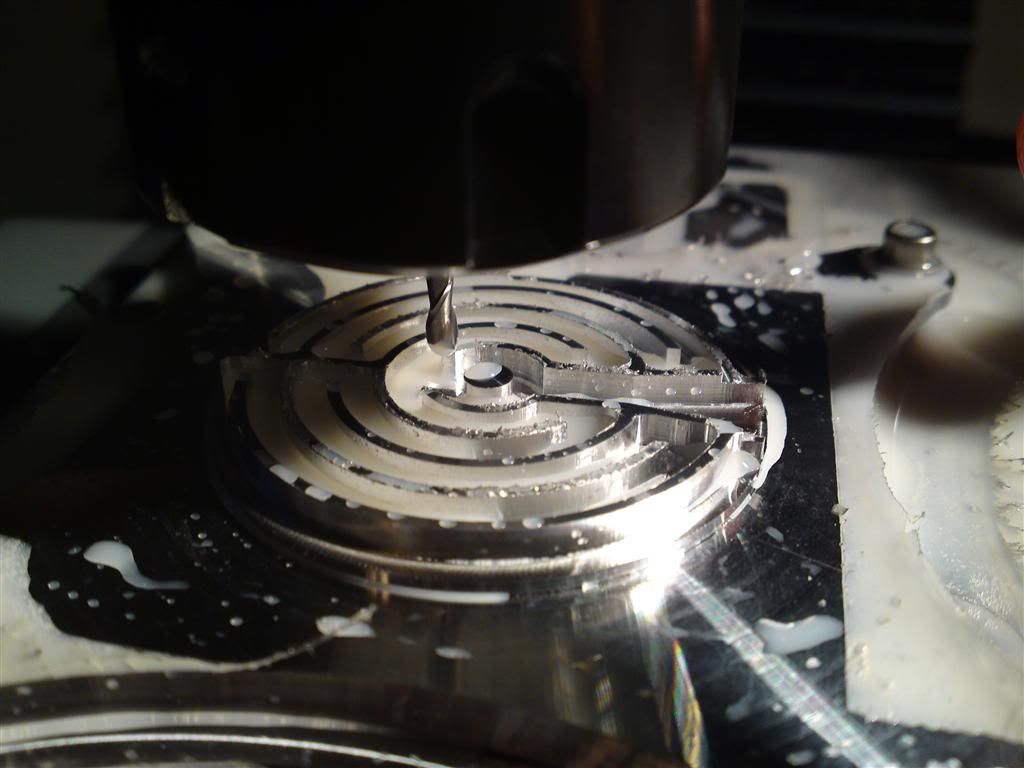
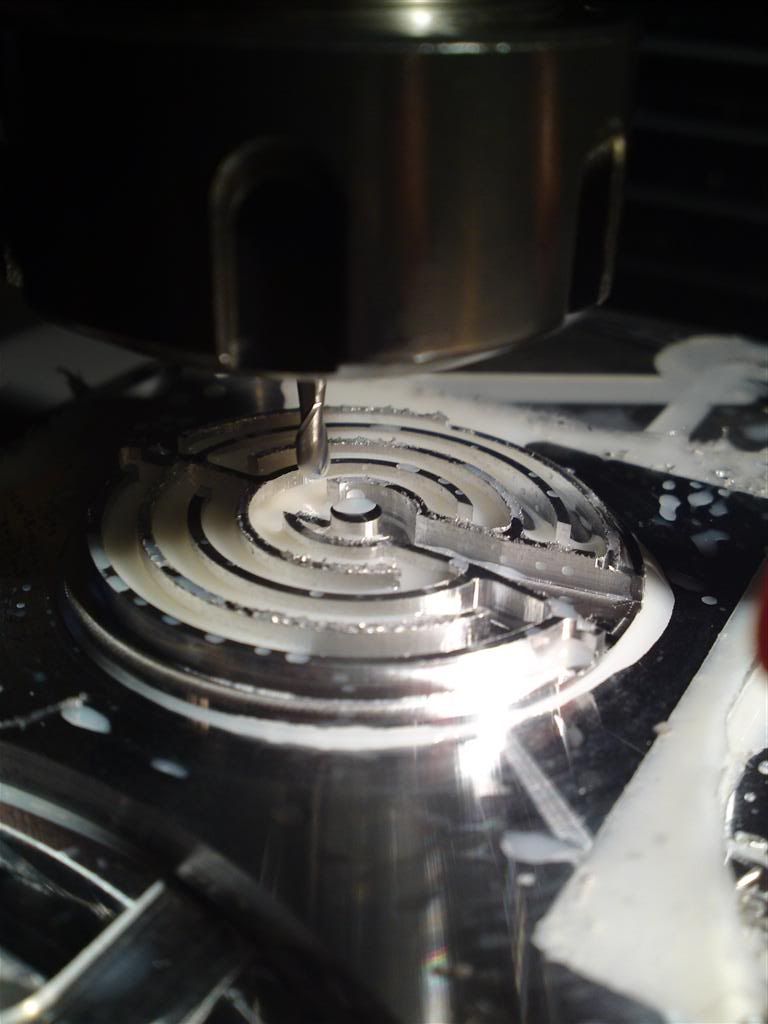
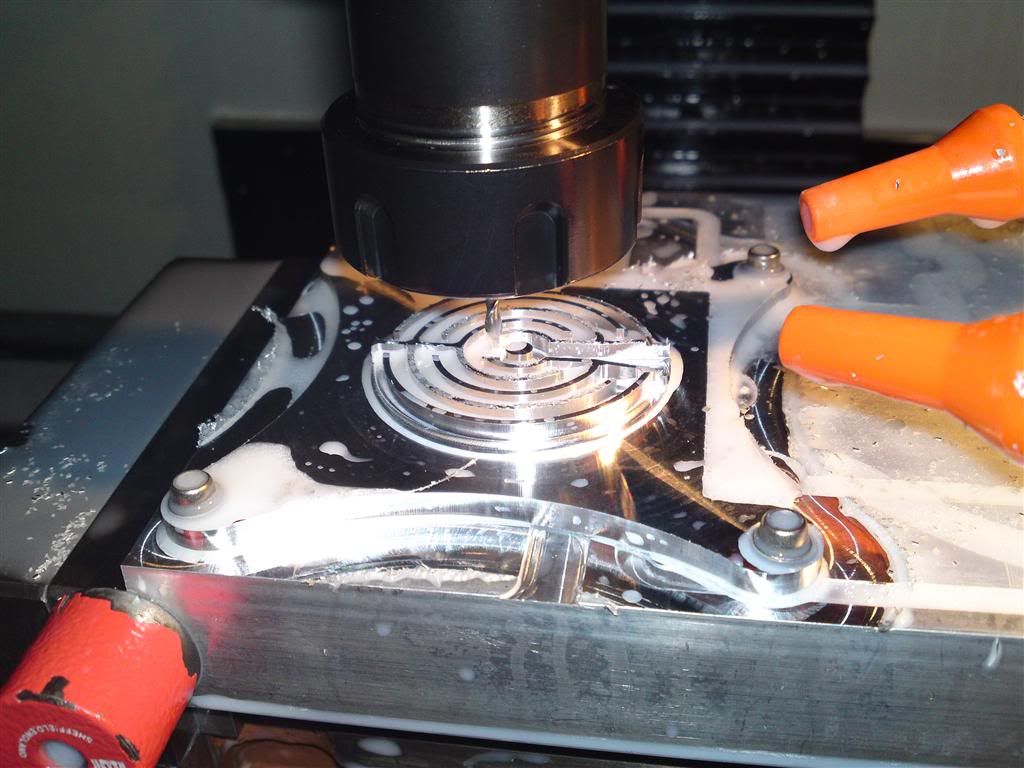
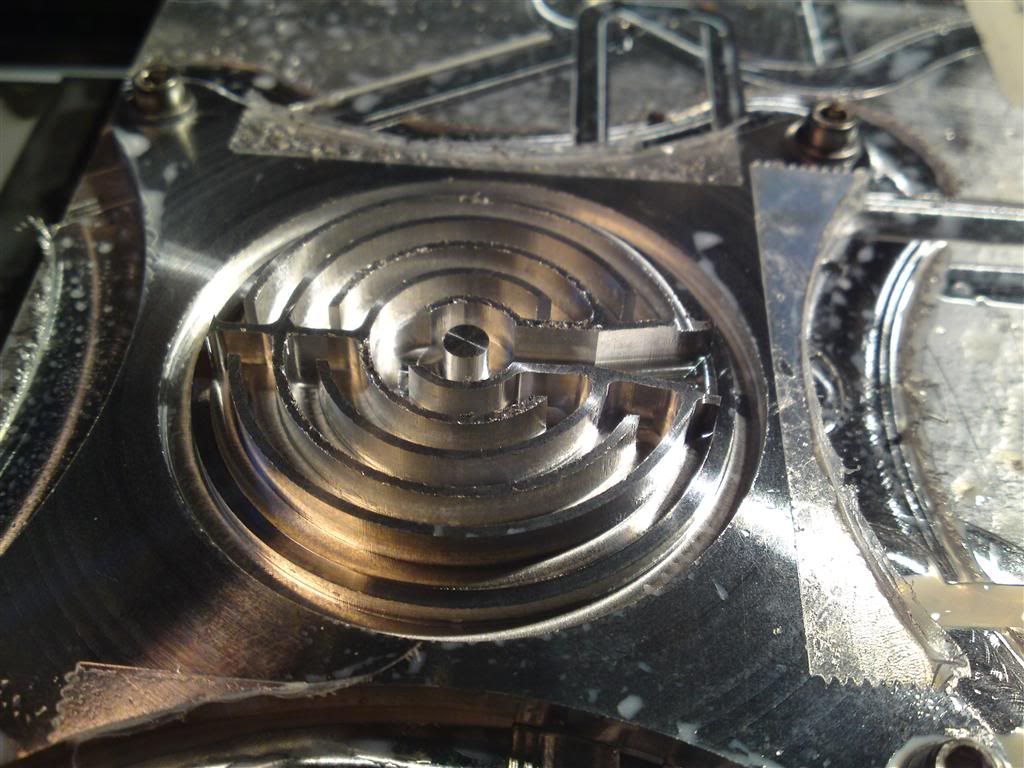
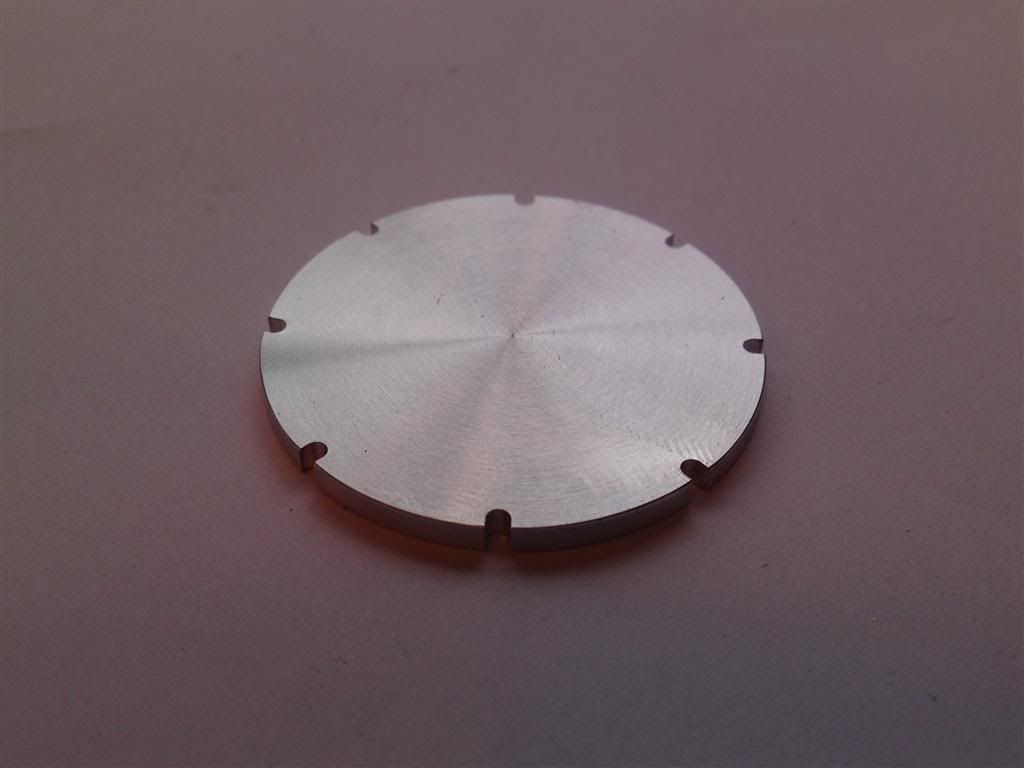
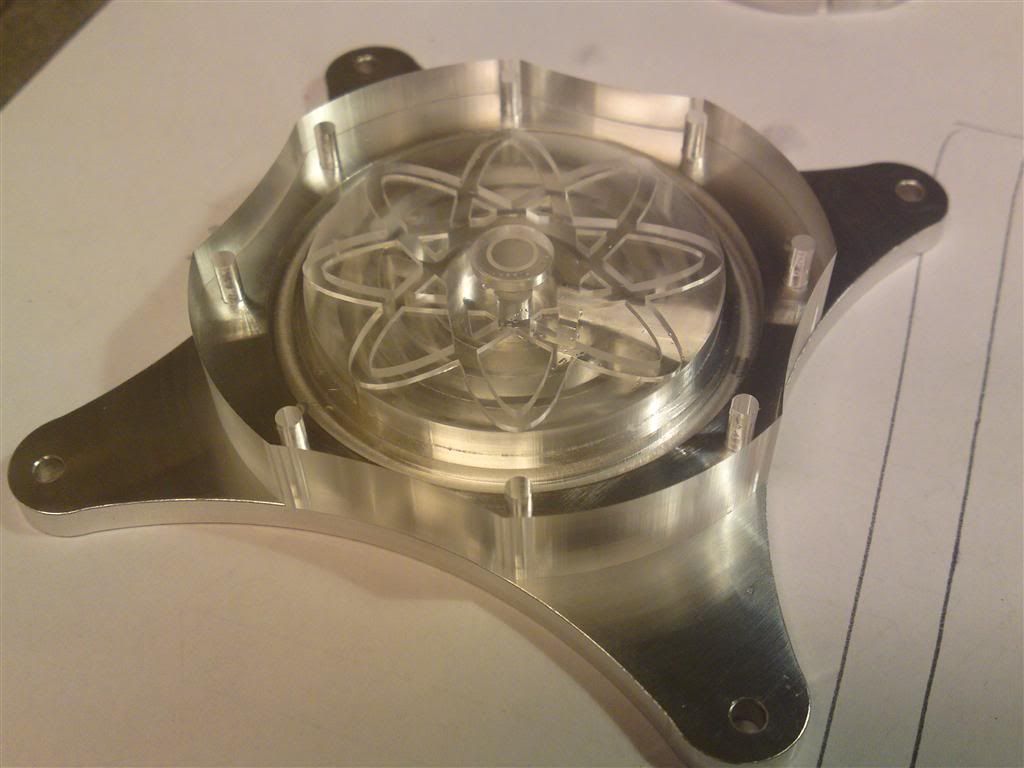
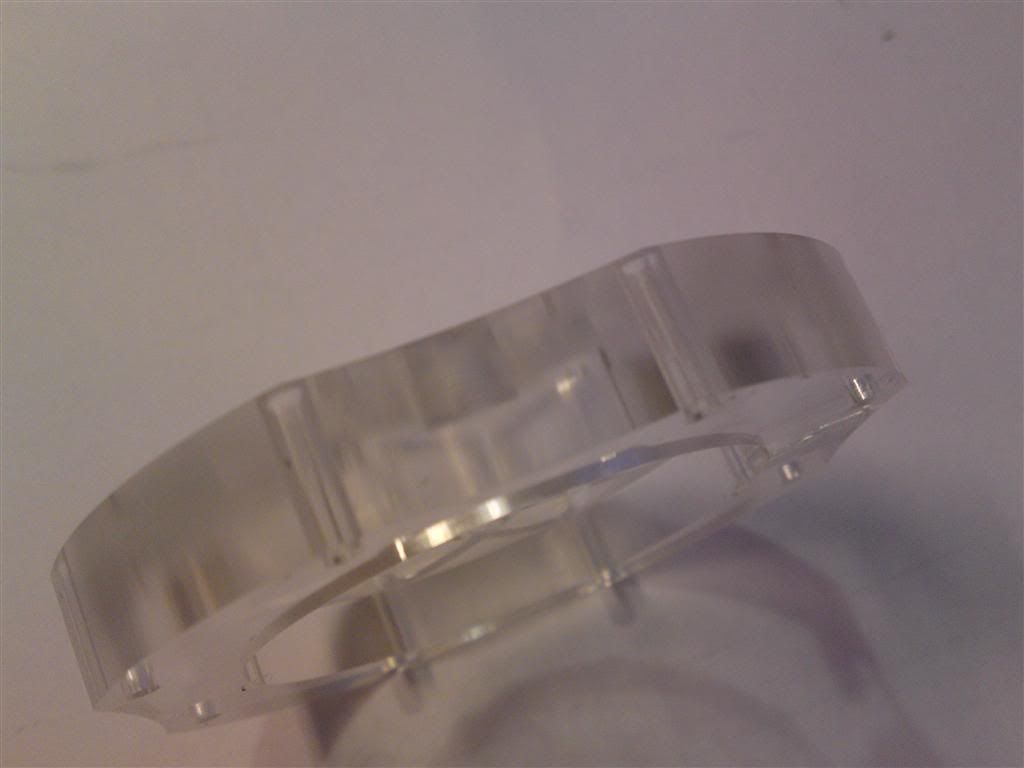
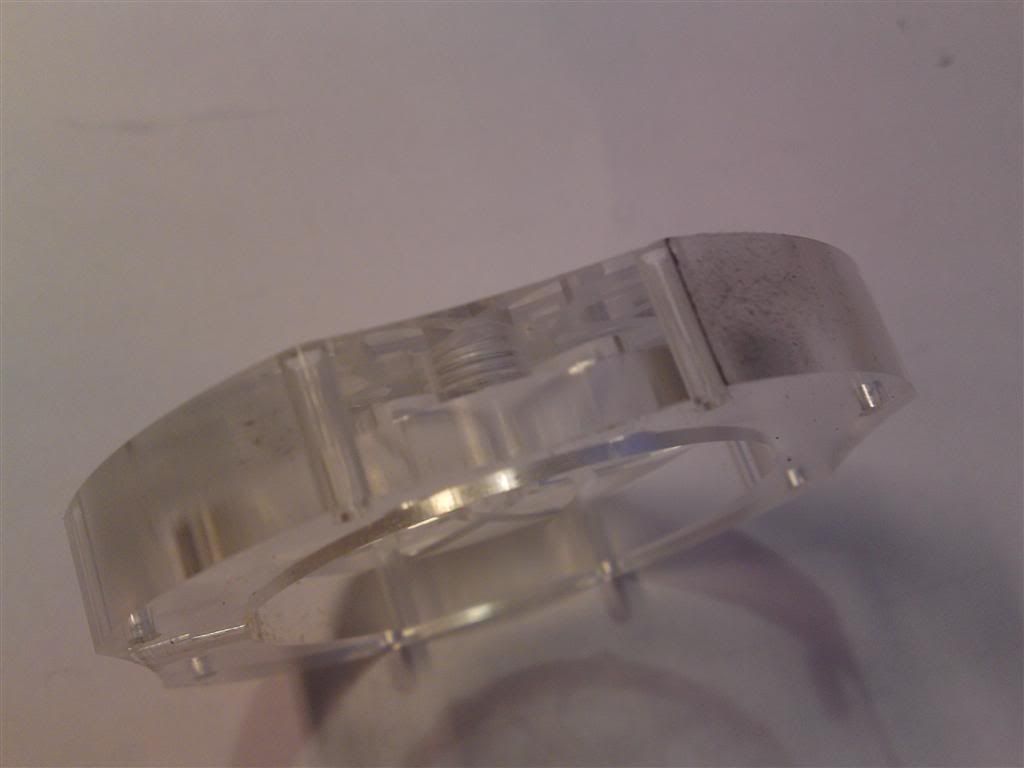
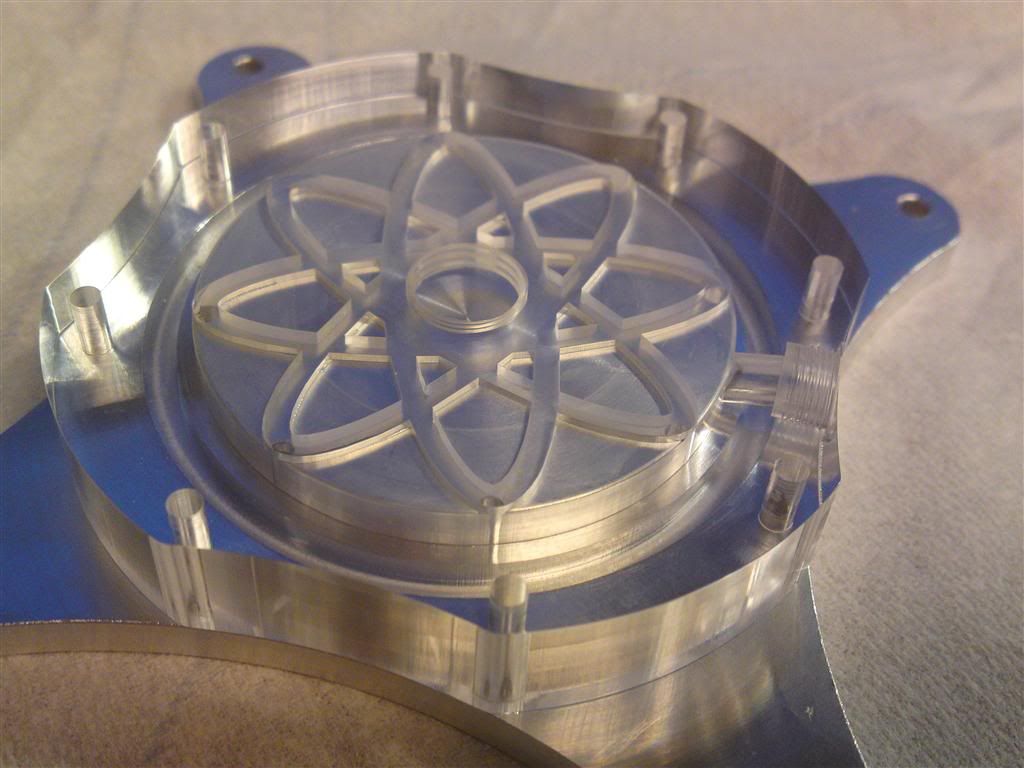
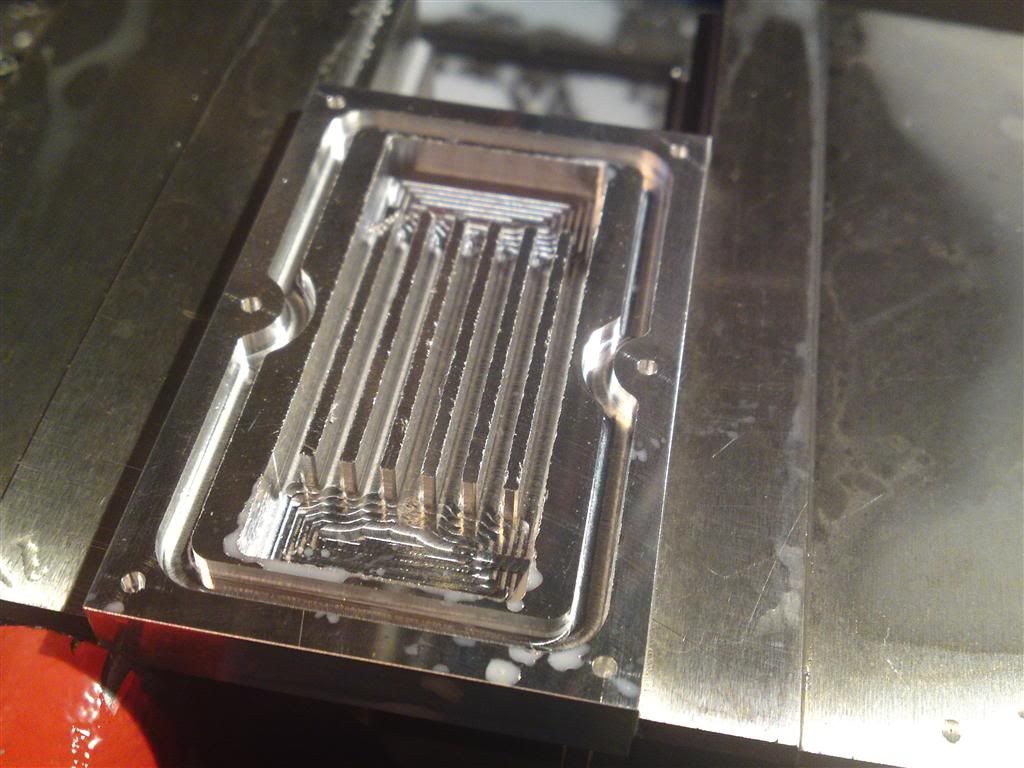
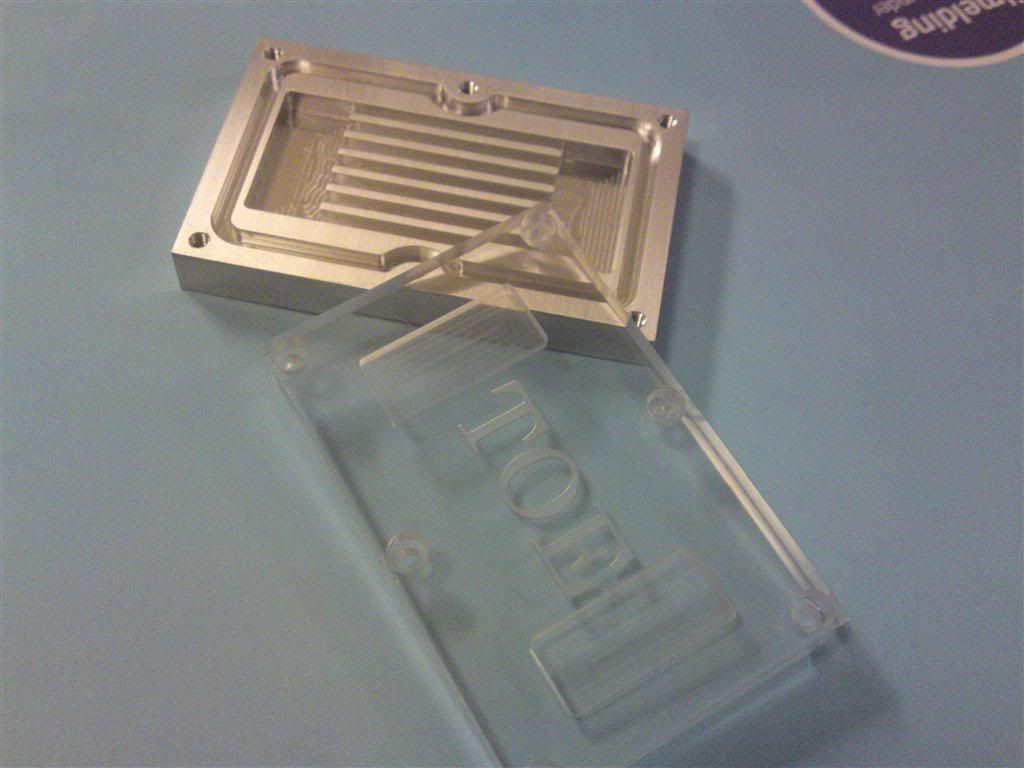
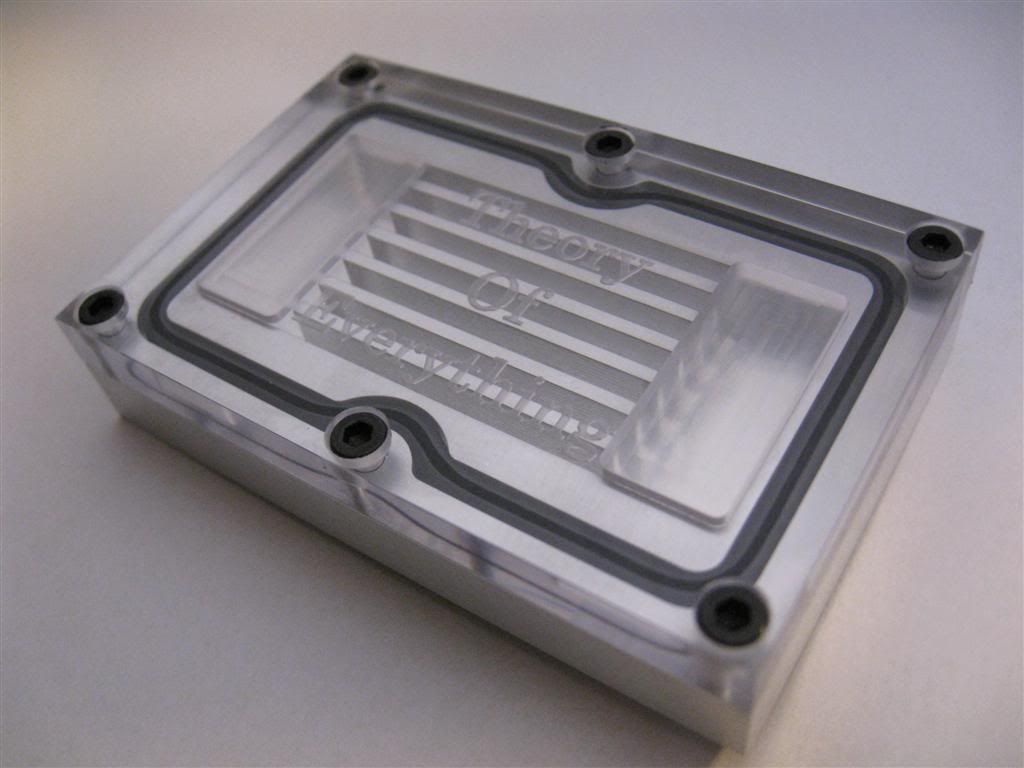
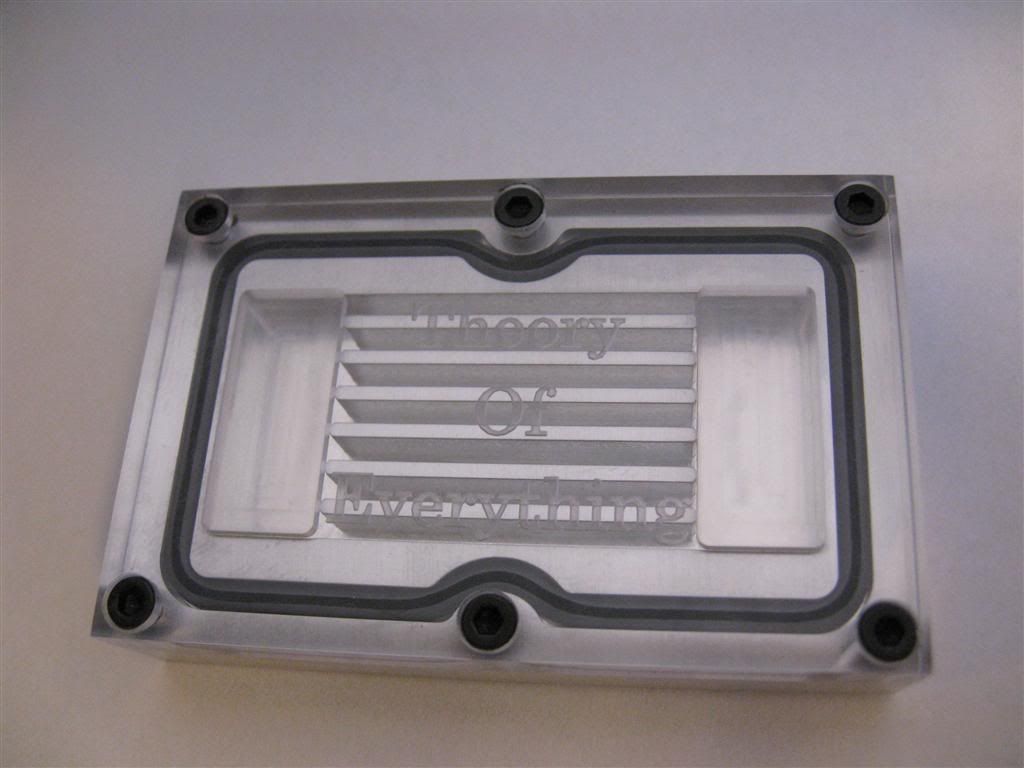
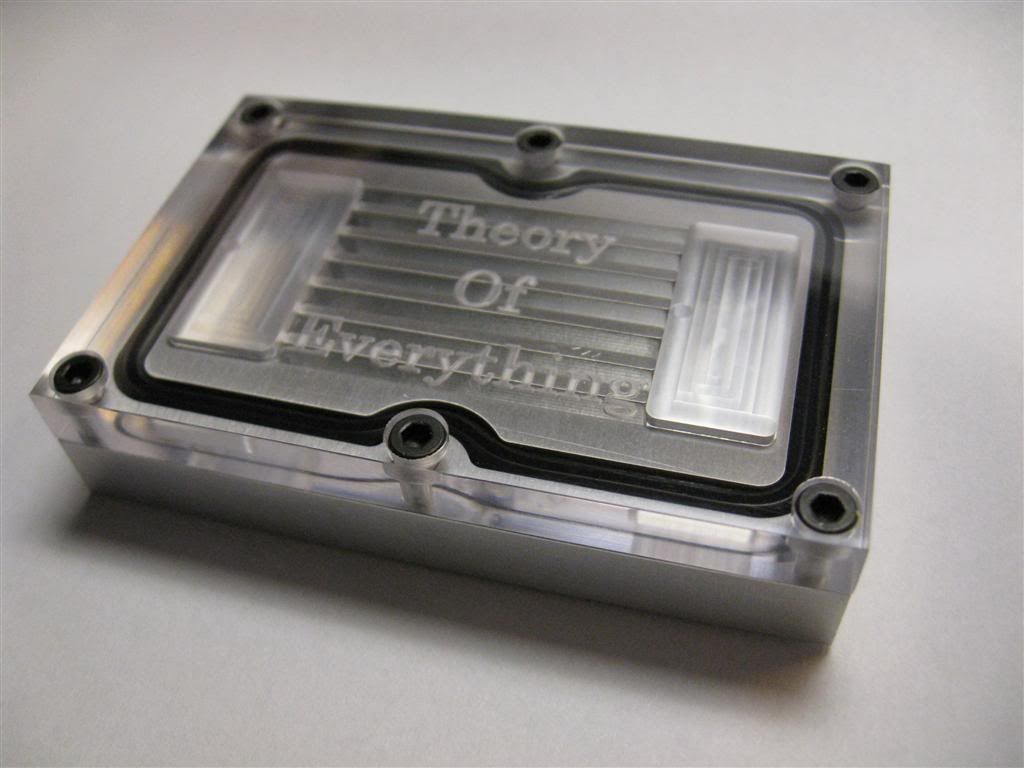
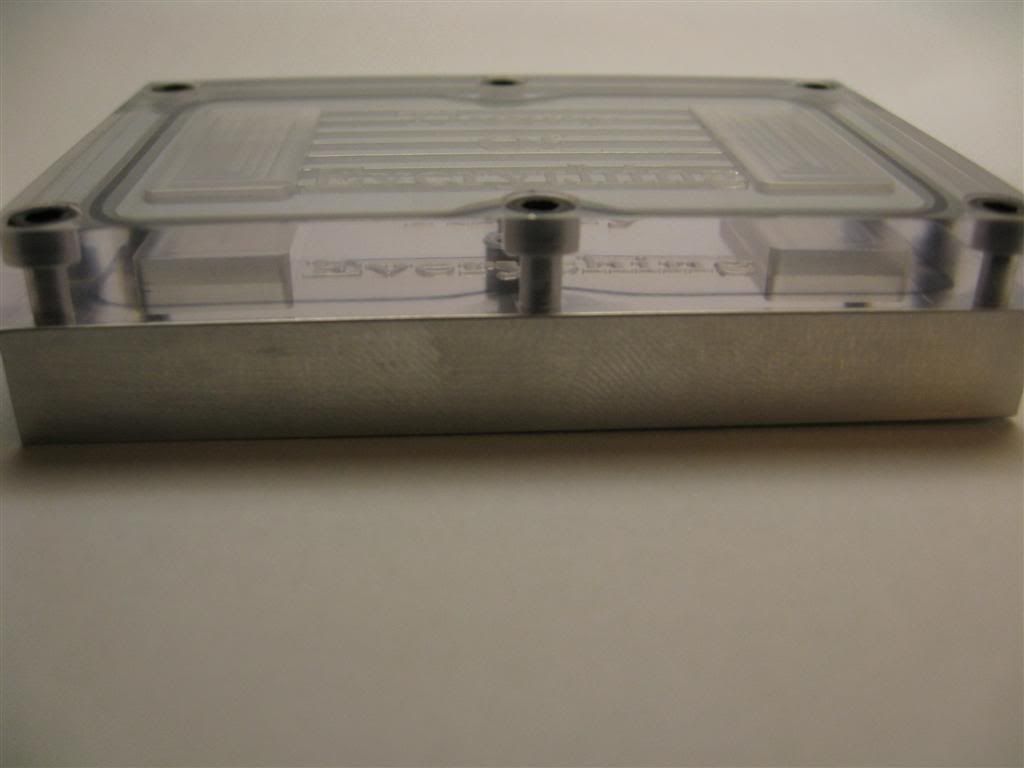
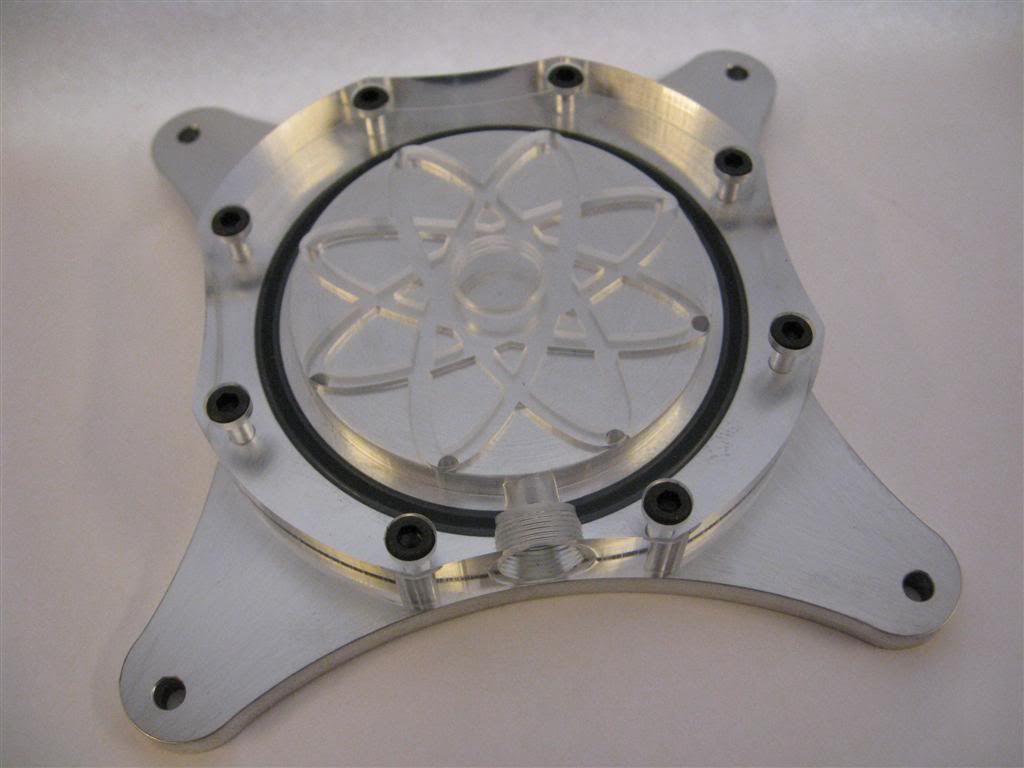
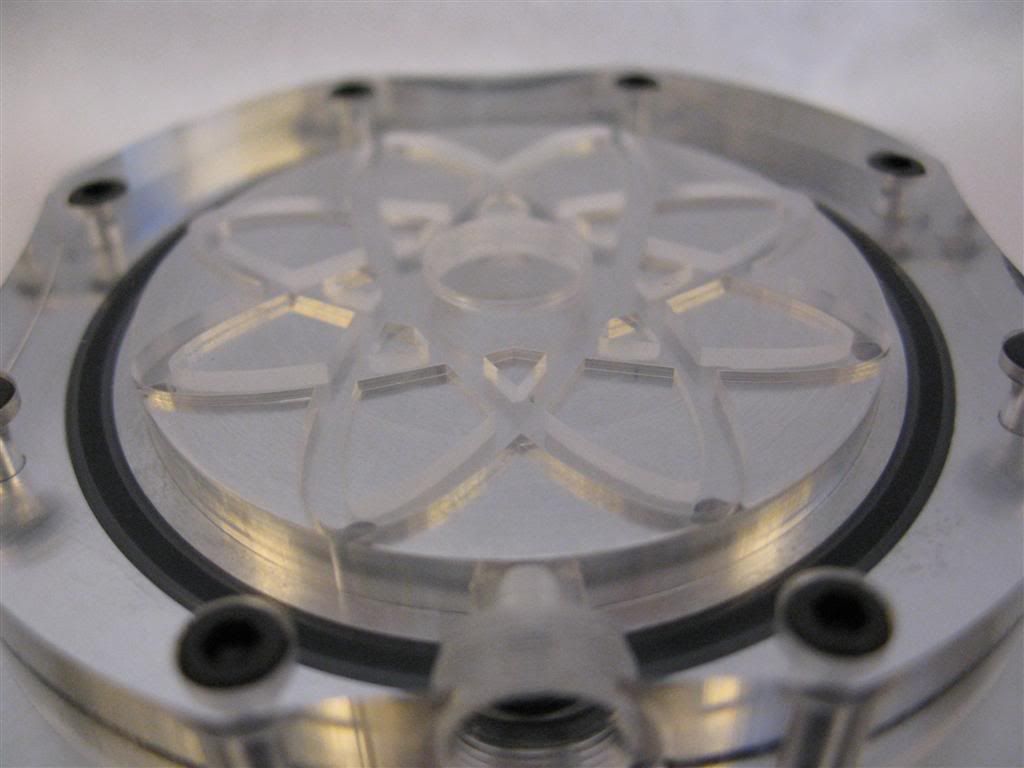
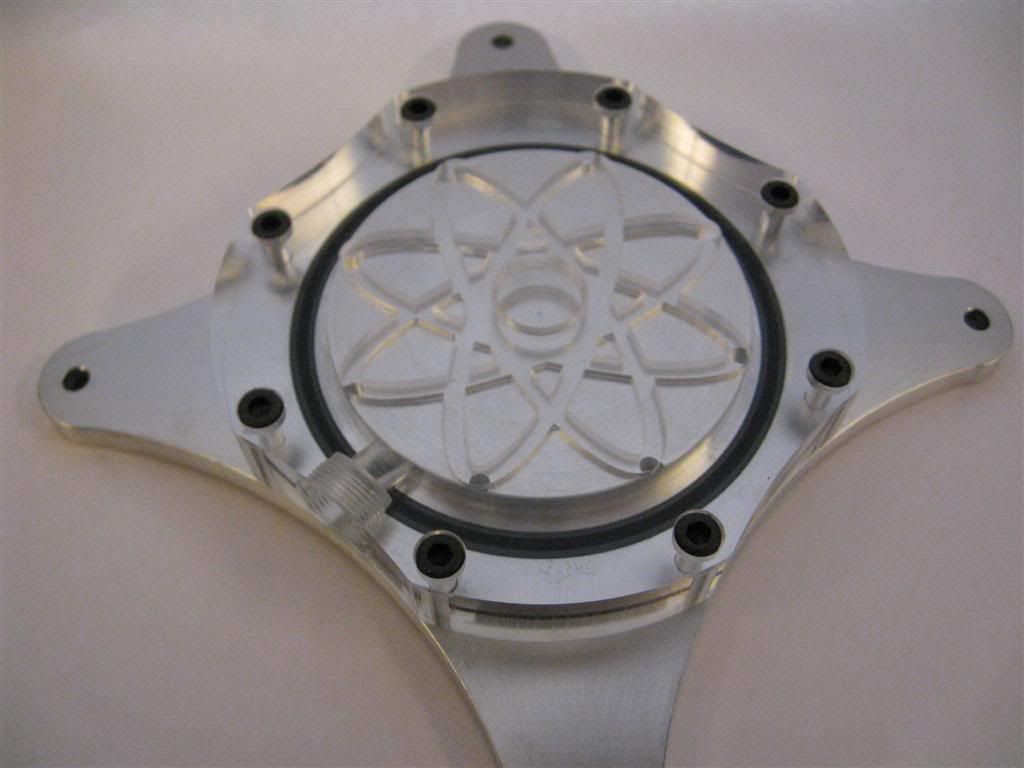
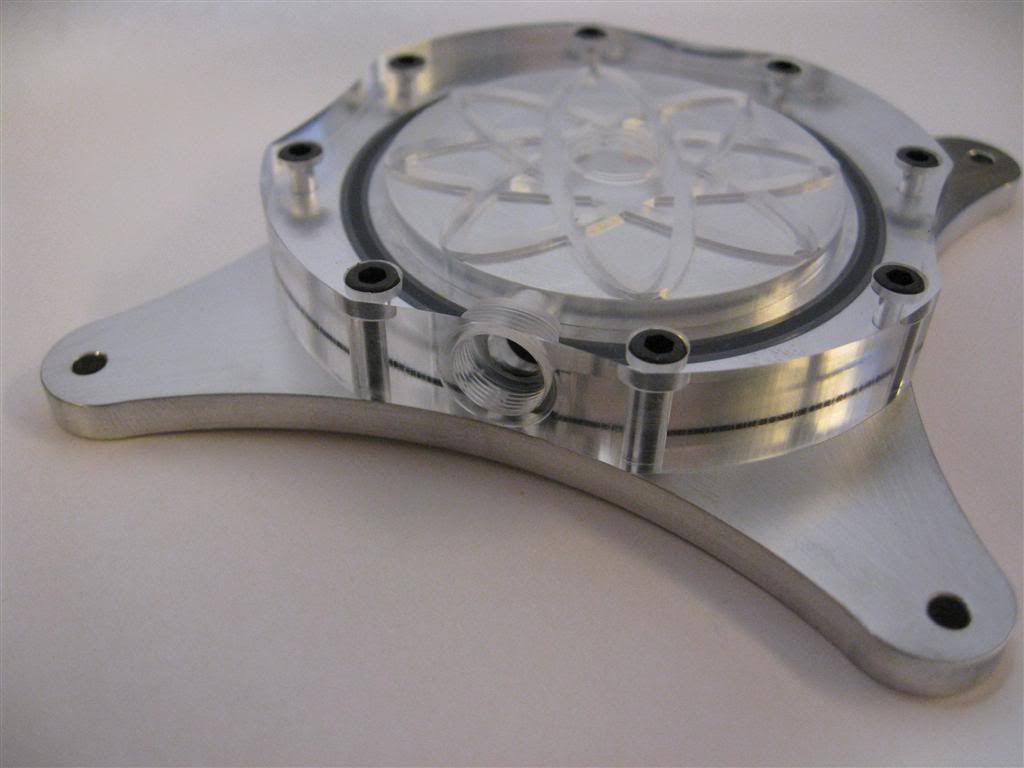
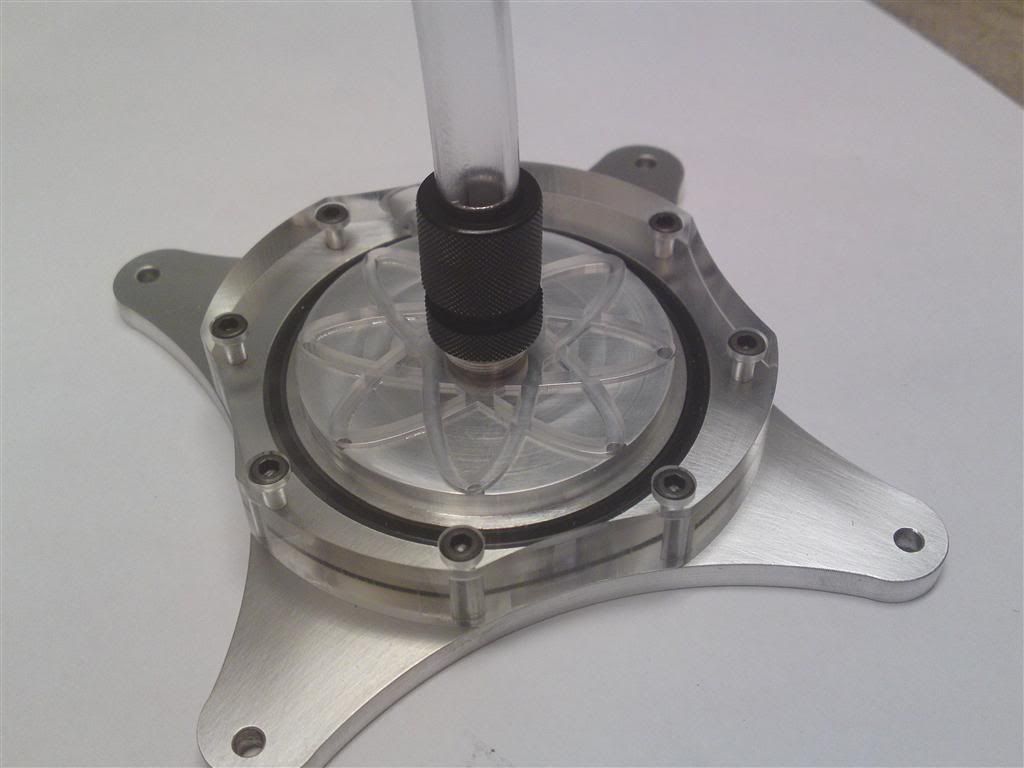
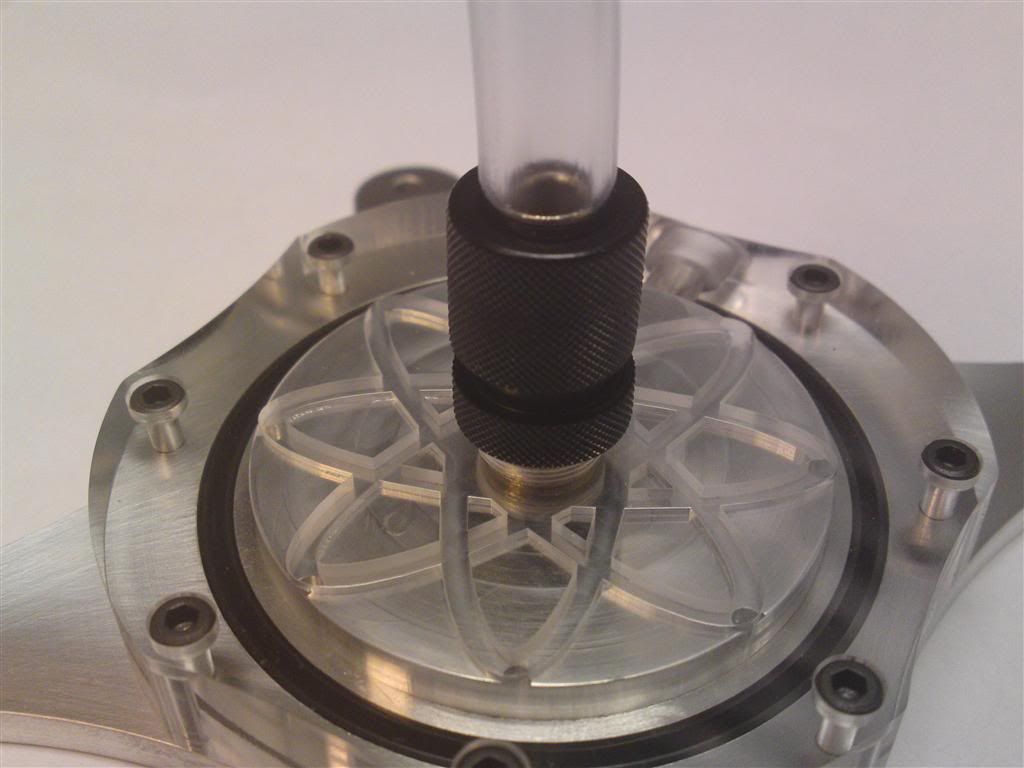
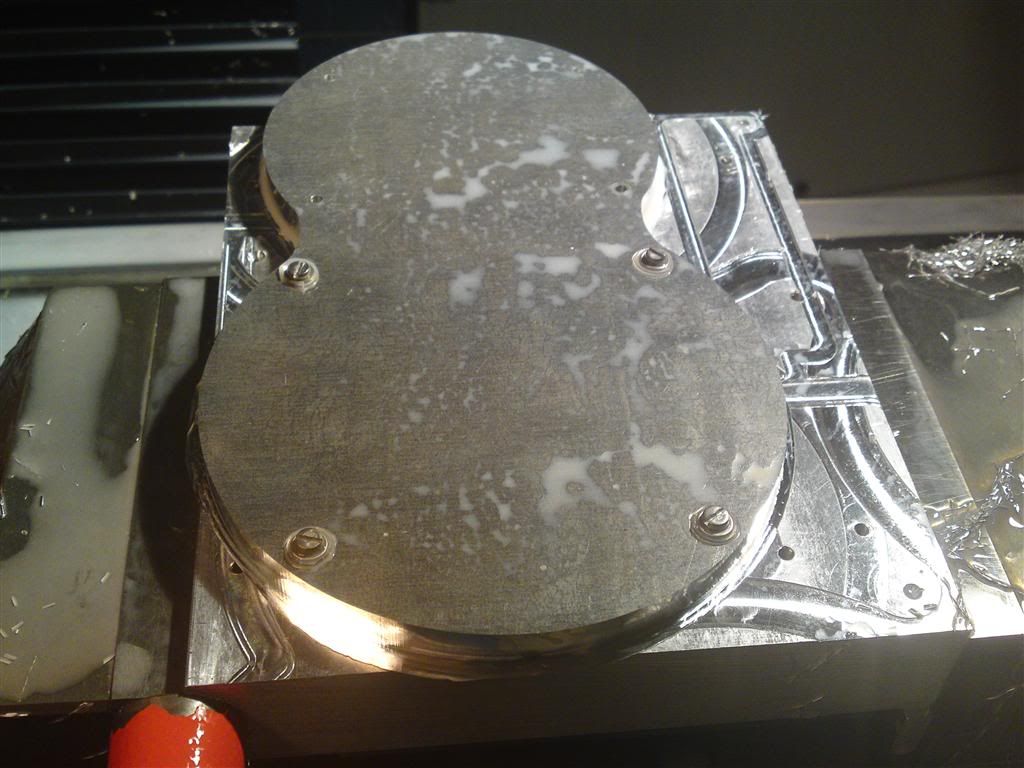
Well, time for another small update. This should bring you a bit closer to understanding the idea behind the CPU waterblock. And if not, I'll make an exploded view drawing with the next update that makes everything understandable!
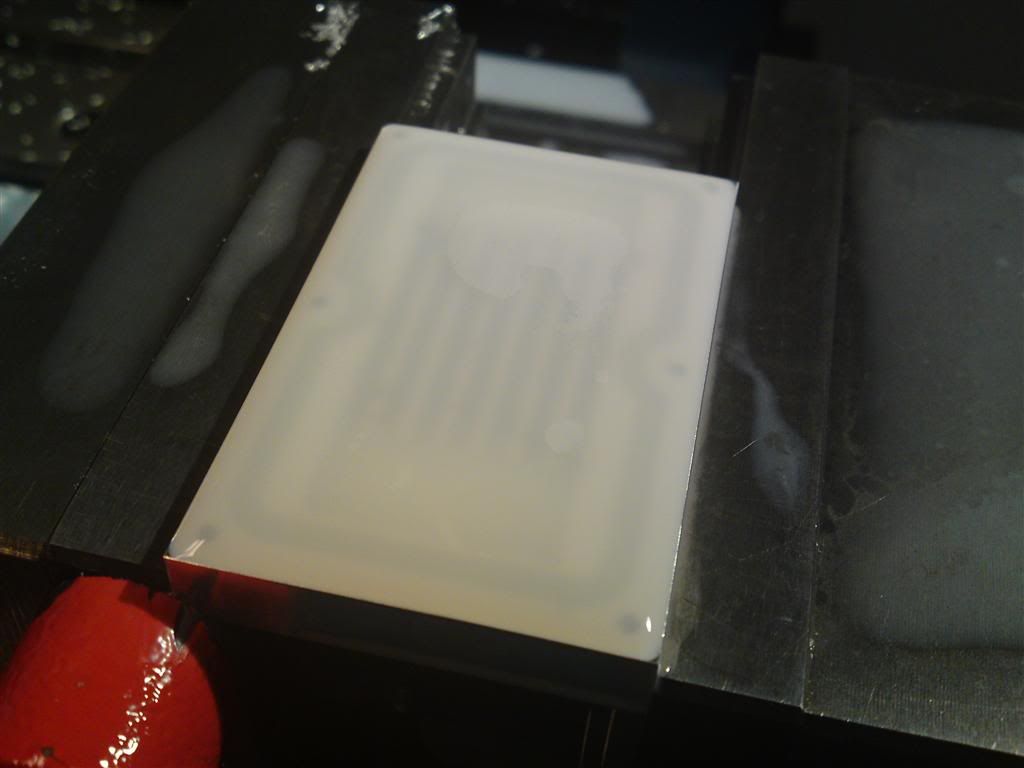
I milled the outside of the Acrylic top:
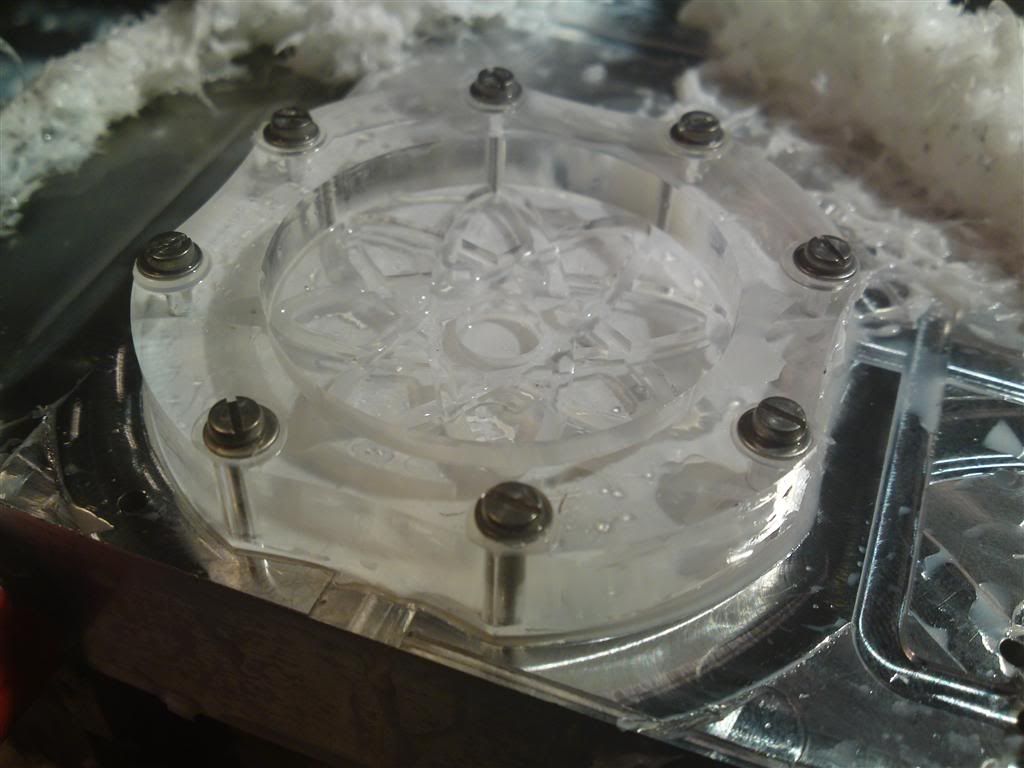
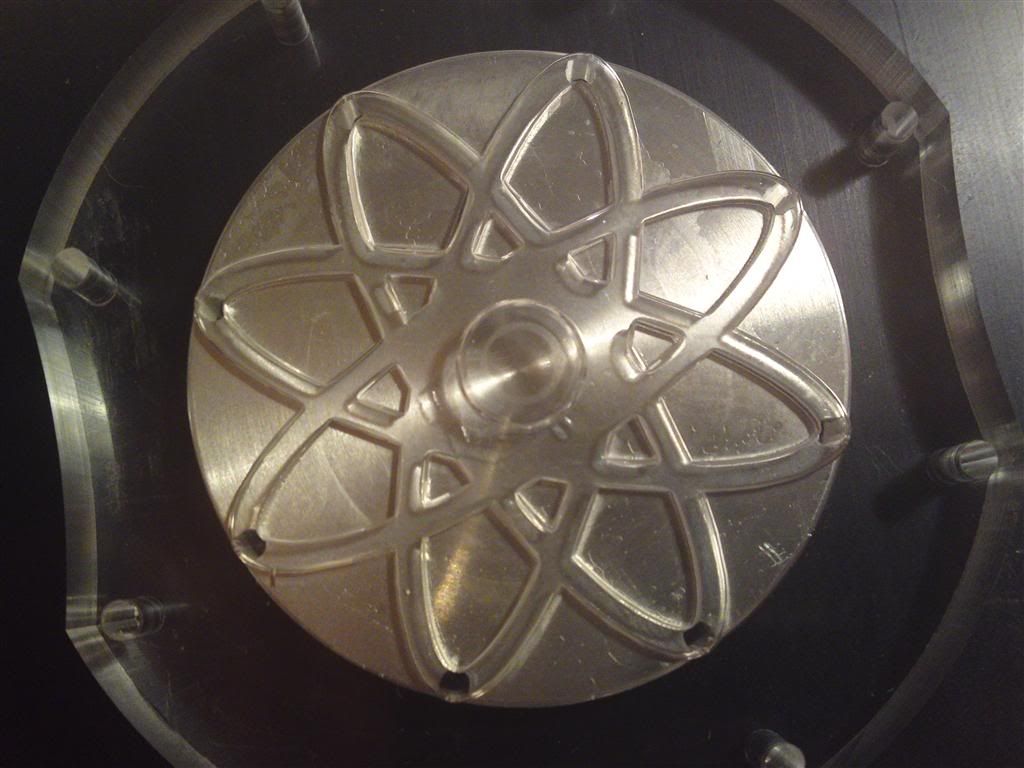
The top seen from... well the top. With the small aluminum insert. Imagine the fitting in the middle, and the water running through the "atom" to the holes in the aluminum plate:
Bottom view, same deal:
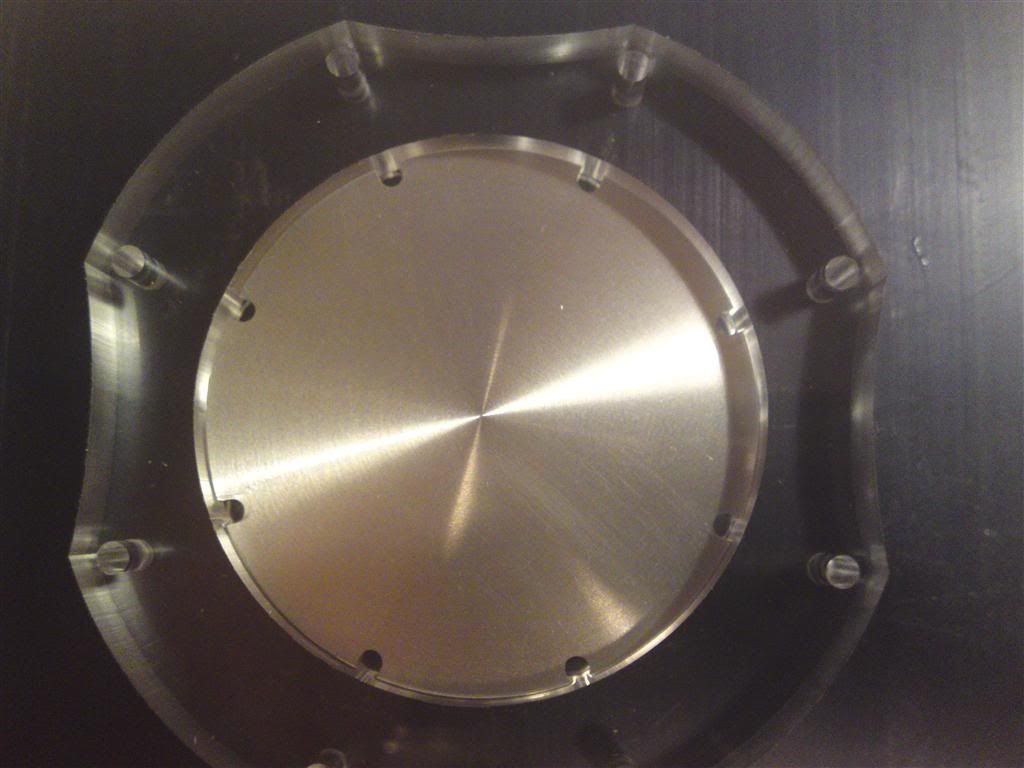
The block with acrylic top, no aluminum insert:
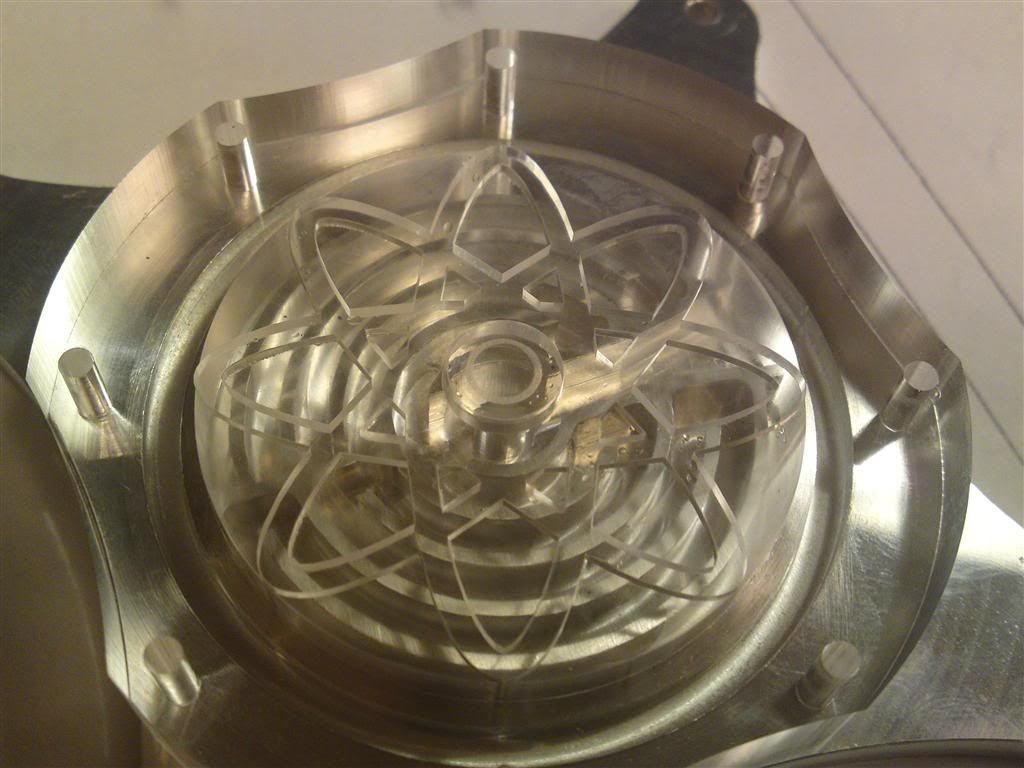
And with the insert:
I still need to drill a hole for the outlet fitting at the side. I might find time for it tomorrow, and if not, then next week. No modding planned the next couple of days. I got thursday and friday off. Since the GF and I are following the NFL, I decided to make a thanksgiving dinner with the works for Thanksgiving football. And I have a month of vacation to kill before may next year!
C ya soon guys and girls! :thumb:
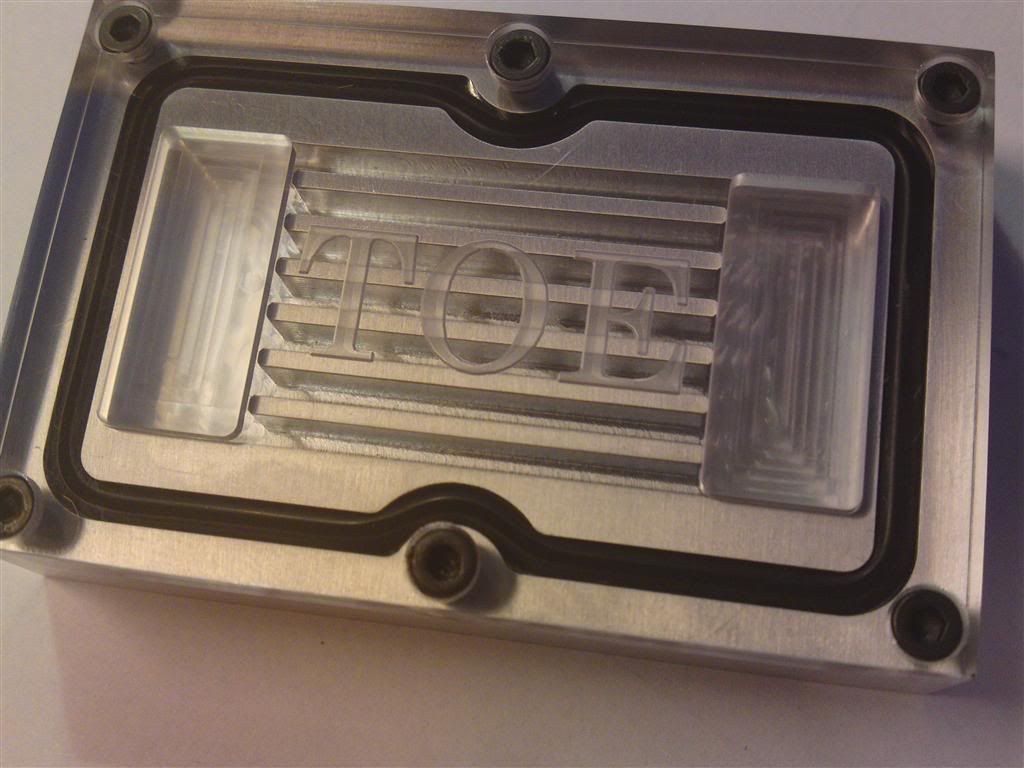
Well, since noone felt like commenting on my last update, here's another! But don't think it's gonna be like that everytime! :lol:
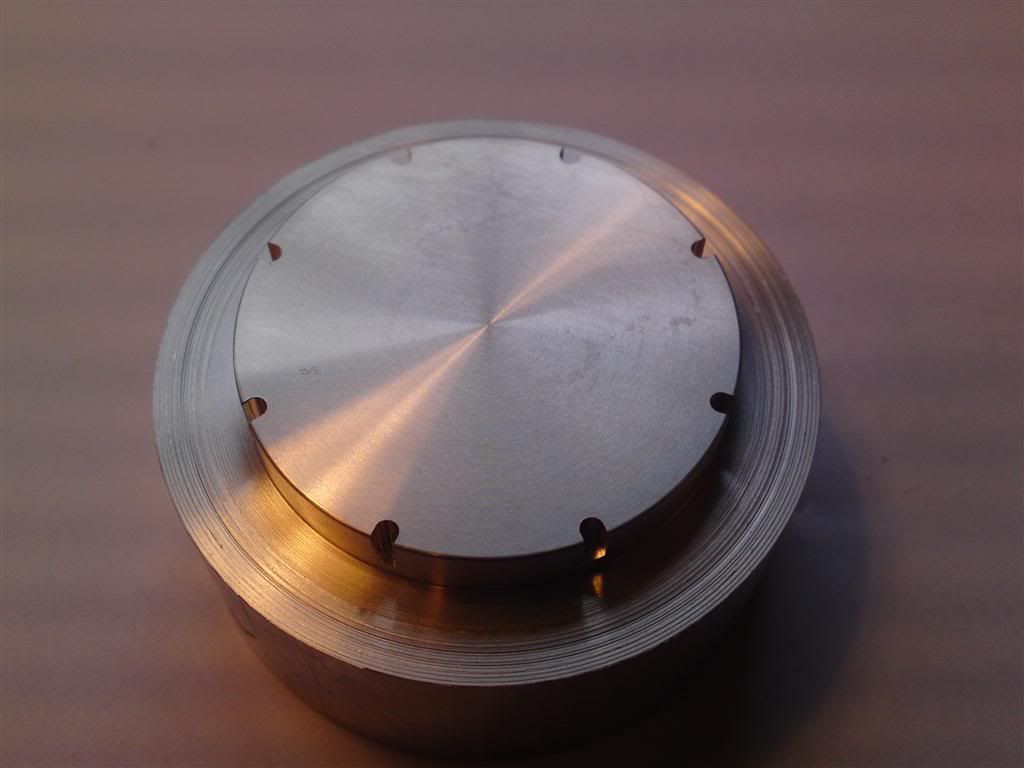
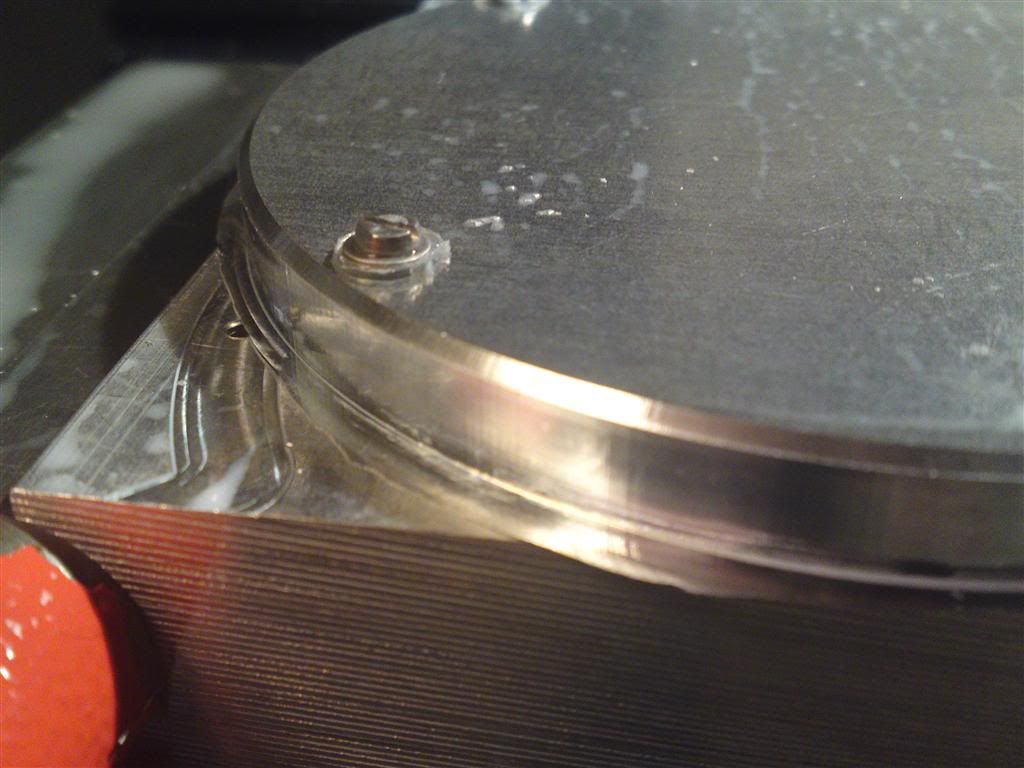
Drilled the hole for the outlet fitting. This is where you hope you made the right measurements in the CAD program!
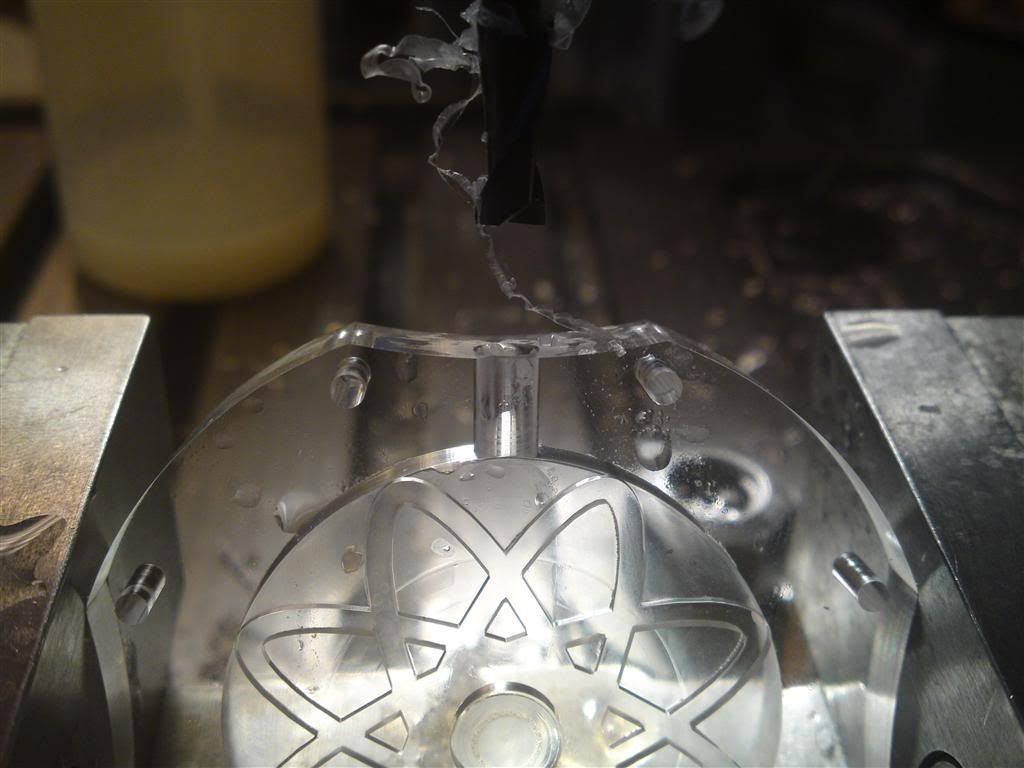
And it seems I did! :
Acrylic top, non-polished surface:
Polished surface:
Testfit on the aluminum block:
And with the aluminum insert:
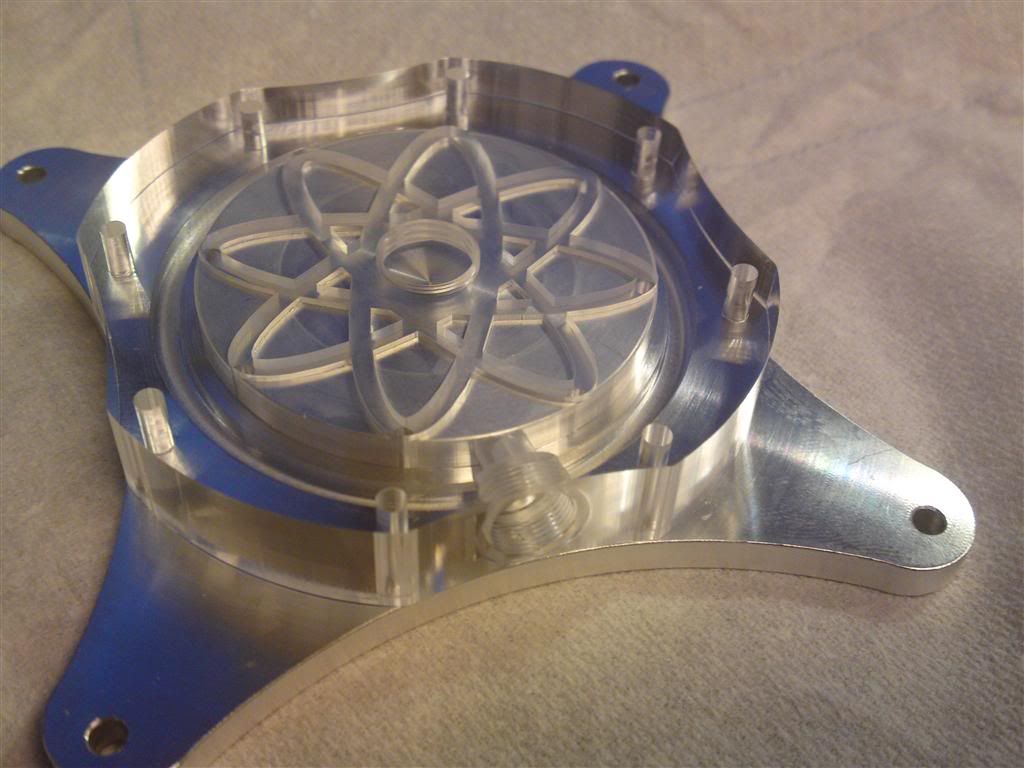
That's it for now. I just need to drill and countersink the acrylic top, and drill and make the threads in the aluminum block. Also I'm gonna polish the aluminum insert.
When I get around to buying some fittings, I also need to re-thread some of them. But that's just a bit of finishing up!
Next up should be the NB waterblock, and a SB passive piece.
C ya next week amigos! :thumb:
The_Gnu ha scritto:
Yet again amaxing work from the master of waterblocks.The_Gnu ha scritto:
I like how you incorporate the fucntion of the waterblock with the design aswell. Wery genius
+rep for you mate:thumb:
Well, they actually called me "Custom watercooling guru" on the bit-tech MOTM page, but I'll live with you calling me master of waterblocks! :lol:
Joke aside, thanks a lot man! Flattering words from people whom I consider some of the best at modding on this page, is truly an honor! :thumb:
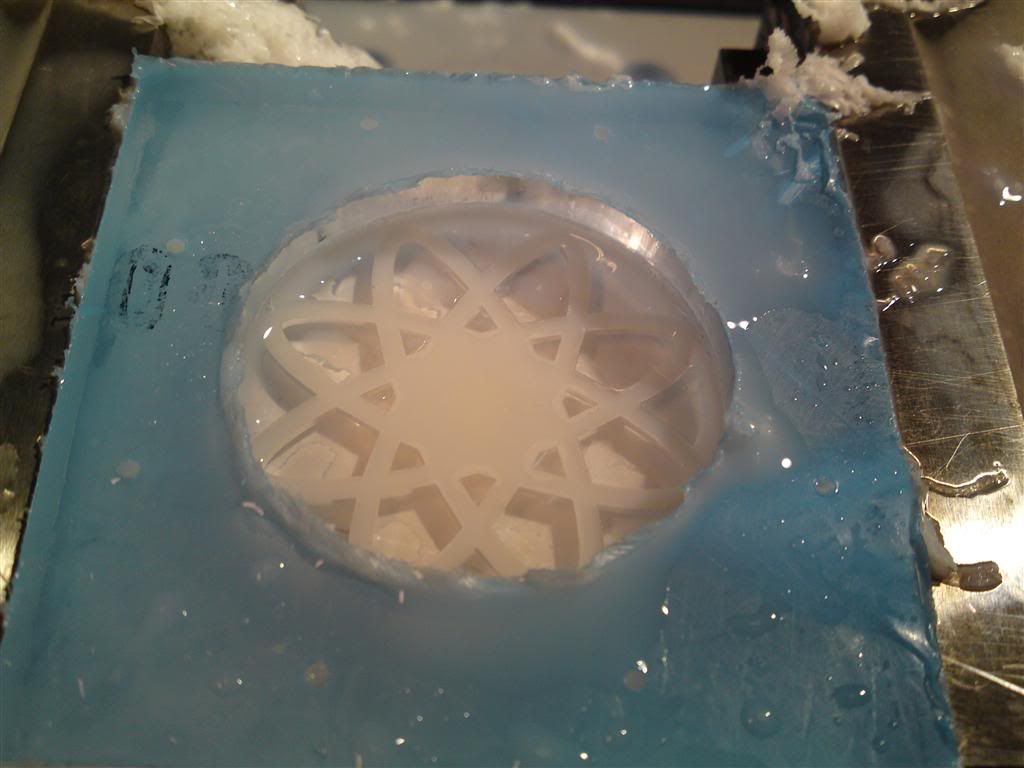
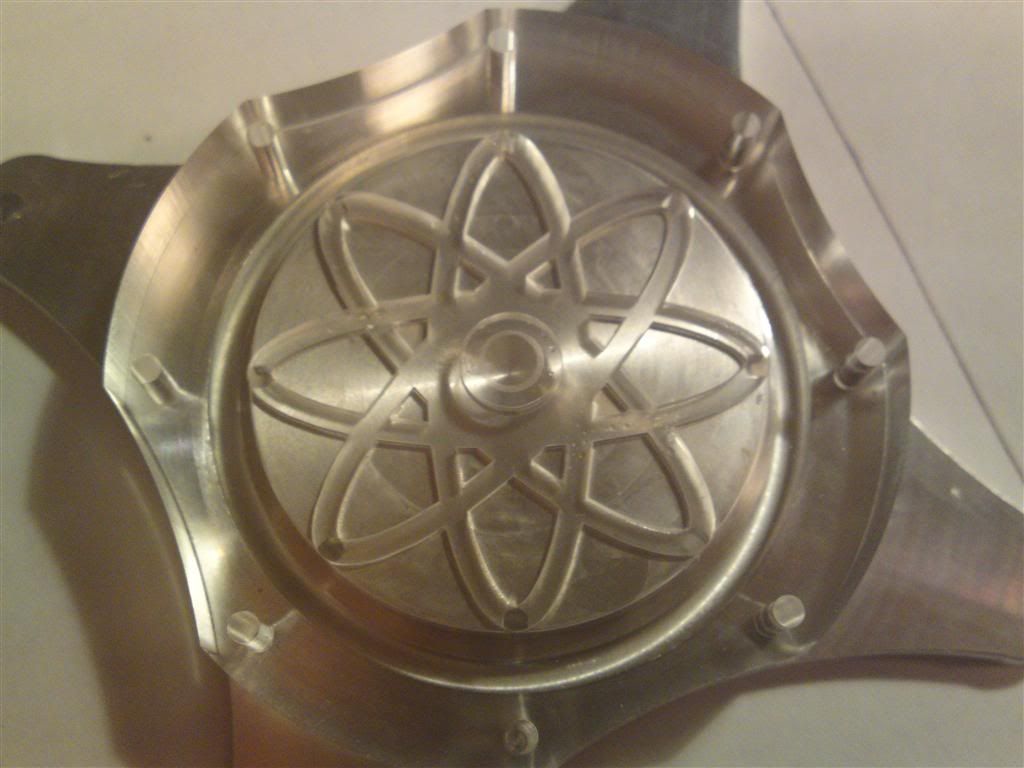
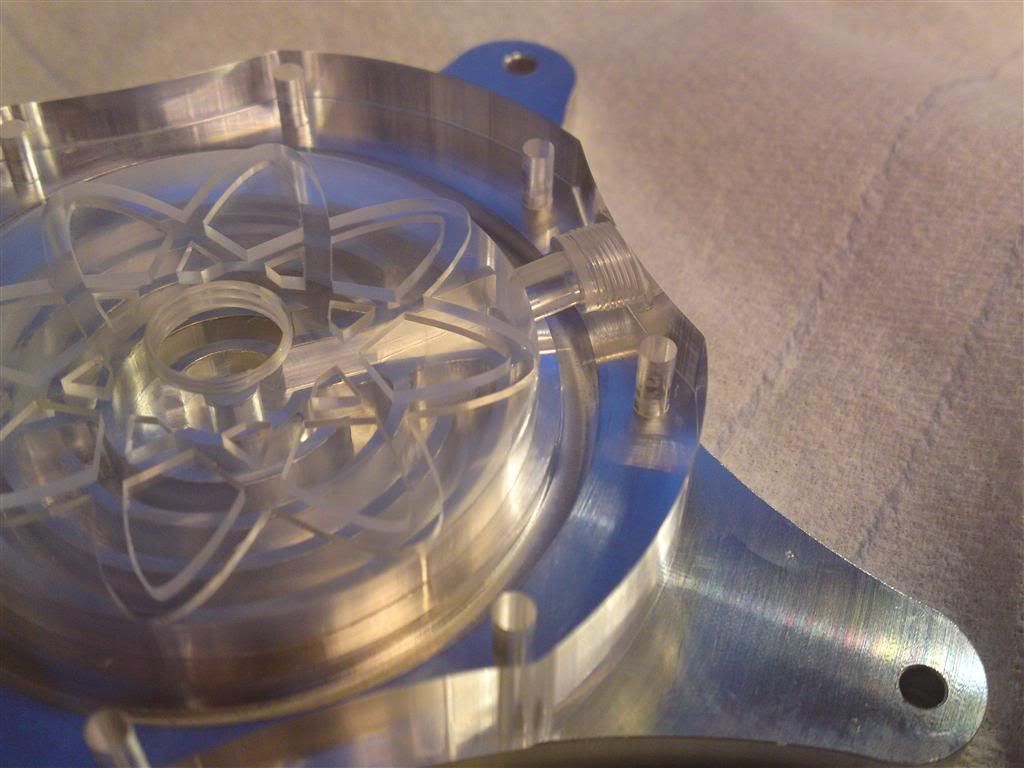
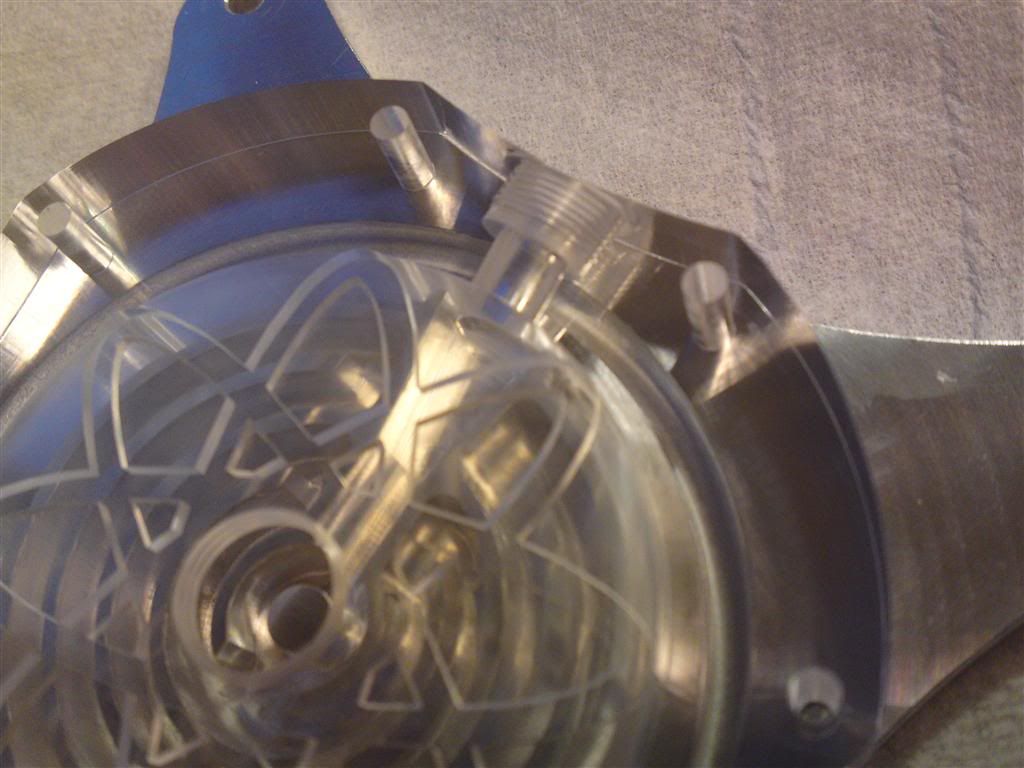
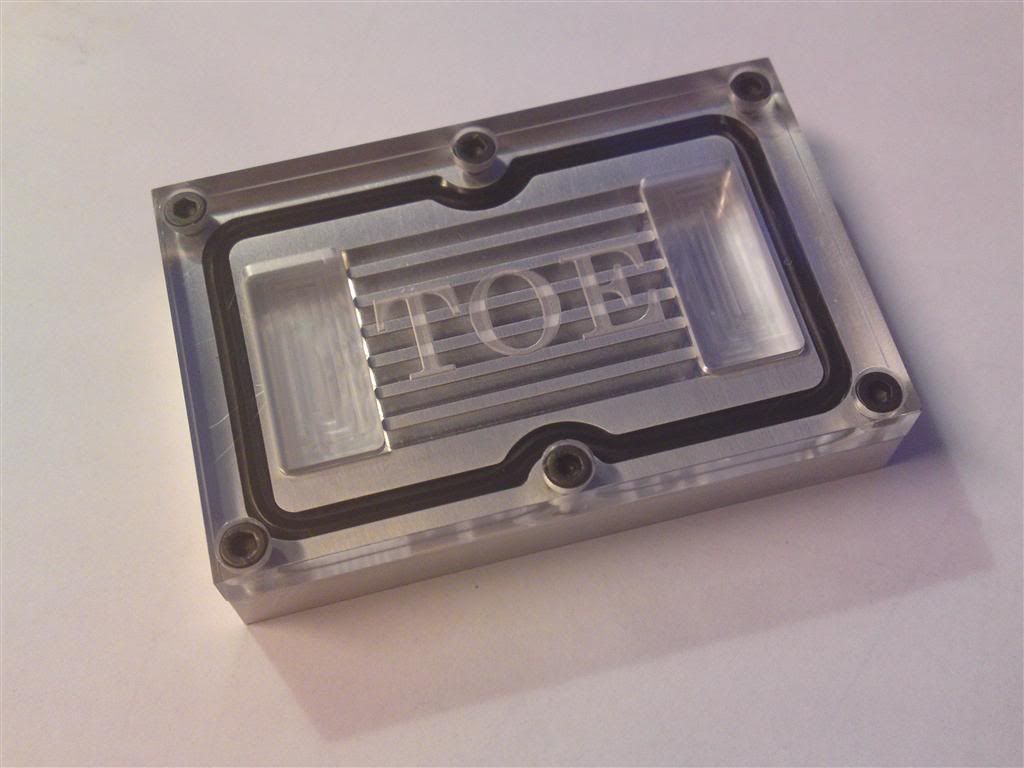
But on a modding note, I promised Jrs77 a couple of screendumps of the flowcharts for the CPU block. As I completely agree with him that having several inlets are ususally a bad idea, I just wanted to show how this will look. And this is easily done by showing the flow charts.
This is just an indication of how it will be, there will of course be water in the whole thing.
Seen from the top, with the aluminum insert:
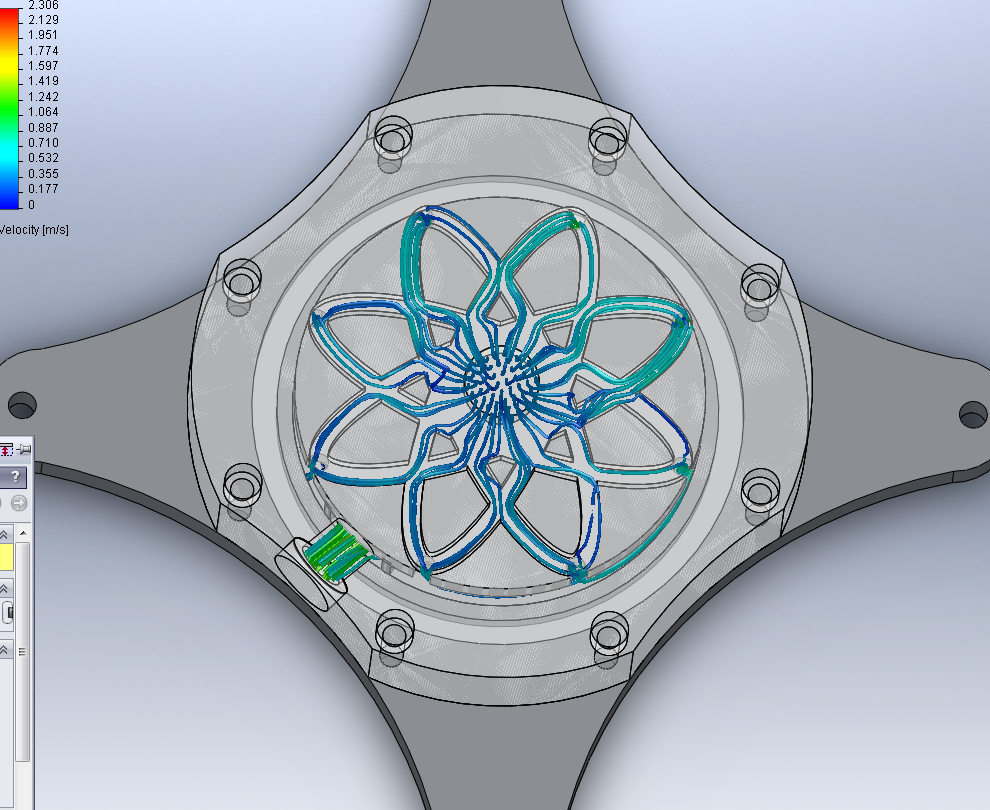
From the side, looking at the back of the block:
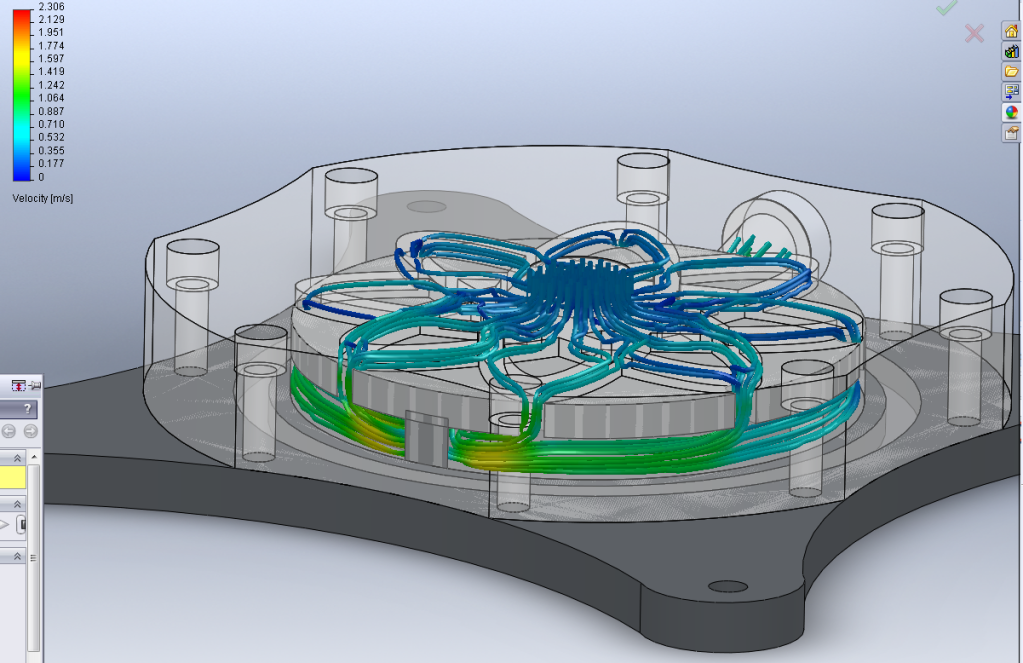
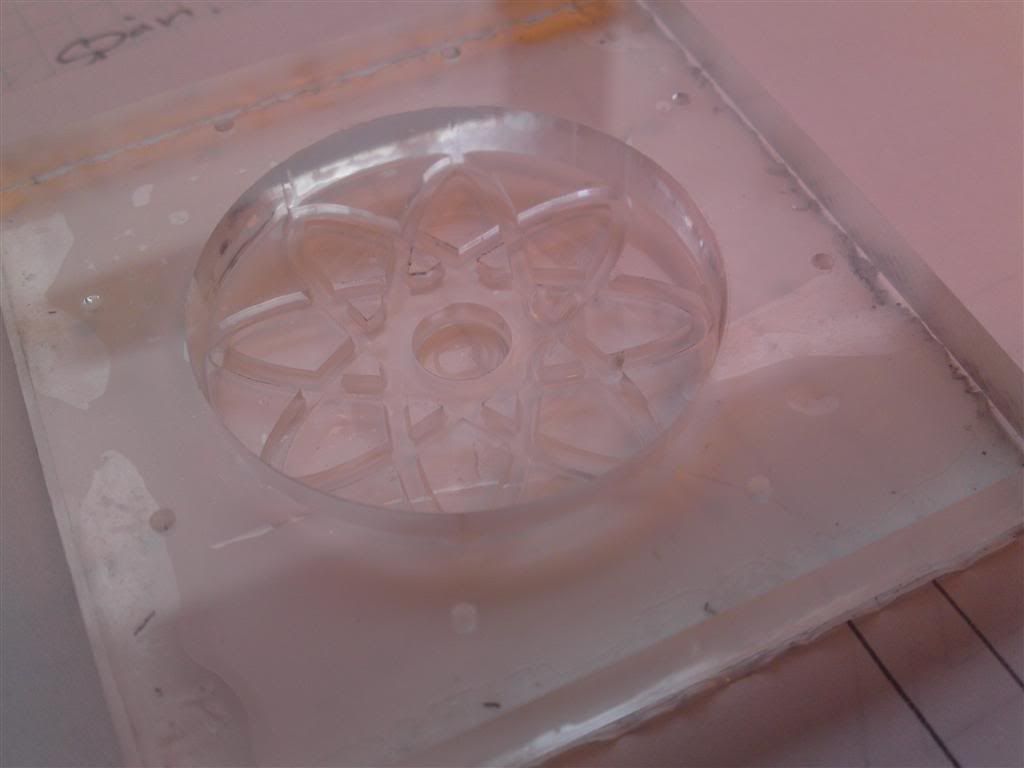
And from the top, where I've changed the material of the insert from aluminum to PC. Just to show how it will look IRL.
Here you see that the water will flow on the outer ring, and come together at the back. From there, it will all go through the same path, which should result in no "hot spots" (I hope)
That's it for now. I'll try to get further on during the week, but with so many ideas it's hard to choose what to start with!
Sooo... I had a couple of hours of spare time today which led to the making of the NB block.
I forgot to send the design of the passive SB block to work, so I'll get that done another day!
But, on with the photo's!
That second you have the first glanse through the cooling fluid:
A second of Compressed air later:
As usual I need to take a small needle file and take the edges off.
The top part of the block:
Oh nooooo, it's mirrored! :lol:
Well, looking kinda like I hoped!
Top and bottom:
O-ring added, and assembled:
The clever reader may have noticed the lack of threaded holes for fittings! I'm still not sure what way to go with the fittings for now, but I'm thinking hard about it!
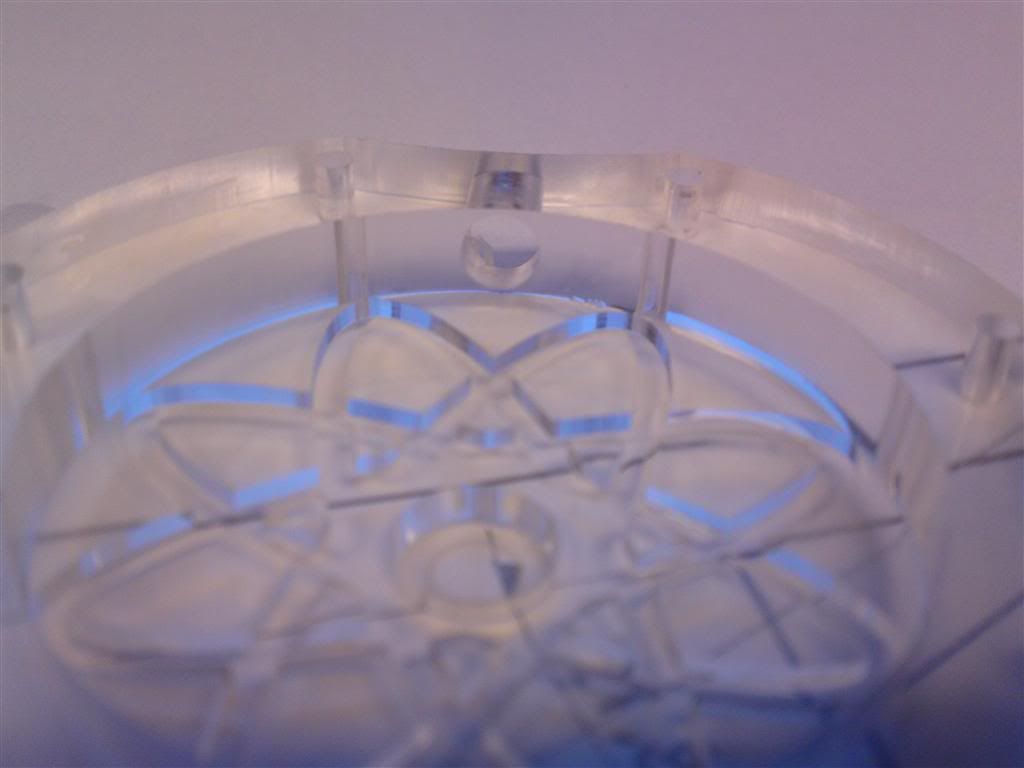
One more:
And the last one. I love how the light breaks and creates the optical illusion:
That's it for now. I'll see how far I get this week. I should get started on the reservoir soon, and if I'm lucky it might actually work the way I'm thinking of!
-
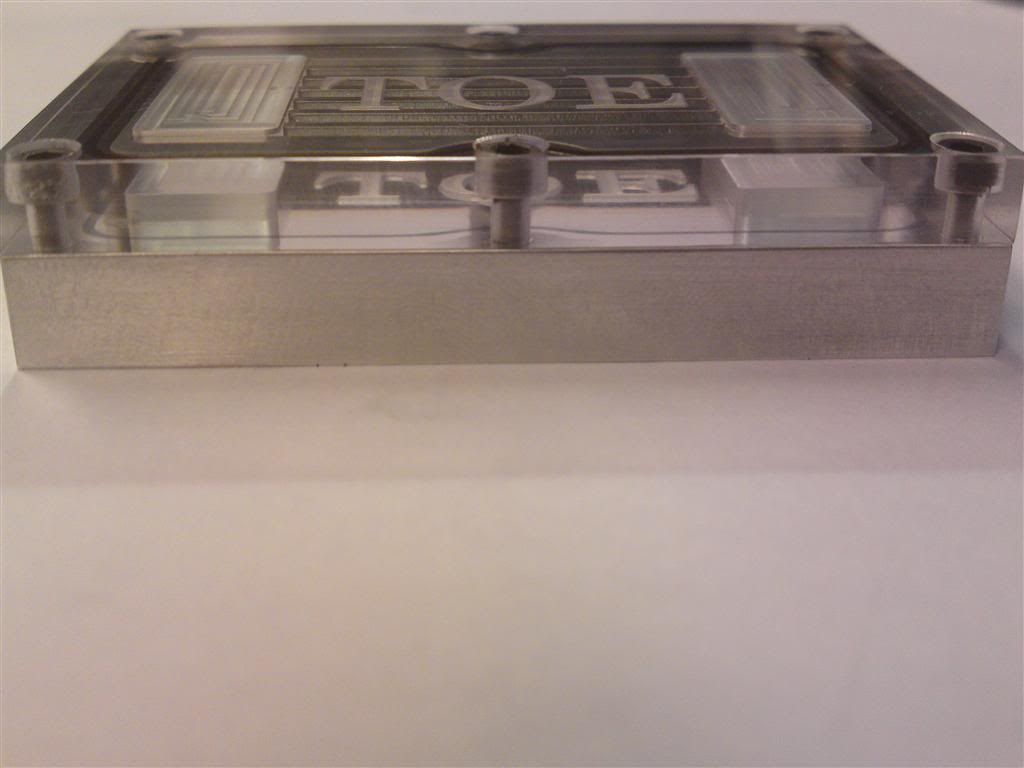
I made a new block today, and hate it love it; it stays!
(but I do hope you like it though!)Pics of the new top!
But... Since you critizised me, I'm gonna make you watch pictures of the finished CPU block!
Ahh... Revenge! :lol:
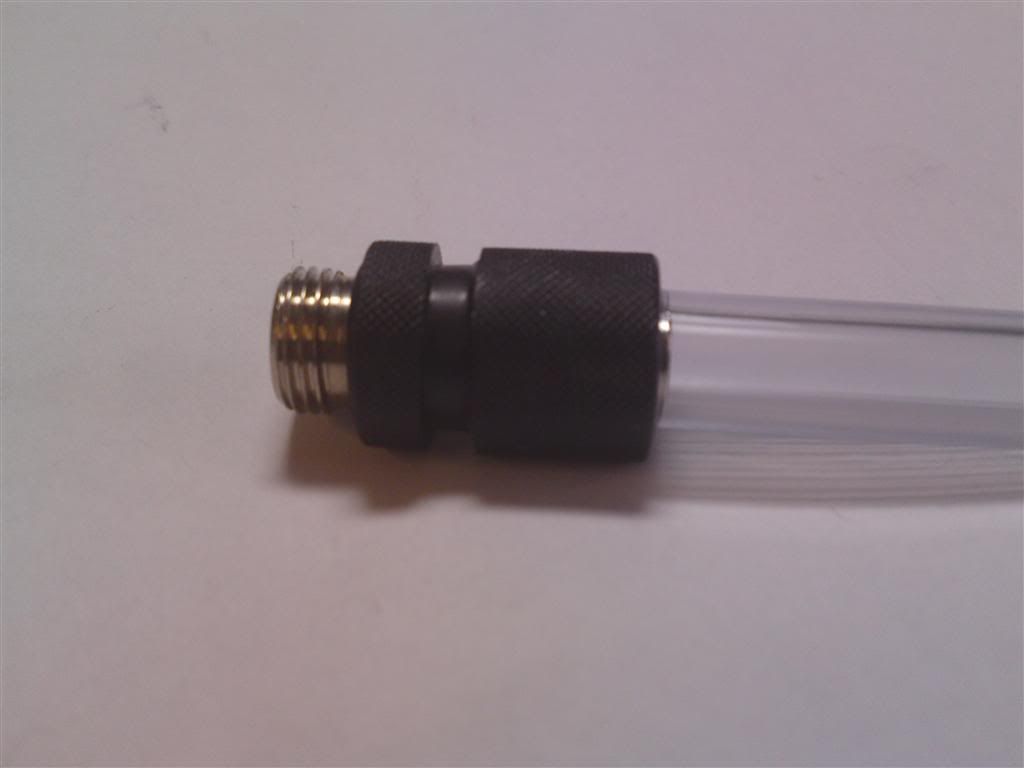
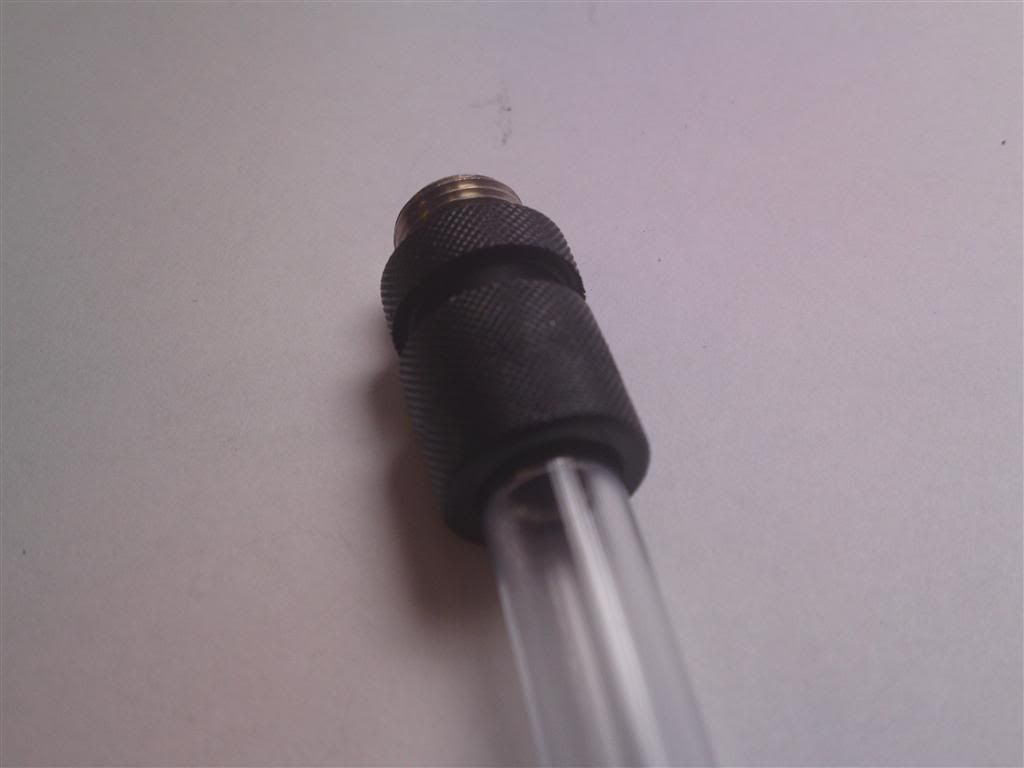
I've been fiddling with the thought of the fittings for a while.
In all honesty I am aware that the standard fittings I use aren't the prettiest ones. But they cost around 1/7 of the bitspower fittings!
I was looking around for some stanless tube to cover them up, but that's gonna be expensive as well. I was thinking about making the from scratch, but again it's a good amount of money to start them up. I could probably sell some, but I want my own stuff!
So I went with the easy and quick sollution.
This is the standard boring one:
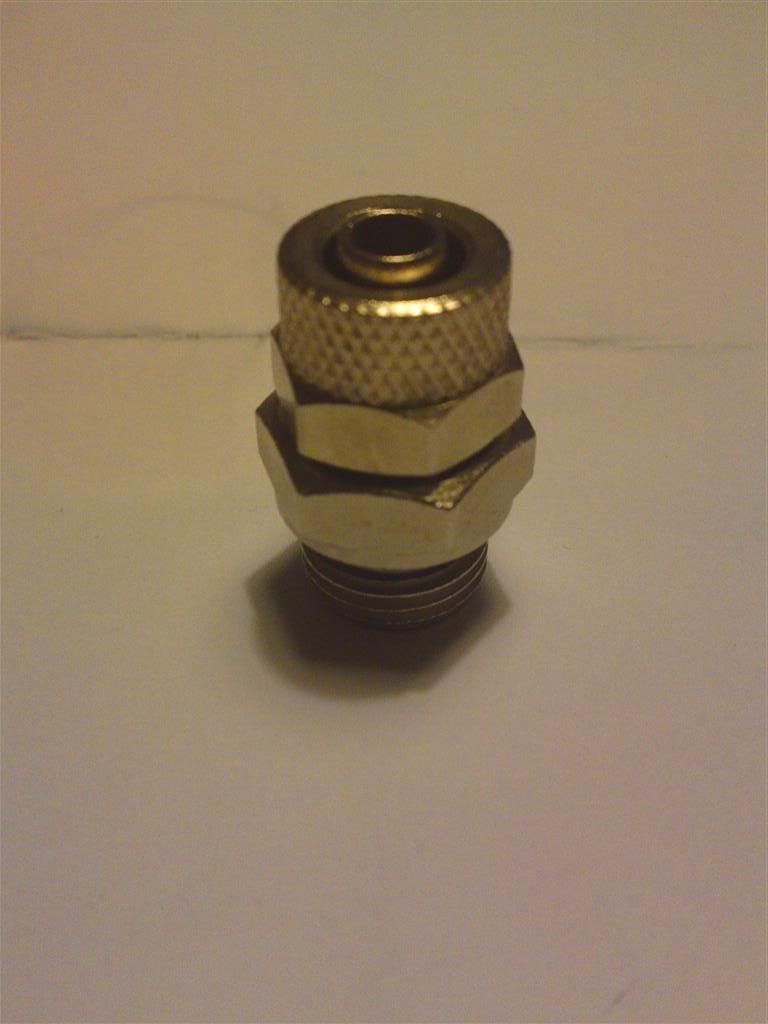
So... I threw it in the lathe and turned just enough off it so it was round all the way. Then I used the tool that gives the surface that "non slip" surface. (Dunno what it's called in english!
)Gonna have to make a tool to set them up on when I turn the whole lot after I order them, but you get the idea.
Then I painted it black, and voila!
The color can be whatever, depending on what I want.
IF I was to make the from scratch, I would have made them bulgier, but I think the result is quite good!
Hope you like it!
That's it for now, catch you on the flipside!
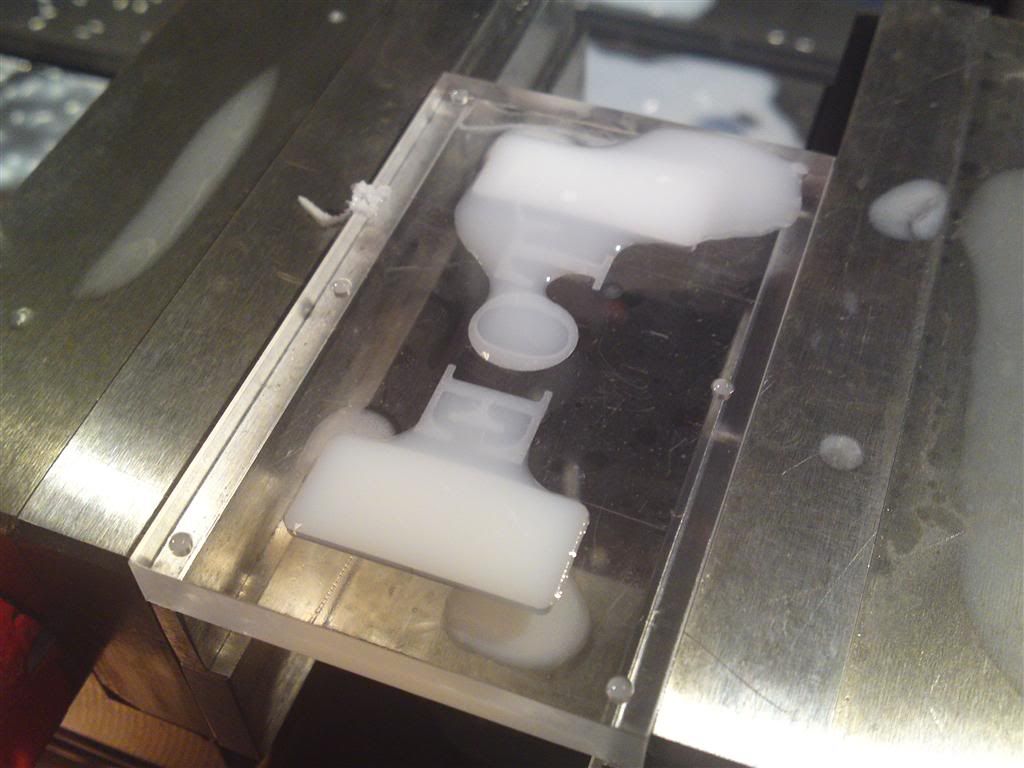
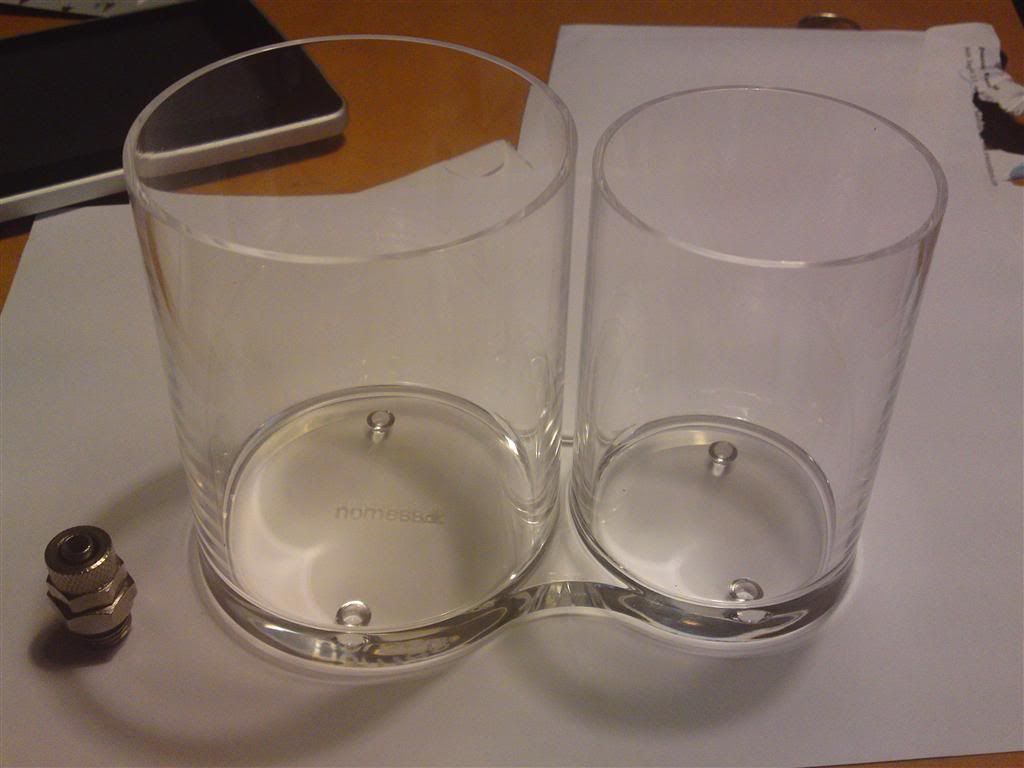
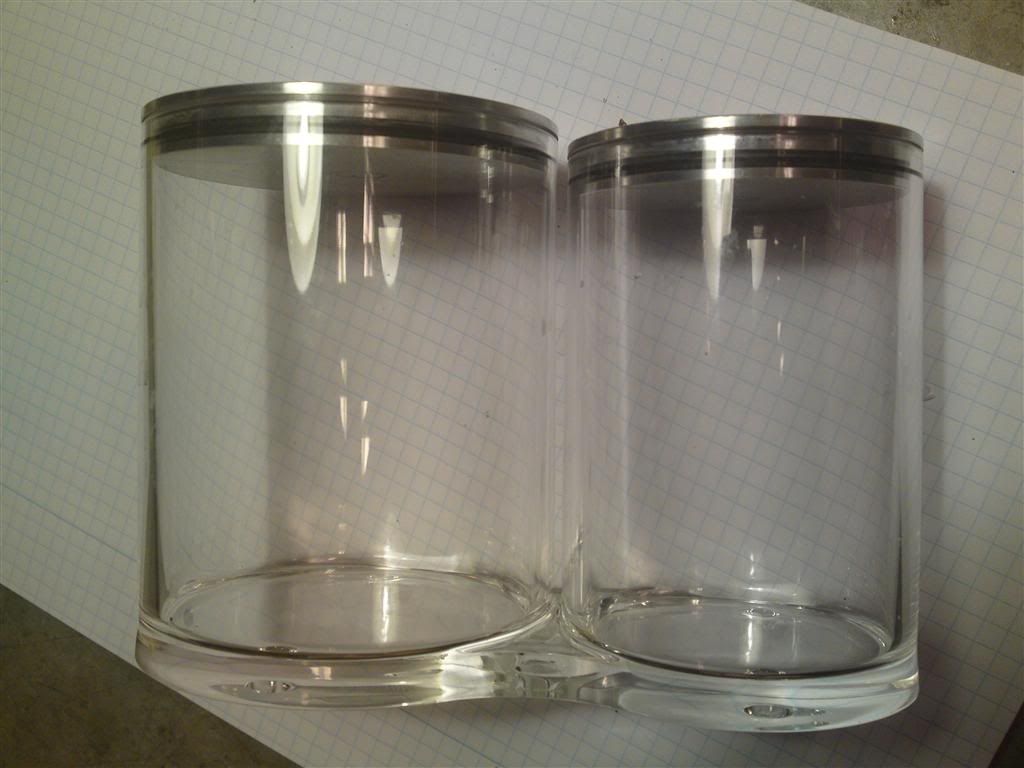
A very small update. Still waiting for the case, but there's a bunch of stuff to do.
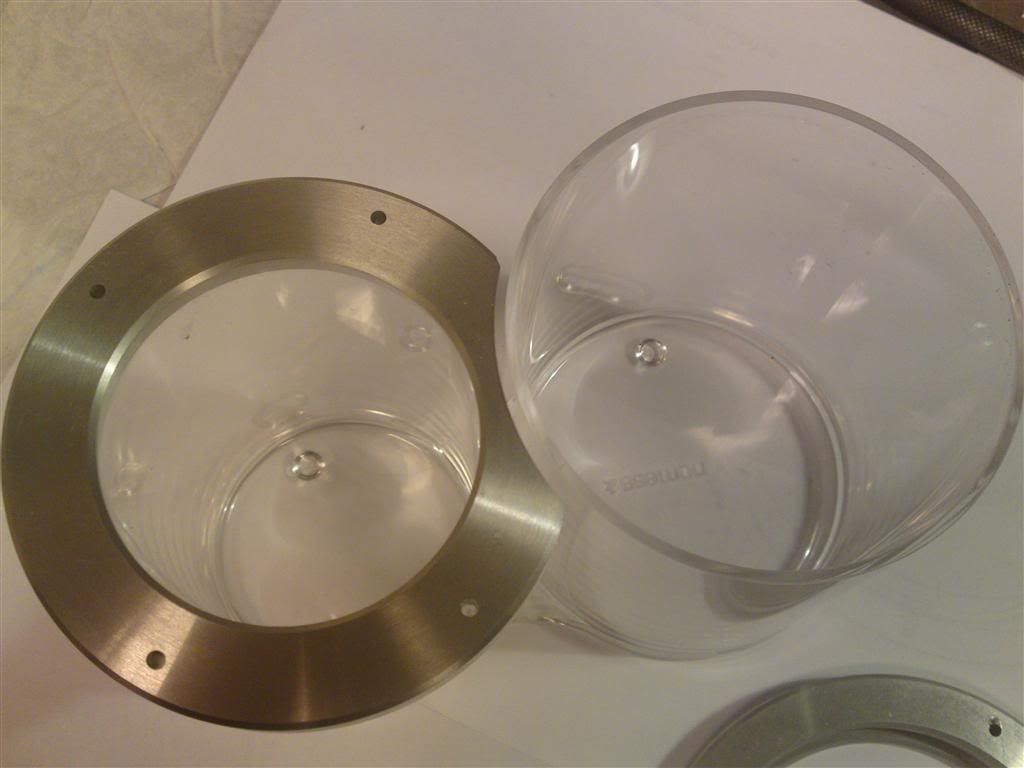
Today I was out shopping for some stuff for work, and my eyes caught a thingy sitting on a table at the shop. Which is why I don't upload my idea for design before I fabricate them. Because I COULD have made the reservoir from scratch like I designed it, which would be a huge amount of work. But this acrylic piece of beauty just kept whipering that I should buy it! And since I'm not one to argue with stuff that talks to me, I bought it!
So here's the res I will be using. It will of course be modified a bit (maybe a lot, I just drew it up is SW, and are looking at my options)
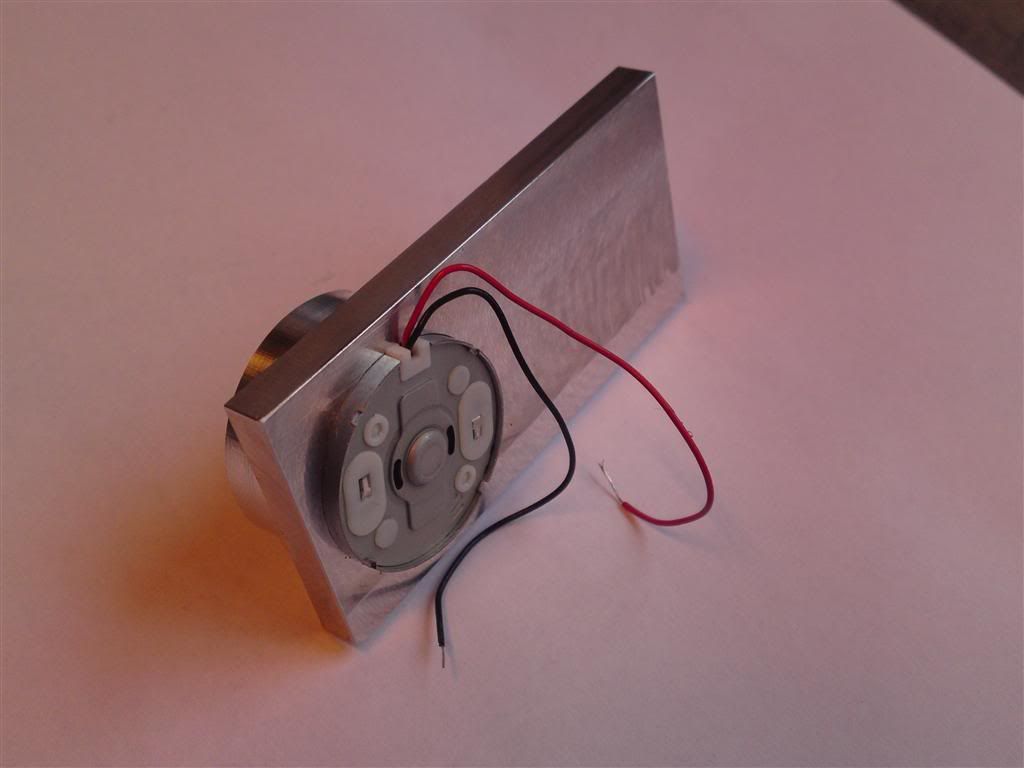
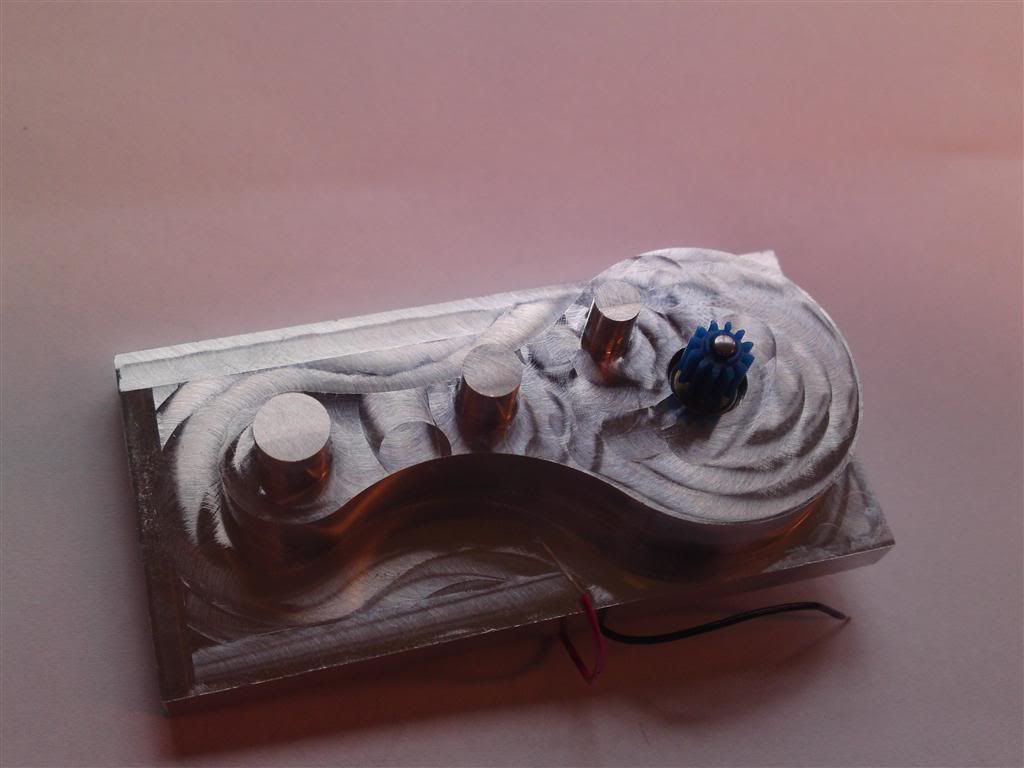
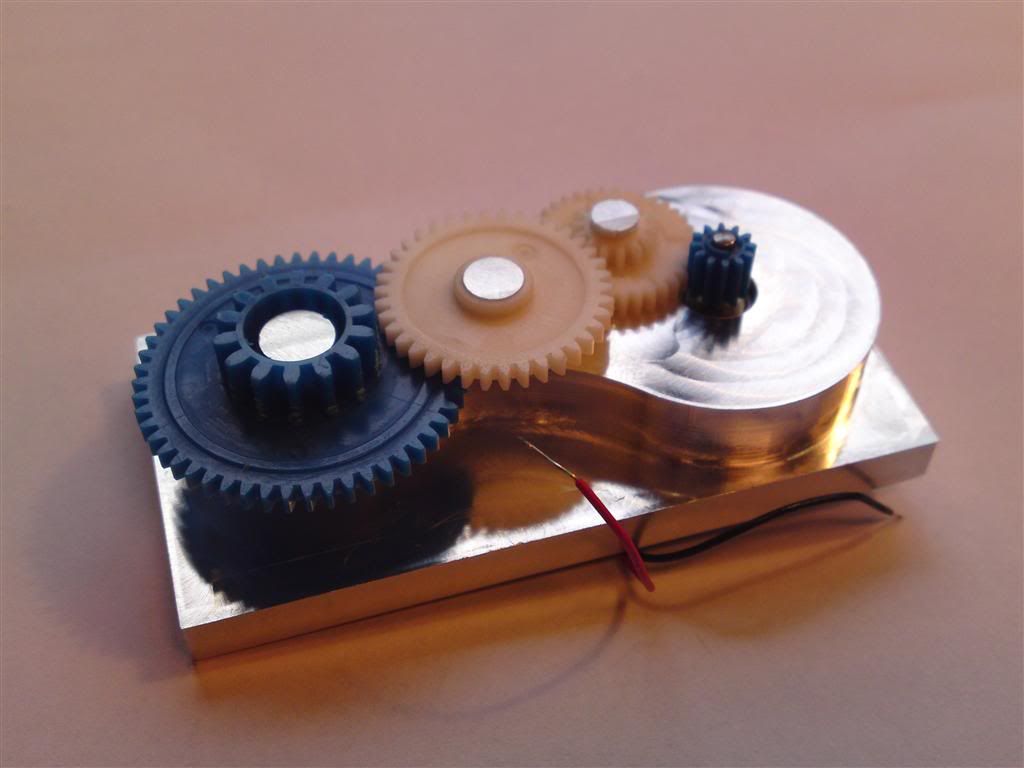
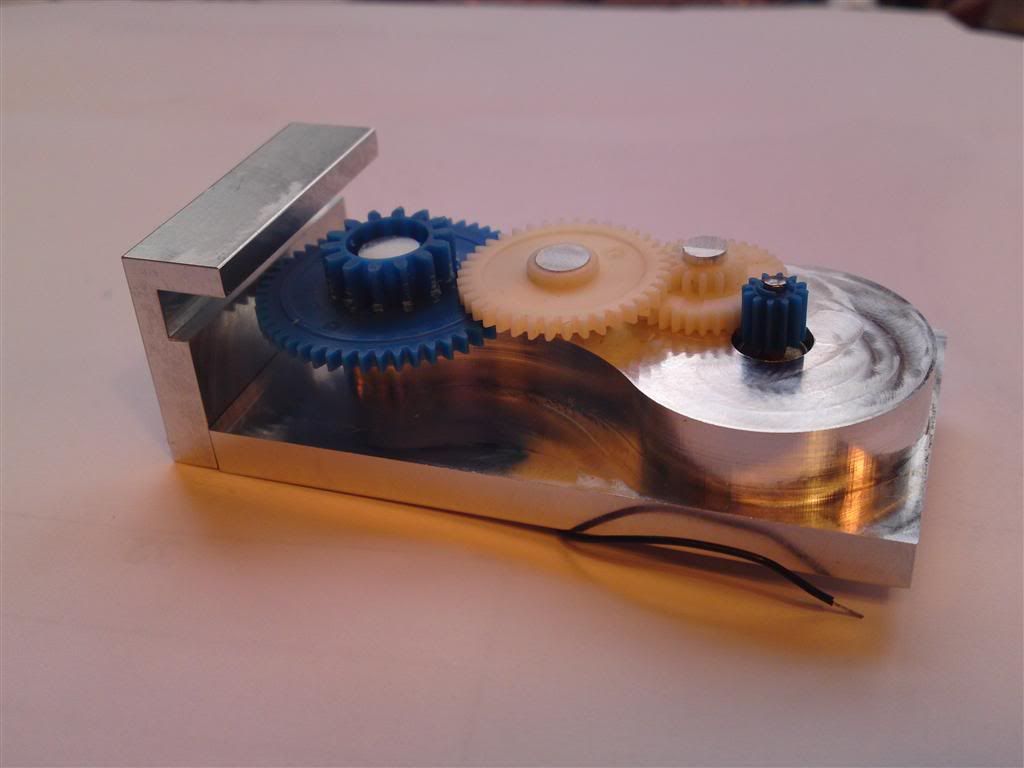
I also finished the motor/gearbox part. I'm not really sure wether it has enough power to do it's deed, but time will tell. If not, I'll crawl in some old boxes and find a bigger motor!
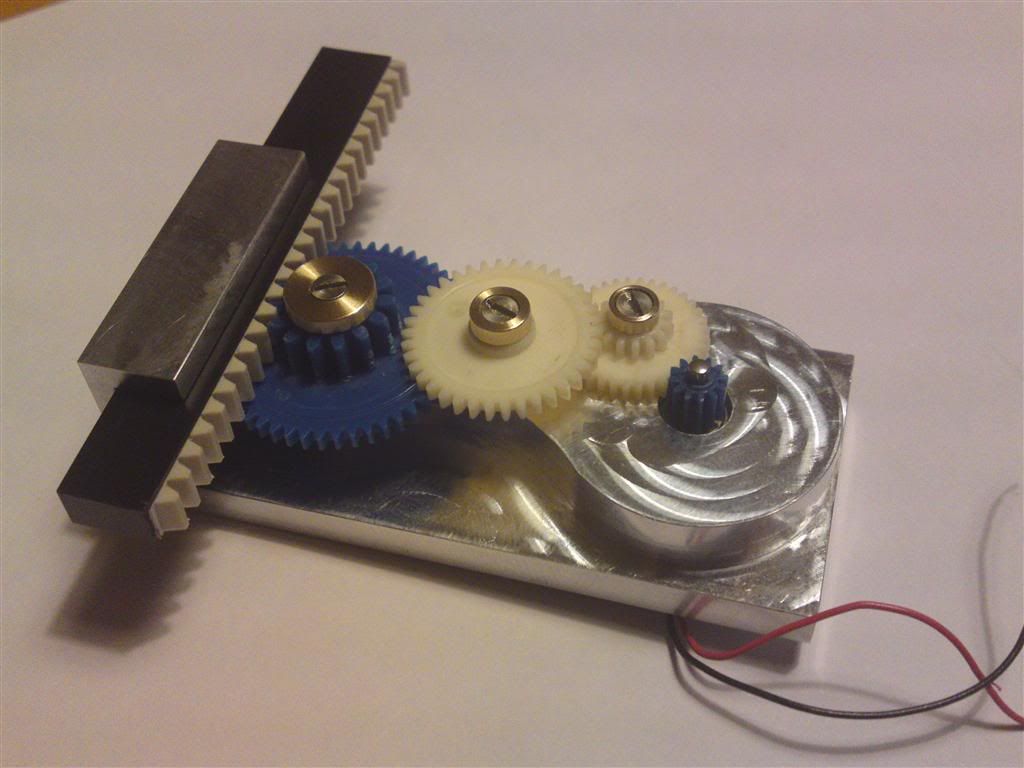
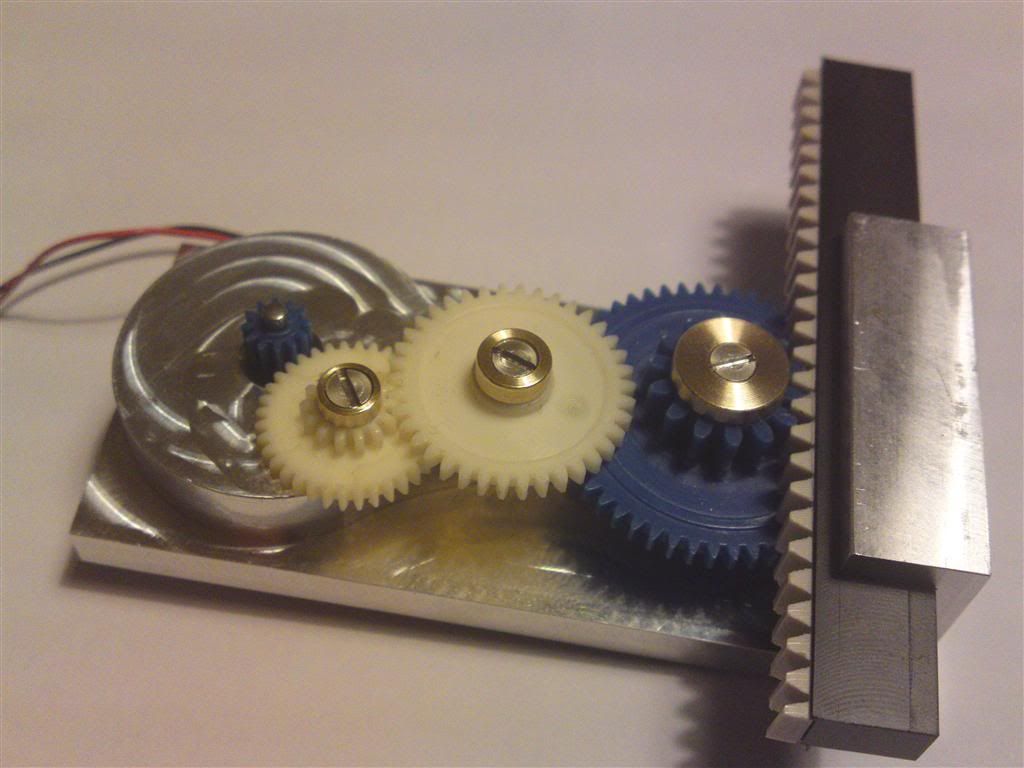
As you might have guessed, I'm knee-deep in designing at the moment, so updates will be a bit far apart. But I will get there!
Gotta love ebay!
I saw some SMD LED's at work that you could cut every 5 cm, and decided to have a closer look at them too check out the price.
Disregard the price here in Denmark. I had a look on ebay, and put in a couple of bids. Later that day I had bought 300 led's on a 15 foot roll for a meer $11 with shipping. $1 was actually paypal asking to give to a good cause.

I also got started on the aluminum tops for the new res. I was going to make them with an O-ring as usual, but I kinda put the first one in, and it was stuck... A truly perfect fit! Insted of trying to use the claw in the lathe to take it out, I put the thing under hot water and it popped out. So I made the other one the same way! Gonna do a video for you guys during the next week, cus it looks funny as hell! :lol:
Sorry for the small update, but I just wanted to let you know I'm still on the job!
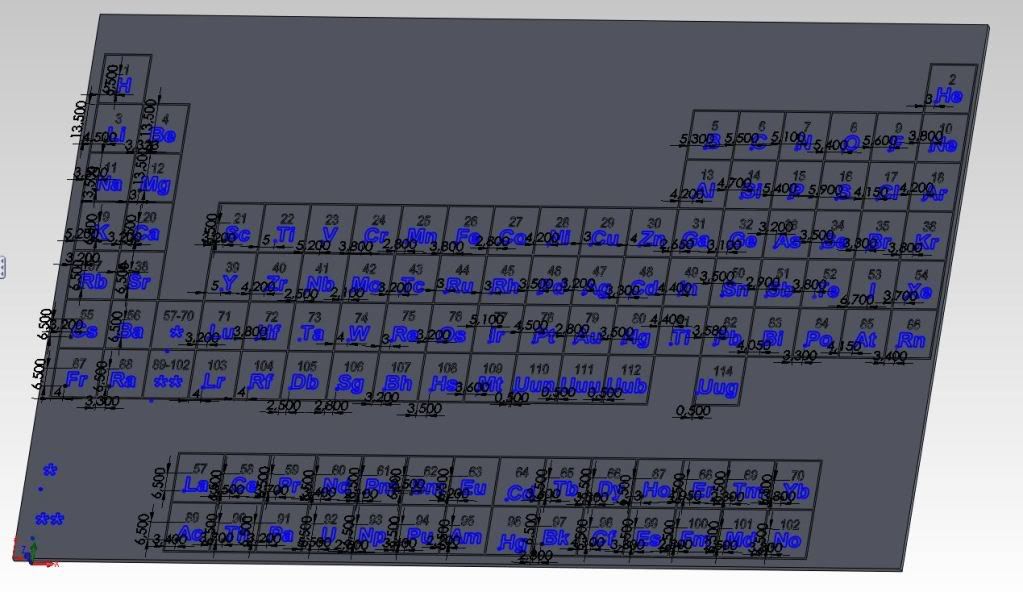
I decided to make sure that the bottom part of the case felt the love as well... So I traced out the peridic table for the mill to dwell on... I have no idea how long it's going to take to make it, but I think it fits with the theme so I made it.
It has taken me a beeeeeb amount of hours, so I hope you like it!
And since I have no idea if I'm ever going to receive the case, I really really hope you like it!
I know it looks boring, but this is it:
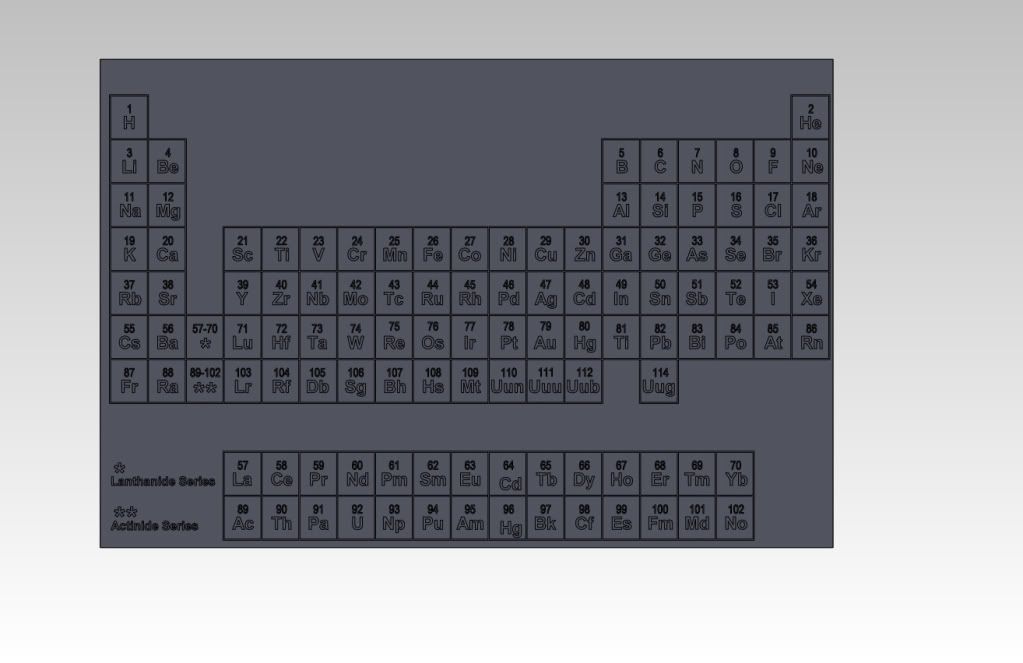
Made from this:
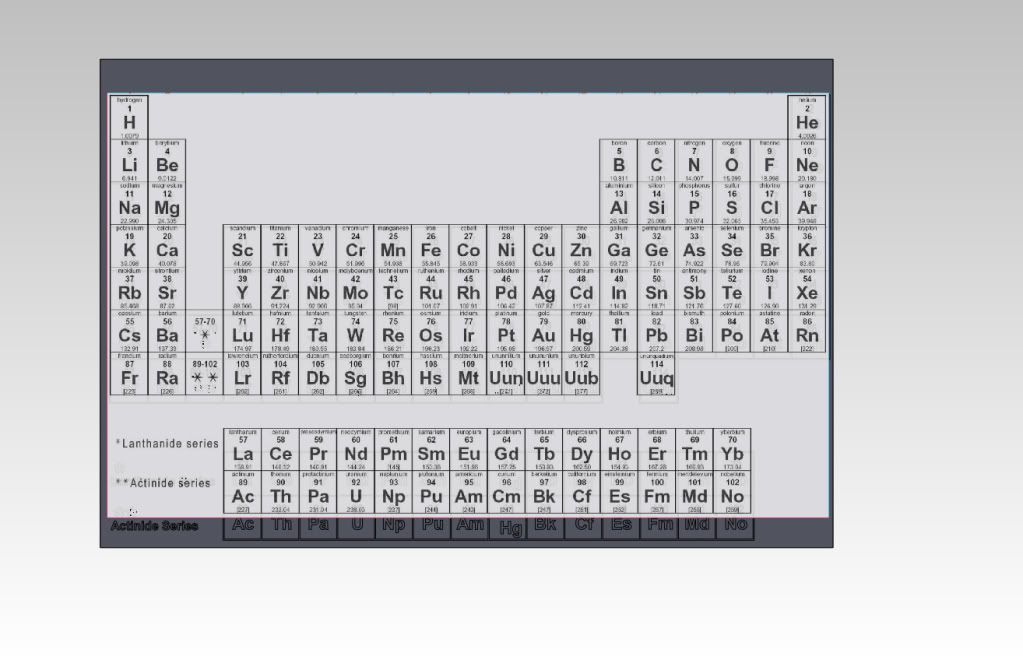
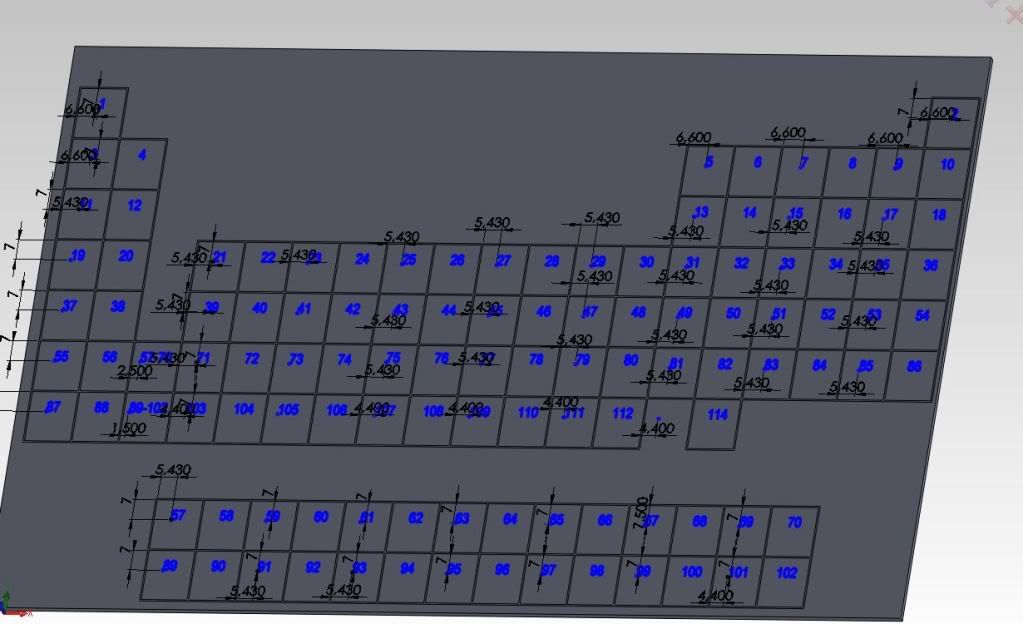
Can't wait to receive the case so I can get on with it!

-
Again, a very small update!
Just to let you know I think of you, and that I put in O-rings on the res.
That's it!
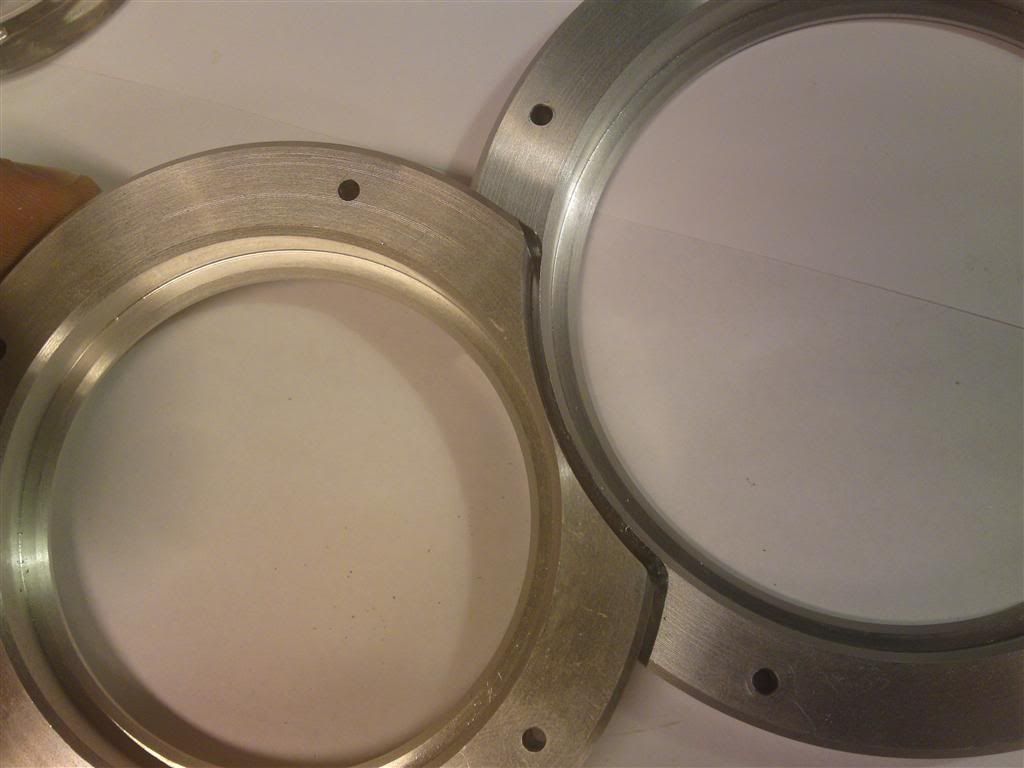
After getting a couple of O-rings in the res, I need to make a top and a bottom for it, so it doesn't pop out when temperature rises.
So I got started on the top parts:
Done with the lathe part of it:

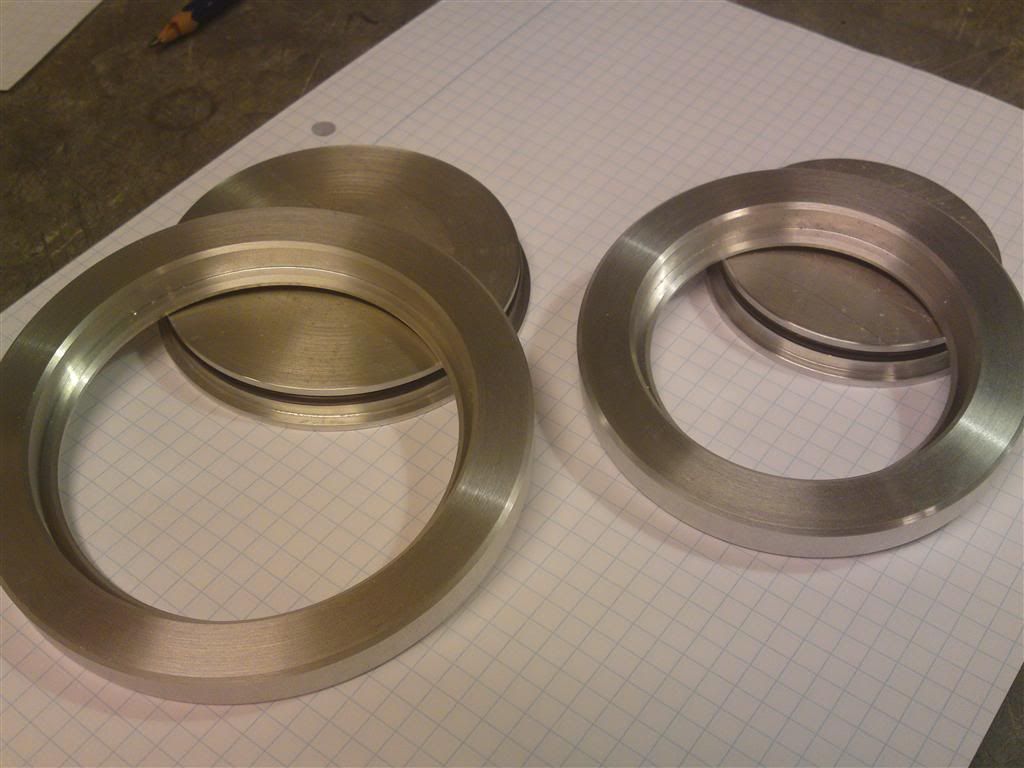
The large one fits:

Oh, a problem! But I knew that was coming!
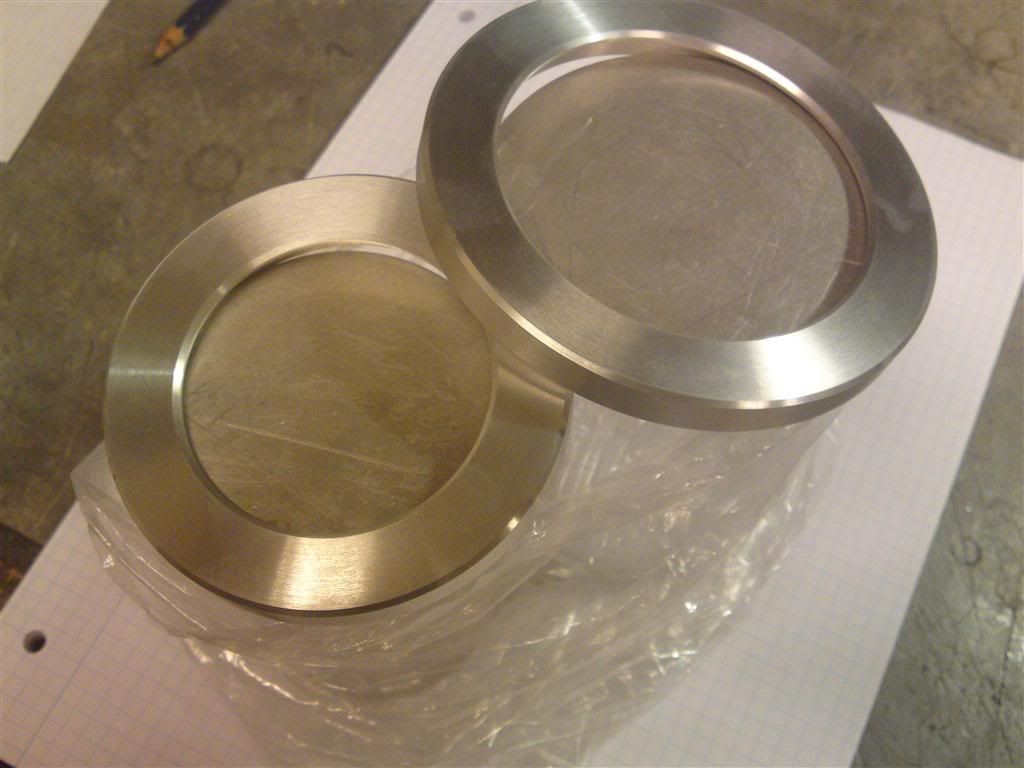
Now I need to make holes in them, and mill them so they can both fit. This is next weeks little task!
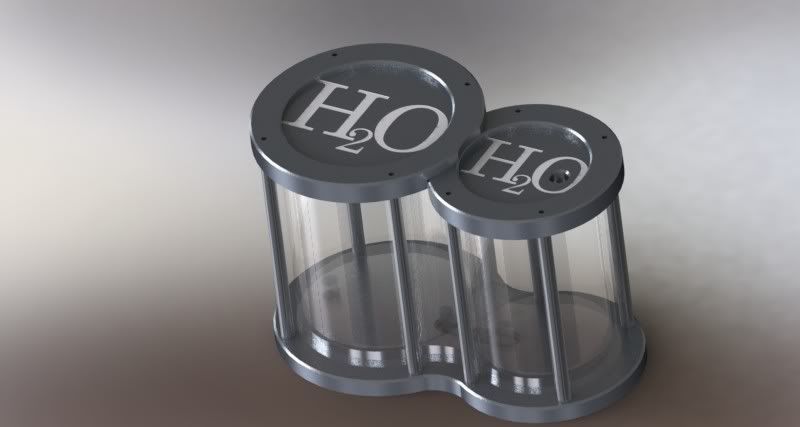
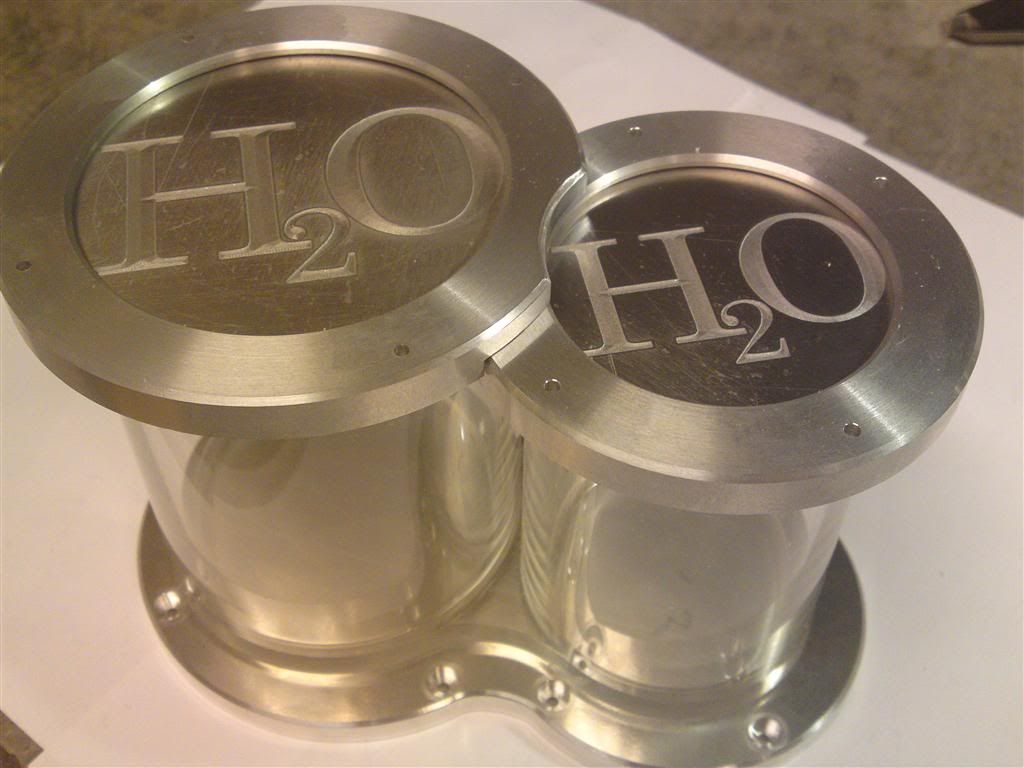
Against my better judgement, I will leave you with a quick render of how the res should look when done. The H2O part will be filled with color, but I don't know which one yet, for obvious reasons... :wallbash:
C ya guys!
I got a little update for you guys today!
I was going to have more, but after milling the first couple of parts I found out they didn't fit. After a bit of troubleshooting, I found out that I had drawn the reservoir 3mm longer than it actually is. Ah well... That ment I had to spend time to correct this, and thus I didn't get the bottom plate done.
But I'm just happy I found out before I started milling the bottom part!
And I can also use the parts I made, just need to take a bit more off!
But on with it!
The top pieces. Needs a bit more milling caused by the mistake, but you get the idea! :
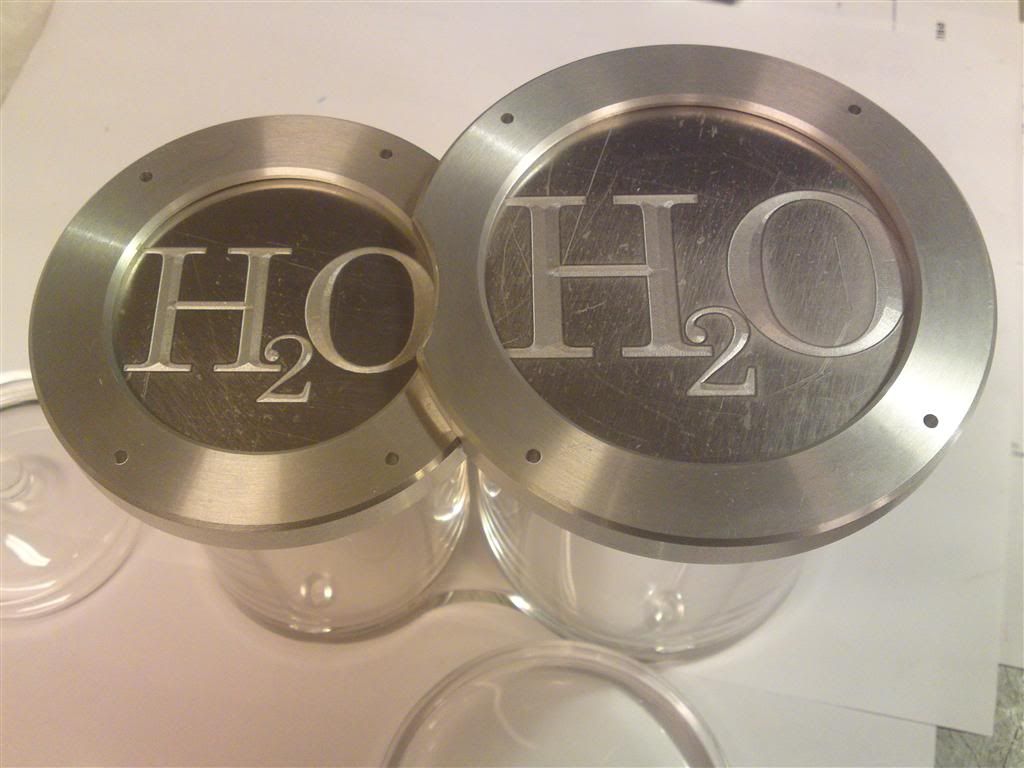
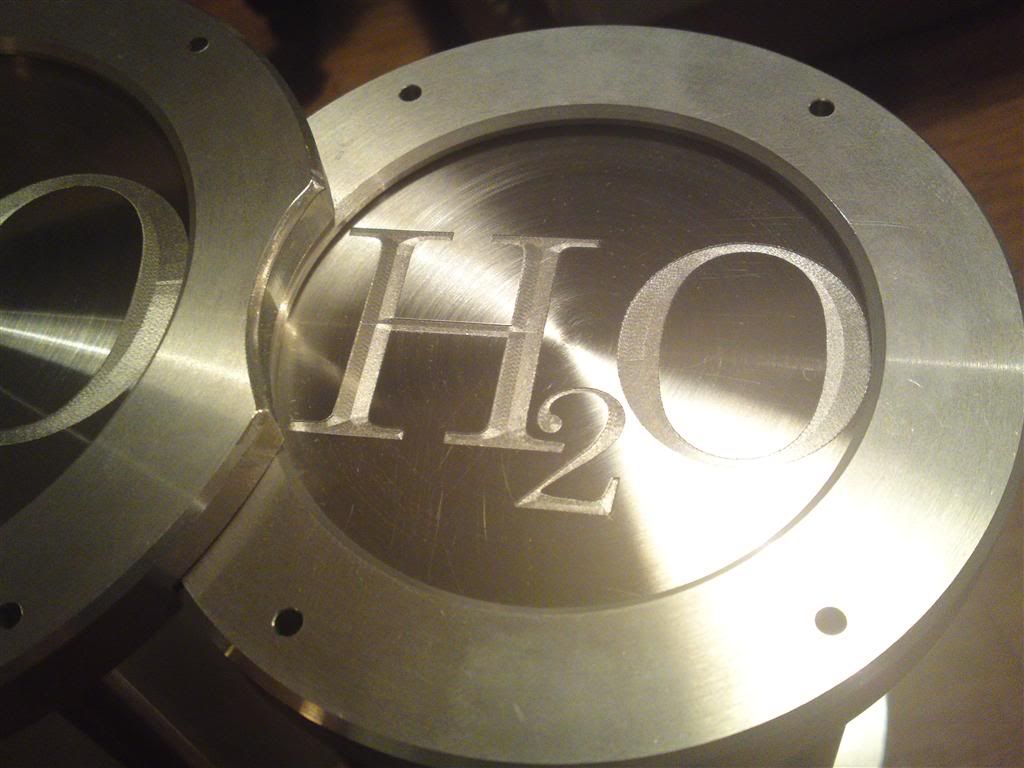
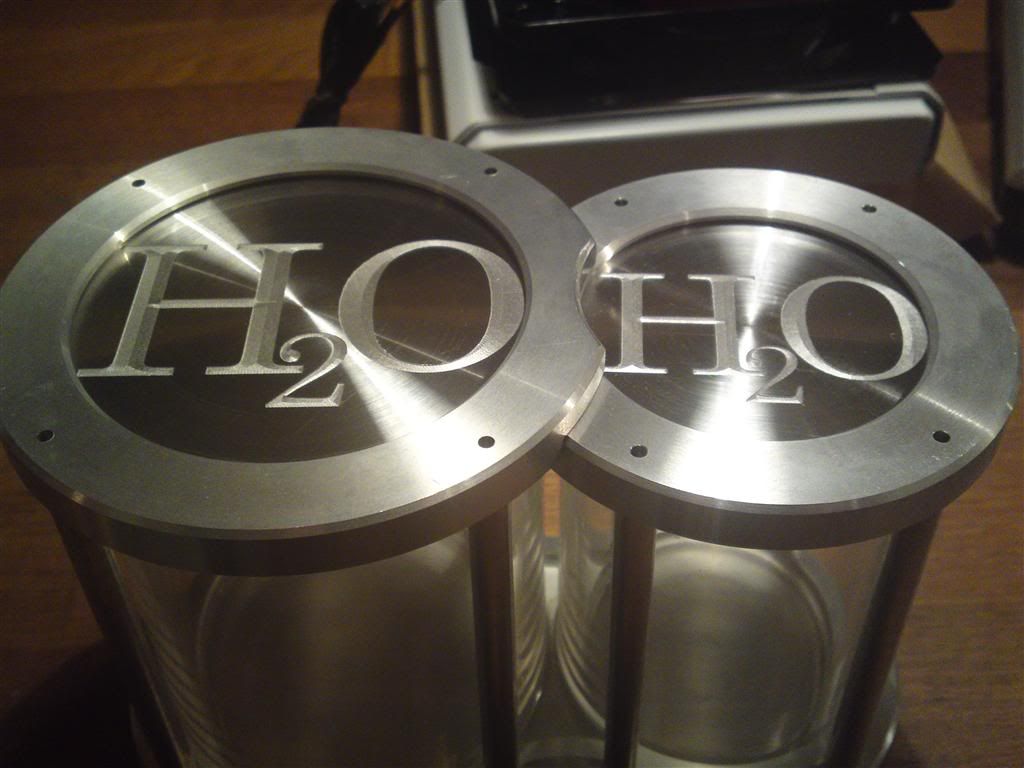
I then went on to do the H2O engraving.
Tool calibration:
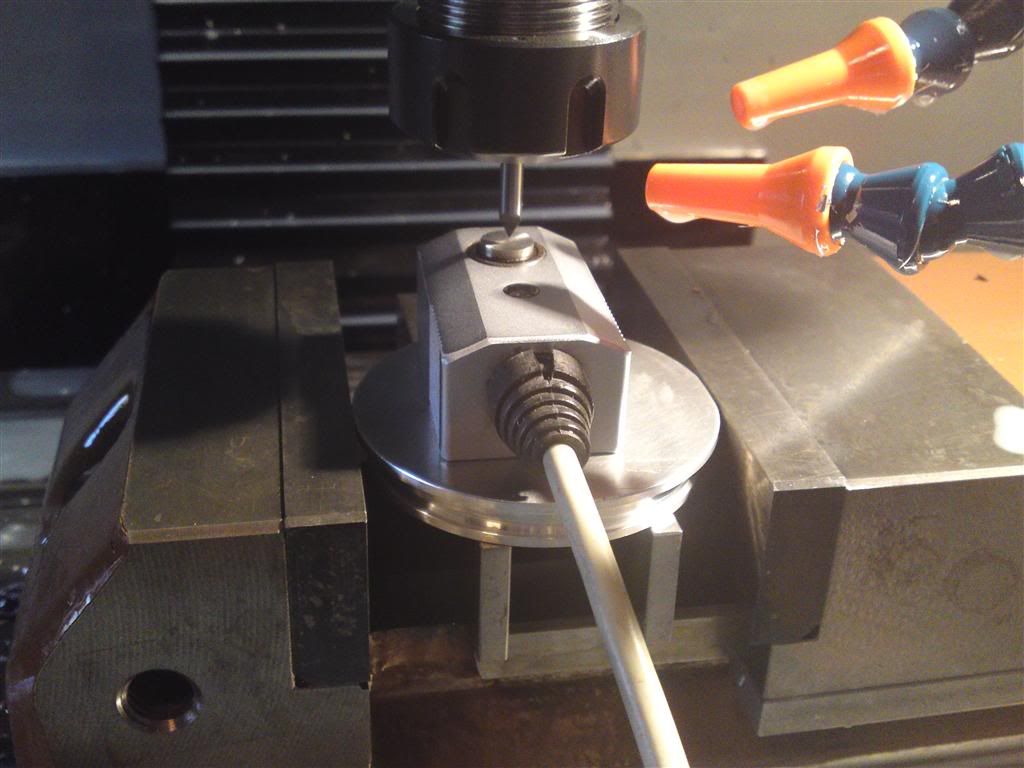
And after milling:
Both of them. Still needs polishing!
That's all for today. I'll be back with more next week!
A small sidenote to start up! I wrote QuietPc.com yesterday, and right now my case and PSU are in transit to moi!
This also means I gotta get a move on with this mod! :thumb:
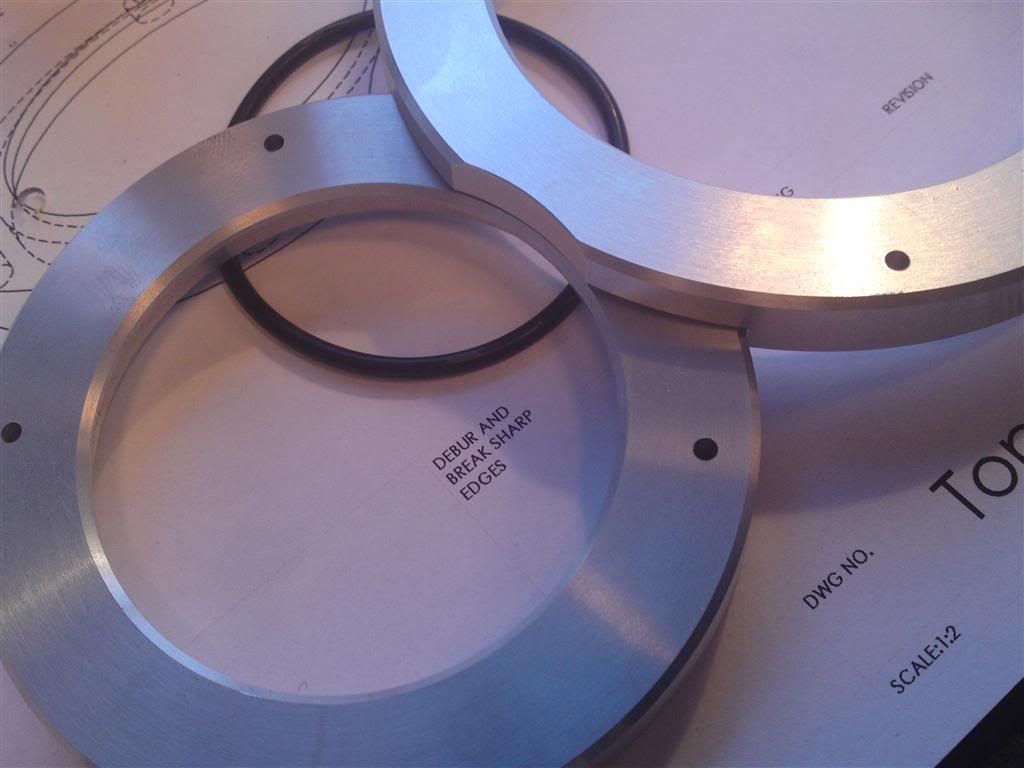
So a bit more on the res boys and girls.
As mentioned, I made a small mistake when drawing up the res itself which resulted in the top rings being milled wrong. Luckily it was a quick fix as I had taken off too little!
The rings as they should be:
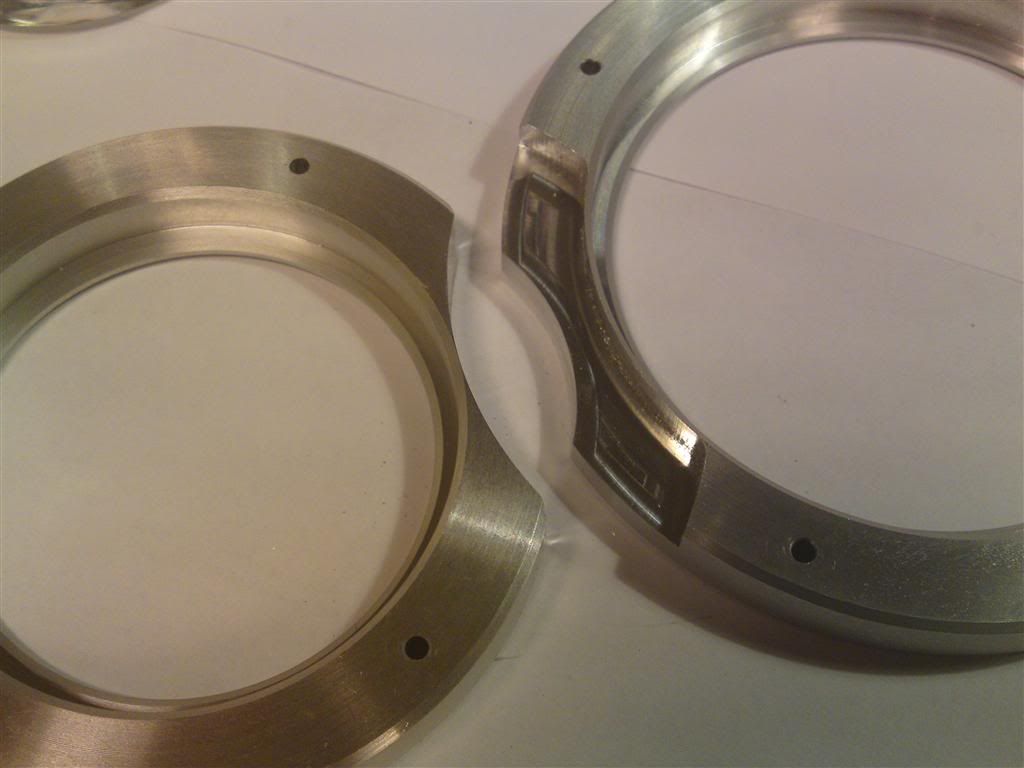
Snug fit:
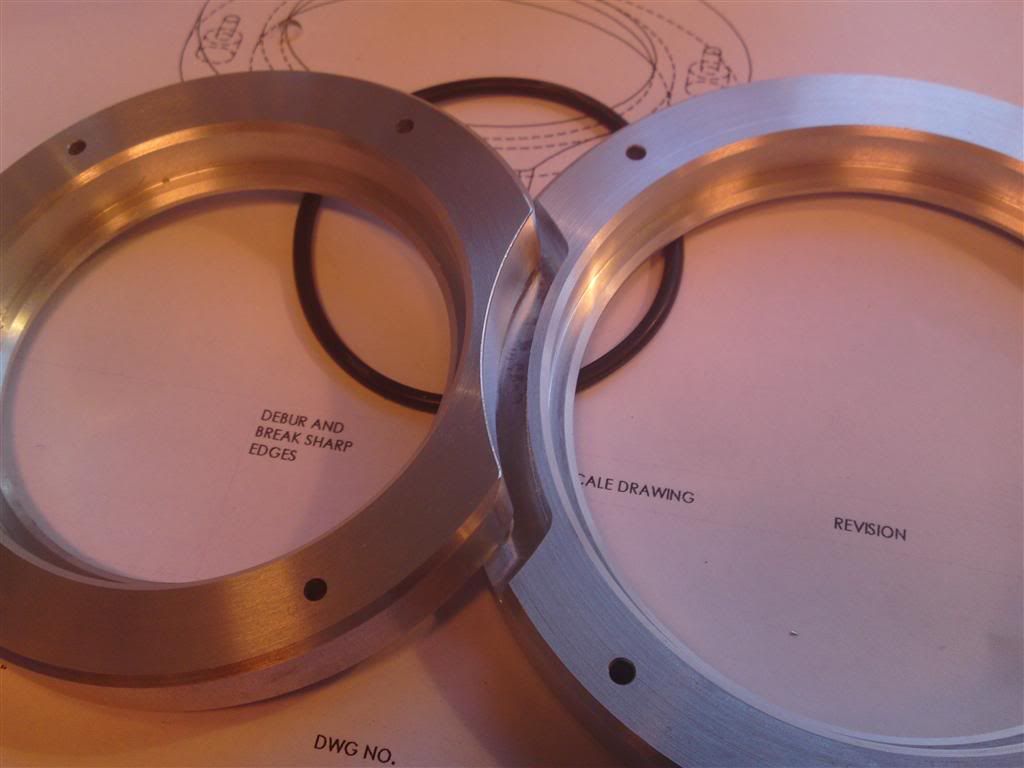
First one put on:
And the second put on:

Tried it with the tops in:
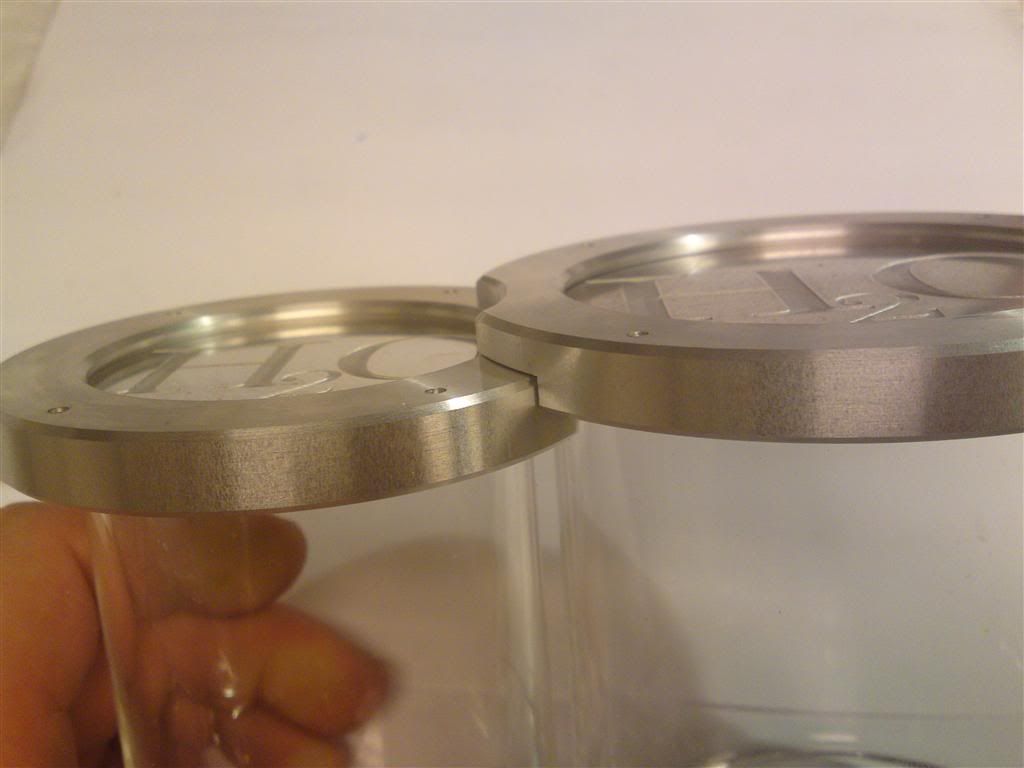
Just like I wanted it!
-
I got started on the bottom piece as well, and milled the outline:
And a small chamfer:
And that's it! I'm hoping to get a bit further this week, but you'll be the first to see the results!
Not much new in this update, but I'll post anyways!
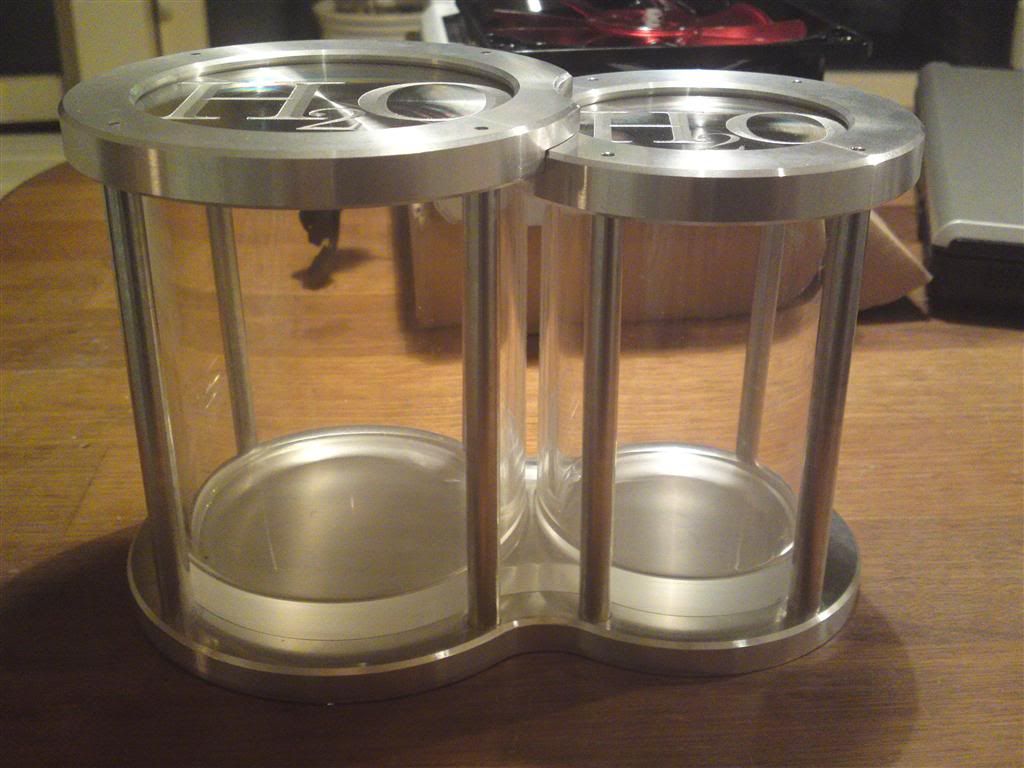
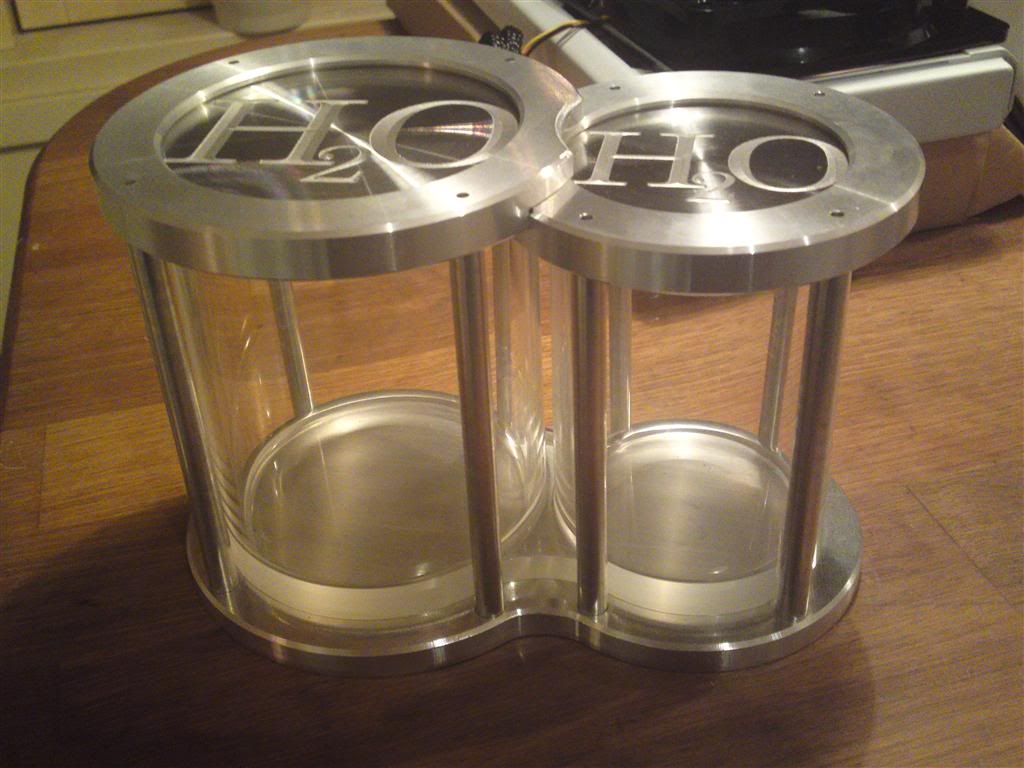
The reservoir I bought is made in a mold and they didn't really care wether the bottom was flat since it has 4 dots to sit on. I didn't want those dots, or the logo at the bottom for that matter. So I decided to grind it down. Started with 60 grit, then 260, and finished up with 1200. It still needs polishing, hope to do that tomorrow.
But a couple of pics to show how it's all coming along.
The acrylic part sanded:
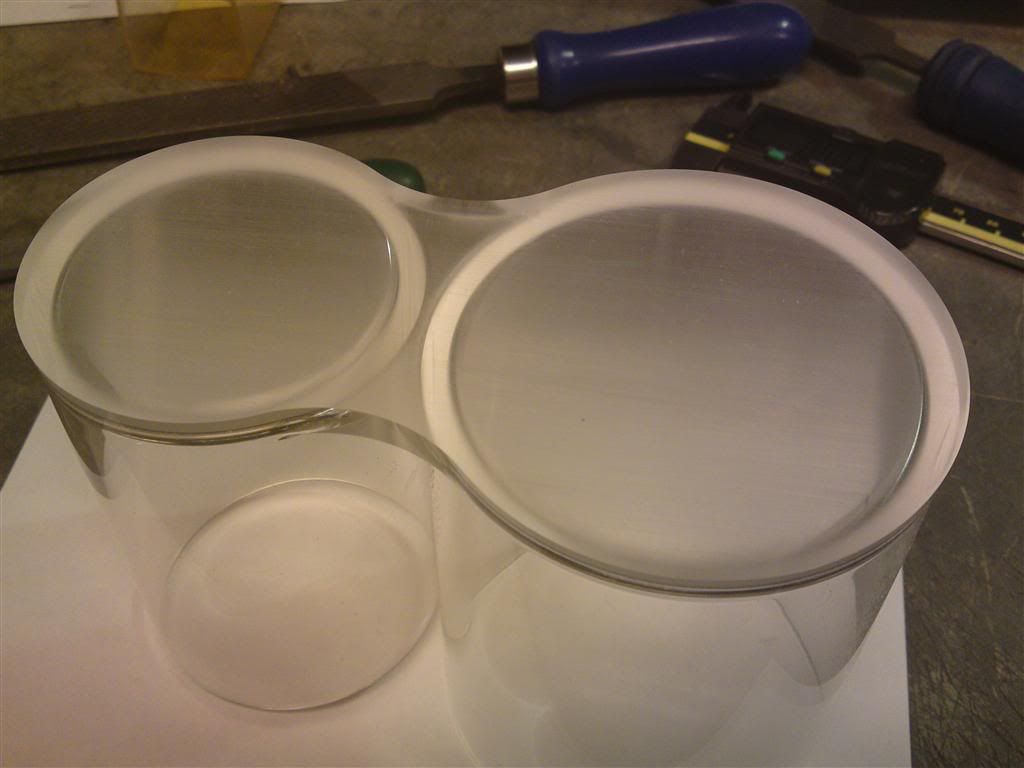
Bottom with the acrylic piece on it:
And the tops added:
Now I just need to cut off some 7mm aluminum rods to the right lenght. Since I have no idea for inlet/outlet yet, I havn't made any threads for them.
The case should be here before the weekend. That should give me a much better idea of what I'm going to do with this mod.
'Til then.
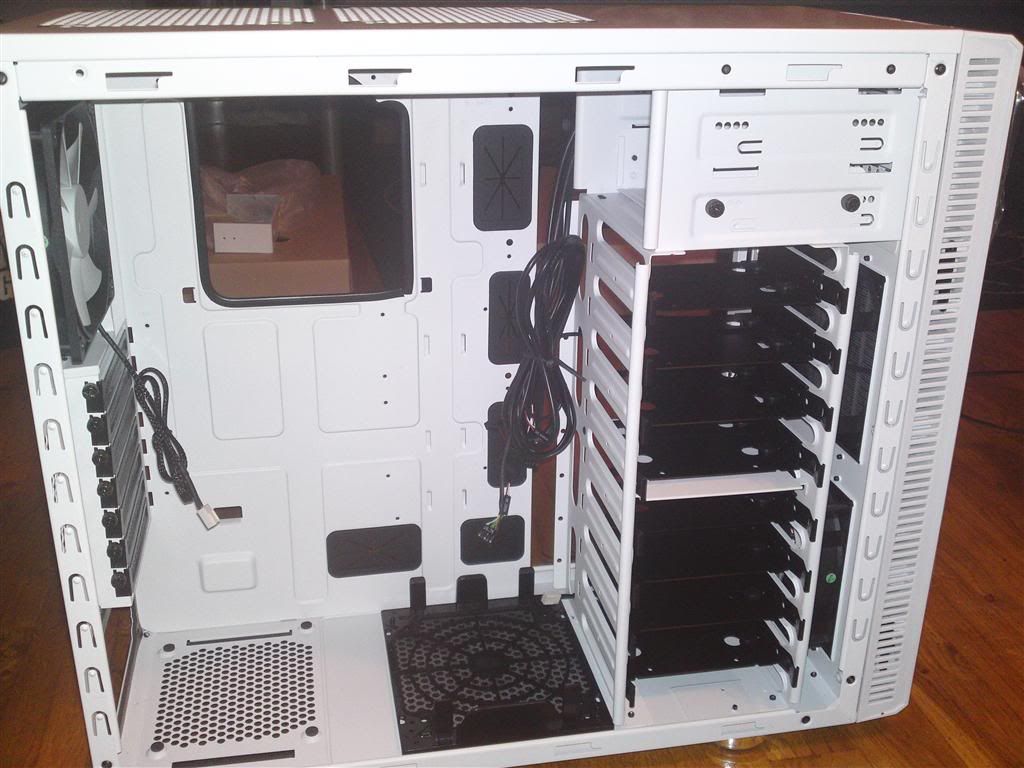
You are not going to believe this! I actually got my case!
:lol:Sorry for the pics, it's dark when I get home from work and I don't have any good light sources... But you'll get the idea!
So with no further adeu (I've been waiting for more than 6 months) the Fractal Design Refine R3:
Right now I have a billion ideas for this! Not sure how and what to do, but time will tell!
The only thing I know for sure, is that if I go with one of the more insane ideas it will be make or break! :thumb:
One idea - Mobo and GFX only for testing, they are both dead:

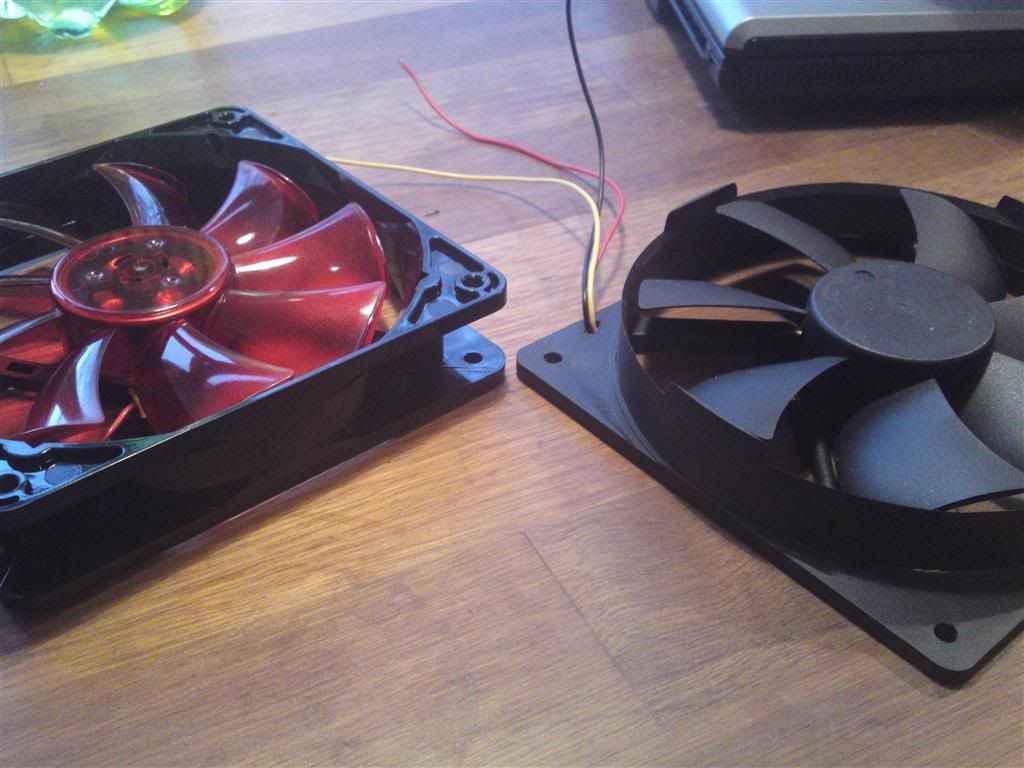
On to the rads. As I mentioned I'll have 2 loops, one red and one blue.
But black rad doesn't seem to fit in, so I gave them a quick spray:
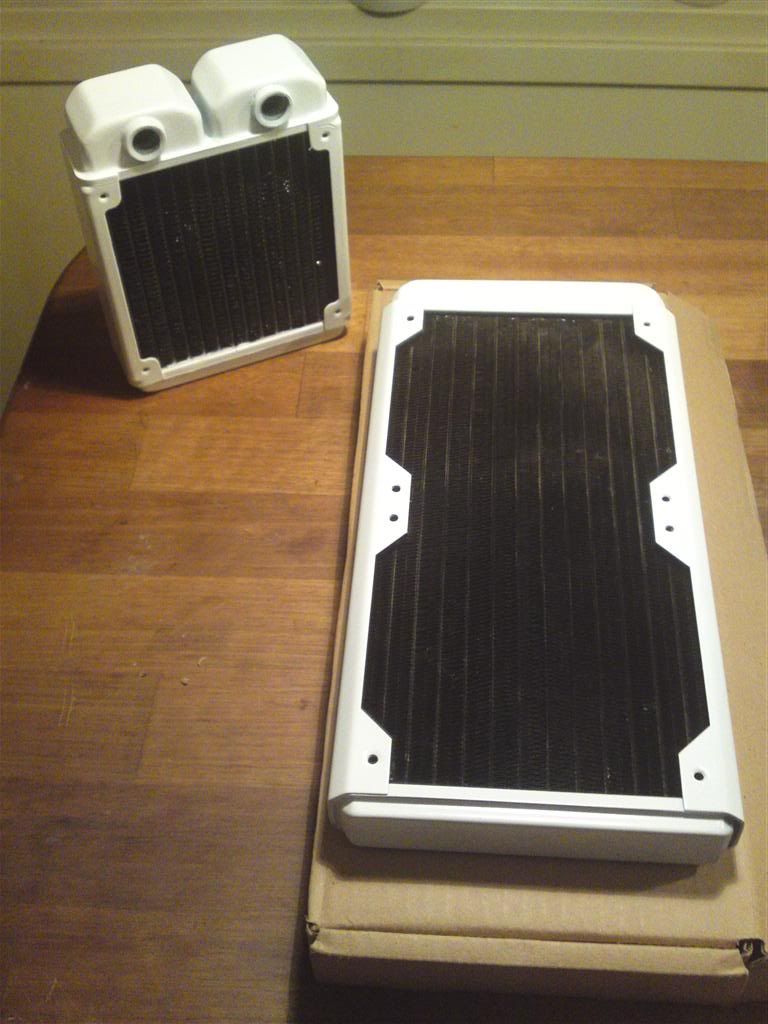
And they do fit necely with the case itself!
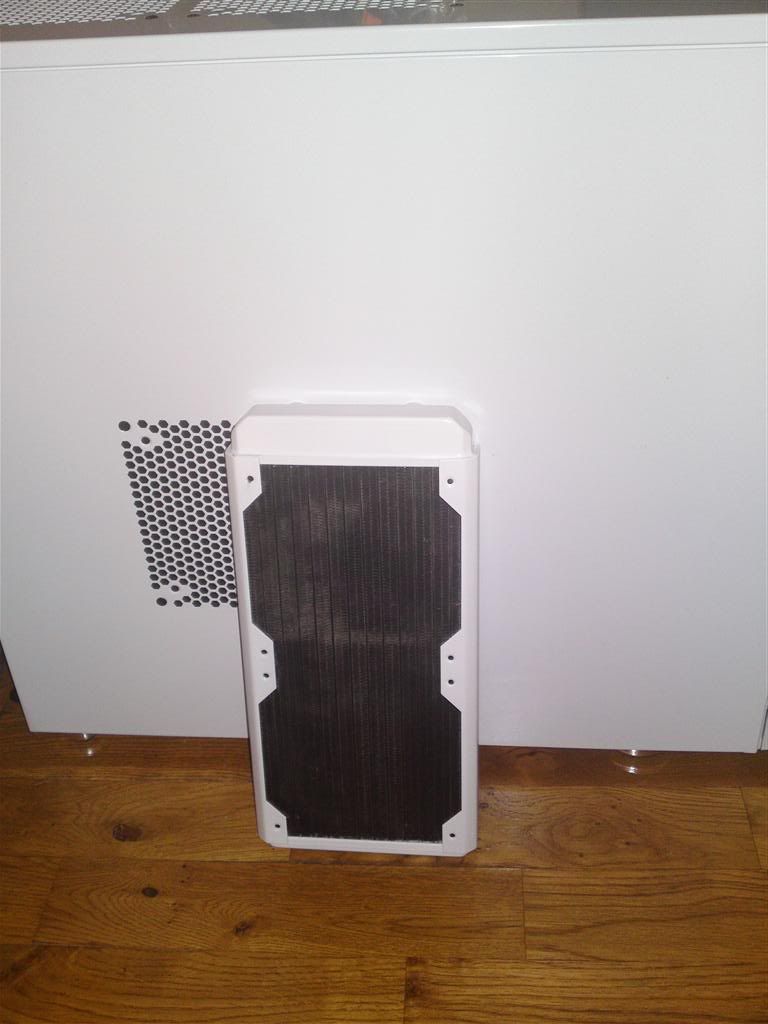
And just a sneak preview:
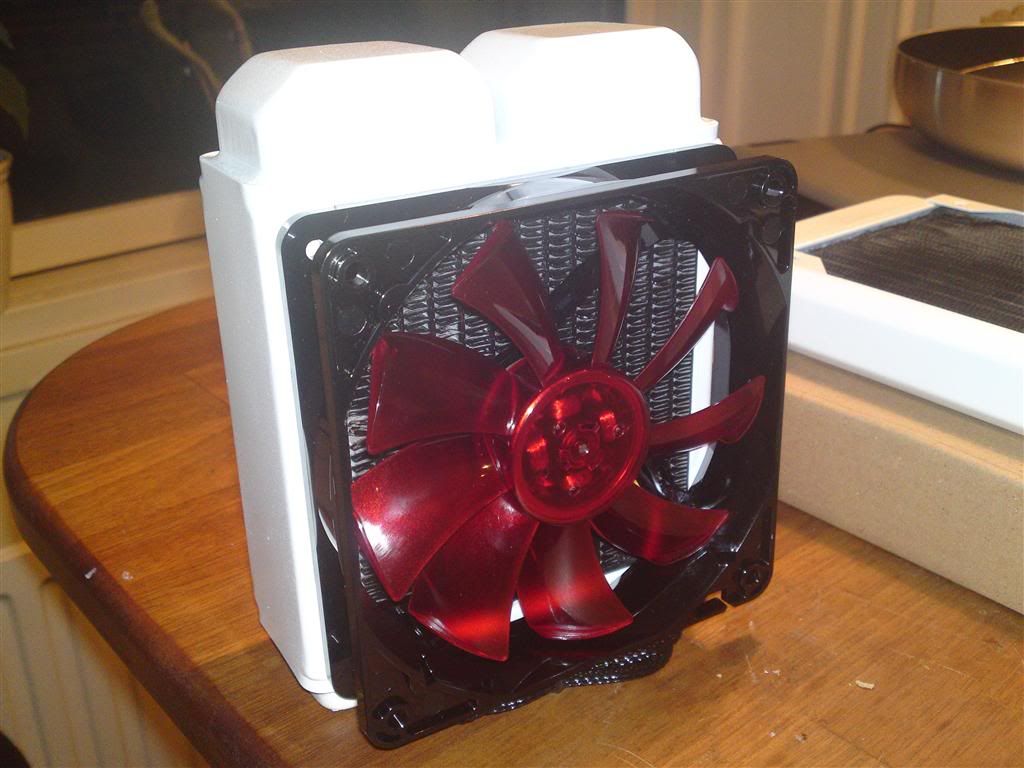
I'm still debating with my alter ego, if I should spray the fan housing white as well...
I'll try to get some more for you soon!
Hello my fellow modders!
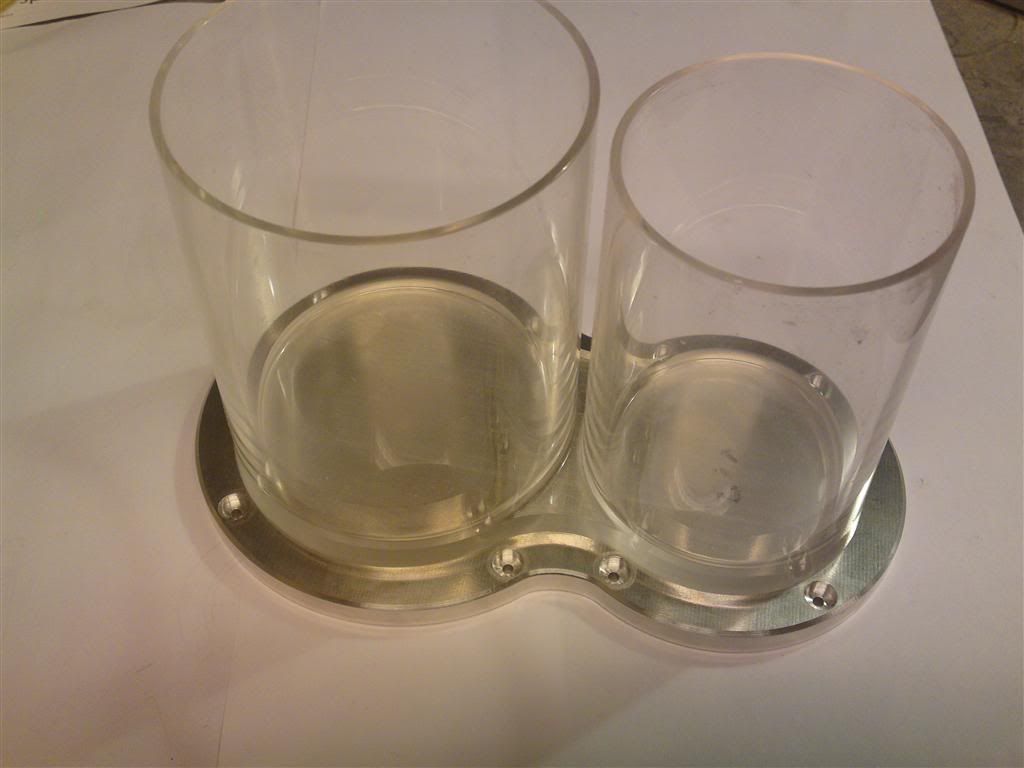
Just a small update, I got a bit further on the res.
I cleaned up the top parts:
And made the 8 pins to keep the thing assembled:
Very small update, but I thought you guys would like it!
C ya soon amigos! :thumb:
-
You are Welcome!
Plese present yourself in this section: Presentazione nuovi utenti - Xtreme Hardware Forum
And please follow the rules of this contest (you should put sponsors logos in the first post
)And by the way I stay tuned on this worklog because this mod seems to me really awsome (starting from the title
 )
) -
Le085 ha scritto:
You are Welcome!Plese present yourself in this section: Presentazione nuovi utenti - Xtreme Hardware Forum
And please follow the rules of this contest (you should put sponsors logos in the first post
)And by the way I stay tuned on this worklog because this mod seems to me really awsome (starting from the title
)Thank you very much. I just went by the introduction section and said hi!
I think I have read and understood the rules by now, and I have no sponsors on this mod.
It is called The Theory of Everything, and I think I might get a couple of things in there that does not have anything to do with the theory that Steven Hawking is working on, but I hope they will look cool anyways!
-
The design of the CPU waterblock is really impressive! I would like to see a performance comparison with other commercial waterblocks
But what about the reservoir? Why not a H-O-H structure with two smaller cilinder and a bigger one?
-
Angel OD ha scritto:
Thank you very much. I just went by the introduction section and said hi!
I think I have read and understood the rules by now, and I have no sponsors on this mod.
It is called The Theory of Everything, and I think I might get a couple of things in there that does not have anything to do with the theory that Steven Hawking is working on, but I hope they will look cool anyways!
You have to put the sponsors of this contest, that's to say Coolermaster, Lamptron, Dremel and Aquatuning. I'm sorry it wasn't so clear from the rules

-
This is the most amazing, astonishing and jaw-dropping customized liquid cooling system ever!
 :ave: Heil to the Custom watercooling guru! :ave:
 -
nice work man keep it up
-
amazing bro
-
Le085 ha scritto:
The design of the CPU waterblock is really impressive! I would like to see a performance comparison with other commercial waterblocks
But what about the reservoir? Why not a H-O-H structure with two smaller cilinder and a bigger one?
Well, since I've never had a commercial waterblock, I can't really compare it.
But I can tell you that simulation has showed that it steal about ½ of the pressure a pump can give, which is why I'm donig 2 loops. The 2 loops are also the reason for the reservoir. I didn't make the acrylic part, I actually found it while I was out shopping for tools!
Le085 ha scritto:
You have to put the sponsors of this contest, that's to say Coolermaster, Lamptron, Dremel and Aquatuning. I'm sorry it wasn't so clear from the rulesOh, I misunderstood then. But it's fixed!

One1ros ha scritto:
This is the most amazing, astonishing and jaw-dropping customized liquid cooling system ever! :ave: Heil to the Custom watercooling guru! :ave:Thanks man! I'm really honored! I've been making custom watercooling since I started modding, so I just try to do better every time!
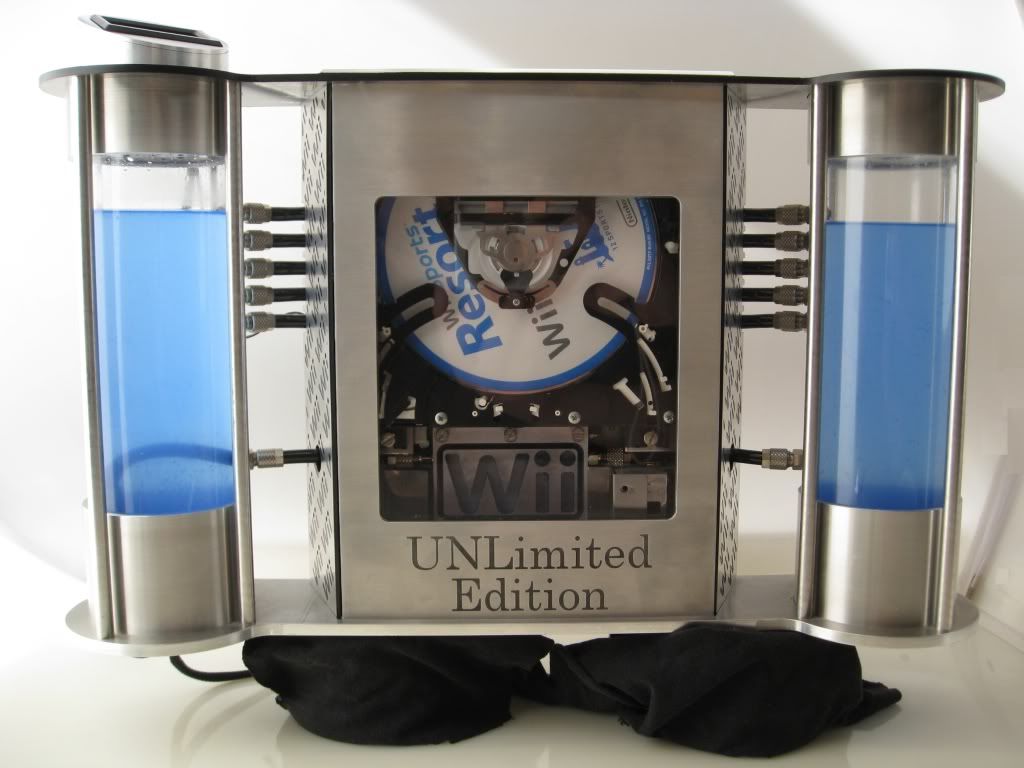
Maybe you have seen another of my creations, the watercooled wii?
momod ha scritto:
nice work man keep it up
Thanks man! I do my best!
tom1 ha scritto:
amazing broThank you! I hope I can keep doing as well for the rest of the mod!
-
interesting!
-
RIC3 ha scritto:
interesting!I hope you mean that in a good way!
Now for the newest update.
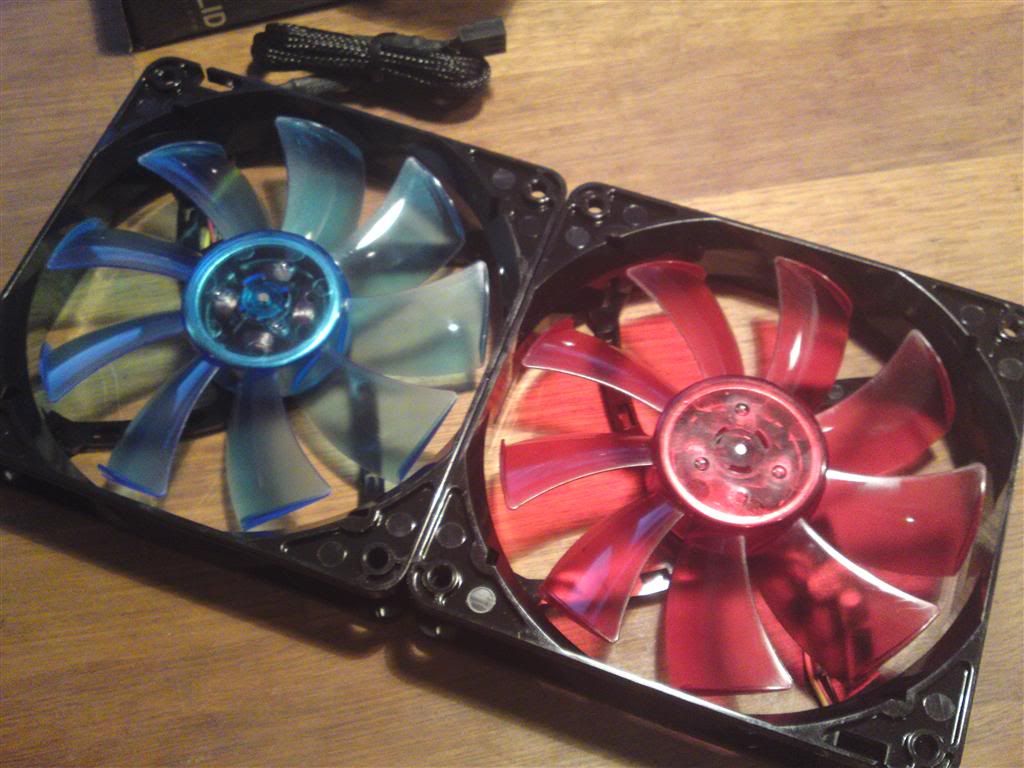
I'm gonna do a dual loop, one red and one blue. And since I have the red Phobya fans I was looking for something similar in blue.
Gelid makes some, so I bought a couple.
I dare you to spot any difference except for color! I can't find any.
Why Phobya don't have them in blue is beyond my imagination, but I'm just happy to have found them!
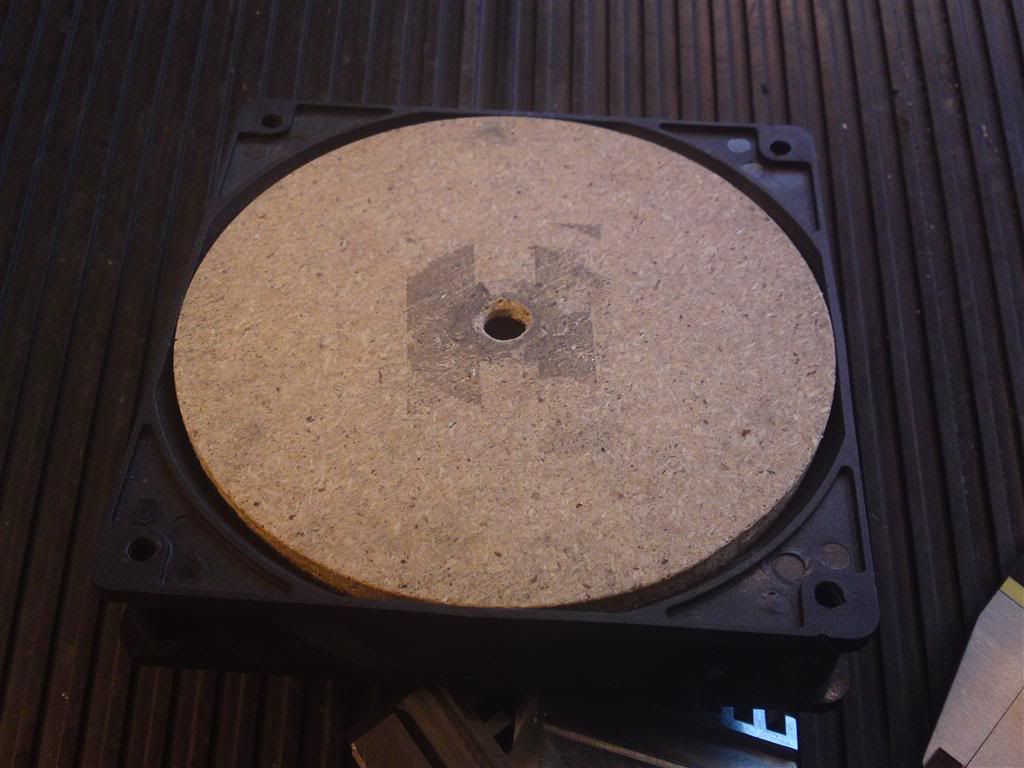
Right now I'm looking at what I can do to mod the fan house, but you'll know soon if I mess it up!
My two ideas are:
1. Mill away some of the outside to give it a better look.
2. Create all new housing from aluminum and Plexiglas.
This will require some thinking, but there's a lot more to do so I wont' keep you waiting long for the next update!
-
Oh oh oh....... Angel OD !!!!!
I' ve seen your mods on bit-tech
")
The res. Is simply awesome. =O
-
Angel OD ha scritto:
Maybe you have seen another of my creations, the watercooled wii?
Of course I did... and I knew it was a your creation.
 I so many things.. that maybe you cannot imagine...
 -
fanatastic mod , the wii project
-
Dot_Kappa ha scritto:
Oh oh oh....... Angel OD !!!!!I' ve seen your mods on bit-tech
The res. Is simply awesome. =O
Thanks man! Yeah, I've been on bit-tech since I started modding!
One1ros ha scritto:
Of course I did... and I knew it was a your creation. I so many things.. that maybe you cannot imagine...
tom1 ha scritto:
fanatastic mod , the wii projectThanks a lot! It was a hard mod as well, but it was worth it!
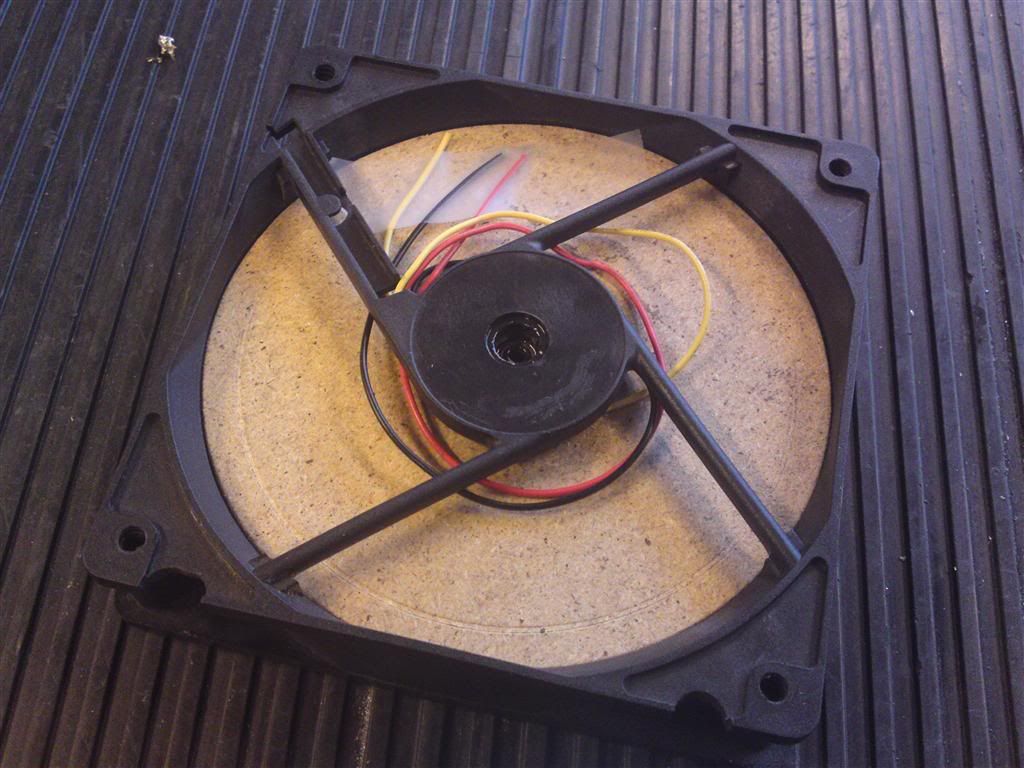
And a small update on my fans.
I was looking into the vinyl dye for them as it would be the easiest way to get them white, but it seems to be very hard to find in Denmark. And I also have no idea how the color would look against the other white!
BUT... There are ways of making it easier to get into the nooks and crannys to rough it up. I think I came up with an idea for a better look, and much easier to work with.
I had a coolermaster lying around that I used as a test. And I'll keep the lower chamfer that I removed on the test, since it actually got a bit seperated the ring from the bottom in the corners!
I made a little tapered wooden tool to hold it in place in the lathe.
Before:
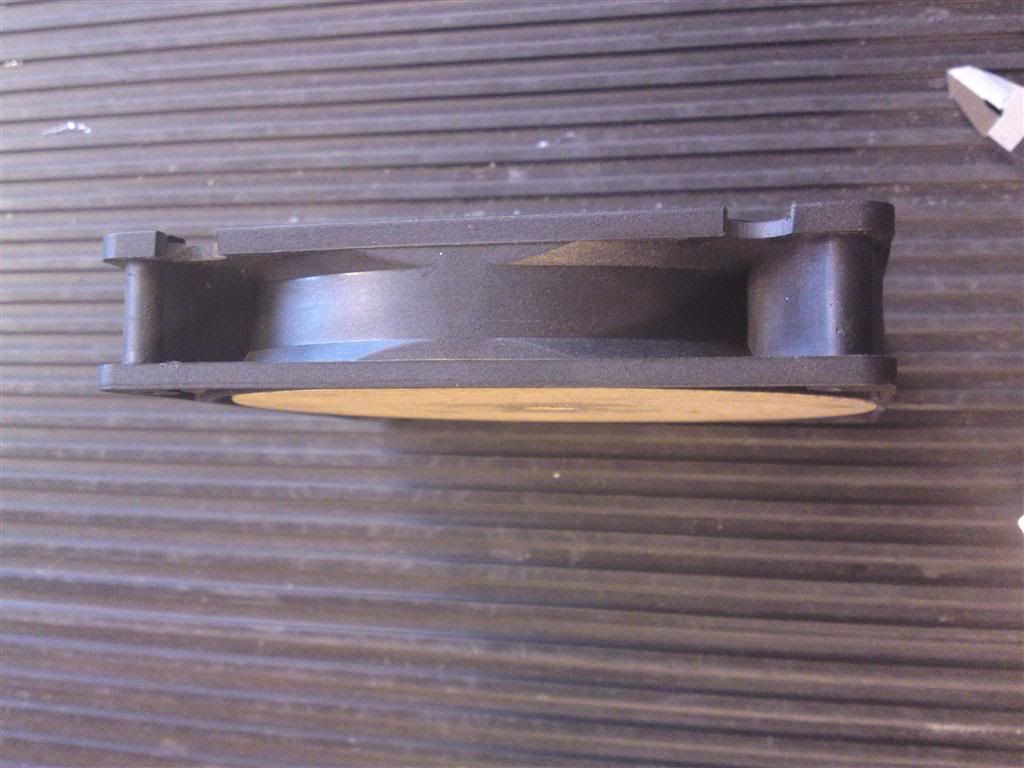
And after:
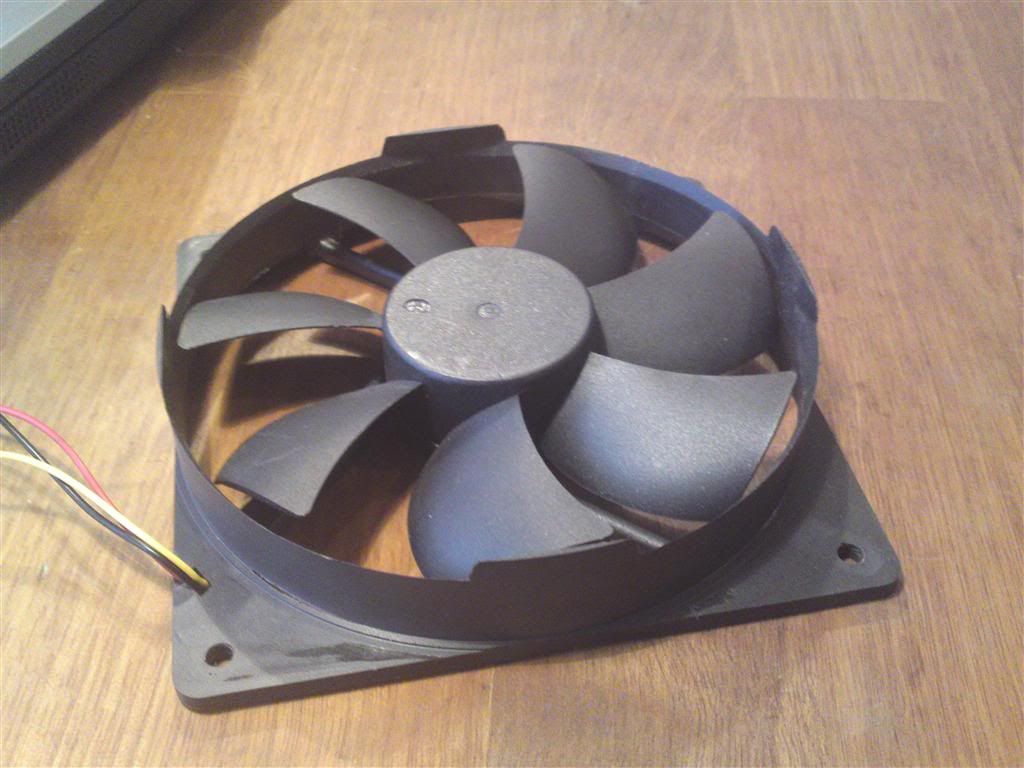
And as a comparison to a real fan for the mod:
It still needs a bit of tweaking, but it's not half bad!
I have a feeling I'm going to go with something like that!
Ciao! Sembra che tu sia interessato a questa conversazione, ma non hai ancora un account.
Stanco di dover scorrere gli stessi post a ogni visita? Quando registri un account, tornerai sempre esattamente dove eri rimasto e potrai scegliere di essere avvisato delle nuove risposte (tramite email o notifica push). Potrai anche salvare segnalibri e votare i post per mostrare il tuo apprezzamento agli altri membri della comunità.
Con il tuo contributo, questo post potrebbe essere ancora migliore 💗
Registrati Accedi